| 24.30 Megapixels | Nikon F | 35mm size sensor |
|---|---|---|
 | ||
| Basic Specifications | |
|---|---|
| Full model name: | Nikon D750 |
| Resolution: | 24.30 Megapixels |
| Sensor size: | 35mm (35.9mm x 24.0mm) |
| Kit Lens: | 5.00x zoom 24-120mm (24-120mm eq.) |
| Viewfinder: | Optical / LCD |
| Native ISO: | 100 - 12,800 |
| Extended ISO: | 50 - 51,200 |
| Shutter: | 1/4000 - 30 seconds |
| Max Aperture: | 4.0 (kit lens) |
| Dimensions: | 5.5 x 4.4 x 3.1 in. (141 x 113 x 78 mm) |
| Weight: | 54.7 oz (1,550 g) includes batteries, kit lens |
| Availability: | 09/2014 |
| Manufacturer: | Nikon |
D750 SUMMARY
Placed between the D610 and D810, the Nikon D750 borrows from both models for a fantastic all-around multimedia DSLR. With a 24.3MP full-frame sensor and fast EXPEED 4 processor, the D750 captures outstanding, highly-detailed images with excellent dynamic range and high ISO performance. The D750 also has class-leading burst shooting capabilities and excellent low-light AF. With an articulated LCD screen and other high-end movie features, the D750 is also a great option for multimedia producers and videographers.
PROS
Outstanding image quality with great dynamic range and high ISO performance; Class-leading burst rate; Very good 51-pt AF system; AF system works in very low light; Deep, comfortable handgrip; Articulated LCD monitor; Excellent battery life; Uncompressed 4:2:2 HDMI video output; Built-in Wi-Fi.
CONS
Buffer fills quickly with 14-bit RAW; Sluggish Live View AF; Shutter speed tops out at 1/4000s; OVF coverage closer to 97%; Weak low-pass filter is great for detail but higher risk of moire.
Nikon D750 Optics
The Nikon D750 is available body-only, or bundled with the Nikkor AF-S 24-120 f/4G ED VR lens. For test results of that lens, please see our full SLRgear review.
Below are our Nikon D750 viewfinder accuracy test results.
Viewfinder Test Results
Coverage
Good accuracy from the optical viewfinder and excellent coverage from the LCD monitor in Live View mode.
Good accuracy from the optical viewfinder and excellent coverage from the LCD monitor in Live View mode.
 |  |
| 70mm, Optical | 70mm, Live View LCD |
The Nikon D750's optical viewfinder displayed just over 97% coverage in our test in FX mode, which is good for a compact full-frame DSLR, but falls a little short of Nikon's ~100% spec. (We probably have the D750's compact design to thank for that as the slightly larger and less expensive D600/D610 have noticeably better coverage.) LCD coverage in Live View mode was just over 100% in our tests, which is excellent.
The images above were taken from our standardized test shots. For a collection of more pictorial photos, see ourNikon D750 Photo Gallery .
Nikon D750 Image Quality
Color
Saturation & Hue Accuracy
Fairly vibrant colors with slightly below average hue accuracy.
Fairly vibrant colors with slightly below average hue accuracy.
 | |||
ISO Sensitivity
| |||
| 100 | 400 | ||
| 1600 | 6400 | ||
| 25600 | |||
| In the diagram above, the squares show the original color, and the circles show the color that the camera captured. More saturated colors are located toward the periphery of the graph. Hue changes as you travel around the center. Thus, hue-accurate, highly saturated colors appear as lines radiating from the center. Mouse over the links above to compare ISOs, and click to load a larger version. | |||
Skin tones. The Nikon D750's rendering of Caucasian skin tones looked a little too warm and yellow in our "sunlit" outdoor lighting test when using auto white balance. (Likely in part because the camera doesn't pump reds as much as most.) Manual white balance produced more healthier-looking pinkish skin tones.Where oversaturation is most problematic is on Caucasian skin tones, as it's very easy for these "memory colors" to be seen as too bright, too pink, too yellow, etc.
Hue. As with most cameras, the Nikon D750 produces a few color shifts relative to the mathematically precise translation of colors in its subjects. Reds are shifted slightly toward orange, light orange toward yellow and cyan toward blue, but there are only very slight shifts in yellow, green and purple. (The cyan to blue shift is very common among the digital cameras we test; we think it's a deliberate choice by camera engineers to produce better-looking sky colors.) Mean "delta-C" color error at base ISO was 6.19 after correction for saturation, which is a little higher than average (lower numbers are better), but still considered good, and remained below 7 across the ISO range. Hue is "what color" the color is.
 |  |  |
| See full set of test images with explanations See thumbnails of all test and gallery images | ||
Sensor
Exposure and White Balance
Indoors, incandescent lighting
Warm results with Auto and Incandescent white balance, though excellent color balance with Manual white balance. About average exposure compensation required.
Warm results with Auto and Incandescent white balance, though excellent color balance with Manual white balance. About average exposure compensation required.
 |  |
| Auto White Balance +0.3 EV | Incandescent White Balance +0.3 EV |
 | |
| Manual White Balance +0.3 EV |
Indoors, in common incandescent lighting, color balance is warm and reddish with the Auto white balance setting. The Incandescent setting is also warm, but with a strong yellow tint. (Some users may prefer this look, though, as being more representative of the original lighting.) The Manual white balance setting produced accurate results, just a touch cool. The D750 required +0.3 EV exposure compensation, which is about average for this shot. Our test lighting for this shot is a mixture of 60 and 100 watt household incandescent bulbs, a pretty yellow light source, but a very common one in typical home settings here in the U.S.
Outdoors, daylightVibrant color, but with mixed exposure accuracy. Options like Active D-Lighting and contrast adjustment would help when faced with harsh lighting conditions like these.
 |  |
| Manual White Balance +1.0 EV | Auto White Balance, 0 EV |
The Nikon D750 handled tough outdoor lighting under harsh sunlight fairly well in terms of color, but it struggled a bit with exposure. We found skin tones a touch too yellow in our "Sunlit" Portrait shot with Auto white balance, preferring results with Manual WB. The D750 also underxposed our standard "Sunlit" Portrait shot more than most cameras, and even with +1.0 EV exposure compensation, the mannequin's eyes are a bit dim due to relatively high default contrast. (Most cameras need about +0.7 EV for this shot, so the Nikon is below average here). On the plus side, even with +1.0 EV compensation, few highlights were clipped in the mannequin's white shirt, while dark shadows are very detailed and relatively clean. The Far-field image on the right was justslightly overexposed with a few clipped highlights in very bright white areas (and in specular highlights where you'd expect). Again, detail in the shadows is excellent, and shadow noise is remarkably low. Color here with Auto white balance is very pleasing and vibrant.
Resolution
Very high resolution, ~2,850 to ~2,900 lines of strong detail.
Very high resolution, ~2,850 to ~2,900 lines of strong detail.
 |  |
| Strong detail to ~2,900 lines horizontal Camera JPEG | Strong detail to ~2,850 lines vertical Camera JPEG |
 |  |
| Strong detail to ~2,900 lines horizontal ACR processed RAW | Strong detail to ~2,850 lines vertical ACR processed RAW |
Our laboratory resolution chart revealed sharp, distinct line patterns down to about 2,900 lines per picture height in the horizontal direction in JPEGs, and perhaps a touch less in the vertical direction, at about 2,850 lines per picture height. Complete extinction of the pattern didn't occur before the 4,000 line limit of a chart. We weren't able to extract any more resolution with RAW files processed through Adobe Camera Raw 8.7, though complete extinction of the pattern was extended somewhat, and the ACR conversion showed stronger color moiré. Use these numbers to compare with other cameras of similar resolution, or use them to see just what higher resolution can mean in terms of potential detail.
Sharpness & Detail
Very good sharpness and detail, though default sharpening and contrast are a bit high. Minimal noise suppression artifacts at base ISO.
Very good sharpness and detail, though default sharpening and contrast are a bit high. Minimal noise suppression artifacts at base ISO.
 |  |
| Very good definition of high-contrast elements, but with some evidence of edge enhancement. | Subtle detail: Hair Noise suppression tends to blur detail in areas of subtle contrast, though detail remains strong in the darker parts of the model's hair here. |
Sharpness. The Nikon D750 produces very sharp and detailed images at default settings, though edge enhancement artifacts are more visible compared to previous generations around high-contrast subjects, such as the sharpening halos around the lines and lettering in the crop above left. Default sharpening is a little higher than we're used to seeing for a prosumer Nikon DSLR, but you can always turn it down if you prefer. (And you can always adjust sharpening to your liking.)Edge enhancement creates the illusion of sharpness by enhancing color and tonal differences right at the edge of a rapid transition in color or tone.
Detail. The crop above right shows only minimal detail loss due to noise suppression, as the darker areas of the mannequin's hair show a lot of detail. Individual strands are still distinguishable even in the lighter shadows, though some begin to merge as shadows deepen, and in places where the tone and color of adjacent strands is very close. The hair is also virtually free from chroma noise, which is often not the case. An excellent performance here. Noise-suppression systems in digital cameras tend to flatten-out detail in areas of subtle contrast. The effects can often be seen in shots of human hair, where the individual strands are lost and an almost "watercolor" look appears.
 |  |
| Nikon D750, ACR RAW conversion, no sharpening, no noise reduction | Sony A99, ACR RAW conversion, no sharpening, no noise reduction |
Aliasing Artifacts. As mentioned previously the Nikon D750 captures sharp, detailed images thanks to its high resolution and weak optical low pass filter, but that means it's also susceptible to moiré and other aliasing artifacts when used with a sharp lens.
As you can see in our Still Life shots, moiré patterns can for instance be seen in the red-leaf fabric. Compared to another 24-megapixel full-frame camera with a stronger anti-alias filter (the Sony A99 in the table above for example, though its transmissive mirror may also be contributing a slight low-pass filter effect), you'll immediately notice the D750's crop contains aliasing artifacts in the form of a wavy moiré pattern that the A99's crop does not contain (both images are at ISO 100 taken with our very sharp Sigma 70mm f/2.8 Macro lenses at f/8).
With the increasing trend of using either a very weak or no optical low pass filter, quite a few cameras produce similar artifacts these days, and the Nikon D750's JPEG processing engine actually does a good job at suppressing aliasing-related false colors in our Resolution target. But it's not fool proof, and luminance moiré is much more difficult to deal with. That's something to be aware of especially if you shoot a lot of man-made subjects with repeating patterns, such as buildings, fabrics, etc. Techniques than can be used to reduce aliasing include shooting at a smaller aperture so that lens diffraction acts as an anti-alias filter, defocusing slightly, shooting at higher ISOs, and post-processing particularly with RAW files.
RAW vs In-Camera JPEGsAs noted above, the Nikon D750 does a great job at capturing lots of fine detail in its JPEGs. Let's see how a RAW conversion using our standard converter (Adobe Camera Raw) at base ISO does:
| Base ISO (100) | |
 |  |
 |  |
 |  |
Camera JPEG, defaults
|
RAW via Adobe Camera Raw
|
In the table above, we compare an in-camera JPEG taken at base ISO using default noise reduction and sharpening (on the left) to the matching RAW file converted with Adobe Camera Raw 8.7 using default noise reduction with some fairly strong but tight unsharp mask sharpening applied in Photoshop (300%, radius of 0.3 pixels, and a threshold of 0).
Here, we can see that Adobe Camera Raw combined with sharpening in Photoshop delivers slightly finer detail than the camera JPEG, with fewer sharpening halos around high-contrast edges. It's also able to resolve some of the individual thread pattern in the red-leaf pattern that the JPEG engine partially obscures. Note that you can however see the moiré pattern in the red-leaf fabric mentioned earlier in both the camera JPEG and the ACR conversion.
Bottom line: the D750's in-camera JPEGs at default settings contain excellent detail and crispness at base ISO, though as is usually the case, you can extract even more detail without obvious sharpening artifacts with careful processing of RAW files.
ISO & Noise Performance
Very good detail versus noise up to ISO 6400.
Very good detail versus noise up to ISO 6400.
| Noise Reduction = Default | ||
 |  |  |
| ISO 50 | ISO 100 | ISO 200 |
 |  |  |
| ISO 400 | ISO 800 | ISO 1600 |
 |  |  |
| ISO 3200 | ISO 6400 | ISO 12,800 |
 |  | |
| ISO 25,600 | ISO 51,200 | |
Nikon D750 JPEG images are very clean at lower ISOs, and show a nice, very gradual increase in luminance noise as ISO rises with minimal drop-off in image quality up to ISO 1600 (except in low-contrast reds which show more significant blurring -- see our High ISO NR crop page for more). ISO 3200 shows some stronger blurring due to noise reduction, but luminance noise is very fine-grained and detail is still very good with continued low chroma noise. ISO 6400 shows another small decline in image quality, but fine detail is still pretty good and noise well-controlled. Image quality drops off more rapidly at ISO 12,800 and above, though, with stronger blurring and more obvious luminance noise, while chroma noise finally starts to become an issue with fairly obvious yellow and purple blotching by the time ISO 51,200 is reached. Still, excellent high ISO performance overall.
Of course, the impact of noise and detail loss are highly dependent on the size the photos are printed at, and pixel-peeping on-screen has surprisingly little relationship to how the images look when printed: See the Print Quality section below for recommended maximum print sizes at each ISO.
A note about focus for this shot: We shoot this image at f/4, using one of three very sharp reference lenses. To insure that the hair detail we use for making critical judgements about camera noise processing and detail rendering is in sharp focus at the relatively wide aperture we're shooting at, the focus target at the center of the scene is on a movable stand. This lets us compensate for front- or back-focus by different camera bodies, even those that lack micro-focus adjustments. This does mean, though, that the focus target itself may appear soft or slightly out of focus for bodies that front- or back-focused with the reference lens. If you click to view the full-size image for one of these shots and notice that the focus target is fuzzy, you don't need to email and tell us about it; we already know it. :-) The focus target position will simply have been adjusted to insure that the rest of the scene is focused properly.
Extremes: Sunlit, dynamic range and low light tests
Very high resolution with high default contrast, though excellent dynamic range. Excellent low-light performance, capable of capturing bright images in near complete darkness.
Very high resolution with high default contrast, though excellent dynamic range. Excellent low-light performance, capable of capturing bright images in near complete darkness.
 |  | |
| +0.3 EV | +0.7 EV | +1.0 EV |
Sunlight:Tthe Nikon D750 required +1.0 EV exposure compensation to keep the mannequin's face reasonably bright, but even then her eyes are a bit dim. Pros would likely prefer that, though, or even the +0.7 EV exposure to preserve all highlights and then balance the image in post (or just shoot RAW). Apart from the underexposure, performance here was excellent with only a few highlights clipped even at +1.0 EV, while shadows are very detailed but do contain some noise, though it's fairly low and very fine-grained. (We prefer this to no noise at the cost of smudged detail.) Note that these shots were captured with the Nikon D750's Active D-Lighting control set to its default of "Off." See below for how Active D-Lighting helps with hot highlights and deep shadows.
| Face Detection | ||
 |  |  |
| Off Aperture-priority 0 EV | Auto mode (Portrait) 0 EV | Live View with Face-priority AF 0 EV |
Here, we can see the effect of the Nikon D750's full Auto mode as well as face detection enabled in Live View mode. As you can see from the shots above, full Auto did a much better job than Aperture-priority, selecting Portrait Scene mode which produced a well-exposed subject and background by boosting ISO to 400 and using an aperture of f/5.0 with a shutter speed of 1/400s. It also enabled Active D-Lighting (Auto mode) which reduced overall contrast. In Live View mode using Aperture-priority, Face-priority AF mode also dramatically improved the exposure versus Aperture-priority with the optical viewfinder, selecting a slower shutter speed of 1/40s versus 1/100s (since the other two exposure variables of aperture and ISO were fixed) to better expose for the face. Excellent results here.
Because digital cameras are more like slide film than negative film (in that they tend to have a more limited tonal range), we test them in the harshest situations to see how they handle scenes with bright highlights and dark shadows, as well as what kind of sensitivity they have in low light. The shot above is designed to mimic the very harsh, contrasty effect of direct noonday sunlight, a very tough challenge for most digital cameras. (You can read details of this test here. In actual shooting conditions, be sure to use fill flash in situations like the one shown here; it's better to shoot in open shade whenever possible.)
Active D-Lighting
Active D-Lighting attempts to preserve detail in both highlights and shadows in high-contrast situations, while maintaining moderate levels of contrast. The series of shots below show the effect of the various Active D-Lighting settings (Off (default), Low, Normal, High, Extra High and Auto) available on the Nikon D750 on our high-contrast "Sunlit" Portrait scene.
Active D-Lighting attempts to preserve detail in both highlights and shadows in high-contrast situations, while maintaining moderate levels of contrast. The series of shots below show the effect of the various Active D-Lighting settings (Off (default), Low, Normal, High, Extra High and Auto) available on the Nikon D750 on our high-contrast "Sunlit" Portrait scene.
Note that Active D-Lighting is different from the Retouch menu's D-Lighting, as it is performed during image capture instead of after. (It does affect only JPEG images, though, Nikon very properly doesn't apply tonal adjustments like this to RAW file data. NEF files are however tagged so that Nikon software can automatically apply the effect when converted.)
"Sunlit" Portrait Active D-Lighting (+0.7 EV)
| |
 | ADL Settings: Off (Default) Auto Low Normal High Extra High |
 | |
Mouse over the links to see how the various levels of Active D-Lighting affects our "Sunlit" Portrait shot with +0.7 EV exposure compensation, and click on any link to get to the full-res image. (Active D-Lighting's effect can be a little subtle in shots like those above, so we decided to use a mouse-over with matching histograms to better show how each setting compares. However as mentioned previously, default exposure was too dim and even +0.7 EV isn't enough of a boost to really show Active D-Lighting's effectiveness at highlight protection.)
As you can see from the thumbnail images and histograms above, the Auto setting did a good job, booting shadows and midtones without clipping highlights. And you can see the manual settings did progressively boost shadows and tone-down highlights as the strength was increased. It's also interesting to note that the default ADL setting for the D750 is Off for most exposure modes (with some scene modes being exceptions), while in more consumer-oriented models, the default setting is Auto.
| Far-field Active D-Lighting (0 EV) | ||
 | ||
| Normal | ||
Here are the results with our Far-field shot. As you can see, Active D-Lighting reduced highlights while boosting or maintaining shadows. The Auto setting did a pretty good job here.
HDR Mode
Like other recent Nikon DSLRs, the D750 offers an in-camera high-dynamic-range imaging function. When enabled, the D750 captures two images with one push of the shutter button -- one underexposed and one overexposed -- and combines them in-camera to produce a high-dynamic-range JPEG. (RAW format is not supported.) Unlike some other recent high-end Nikon bodies like the D810, though, there are no exposure differential or smoothing options on the D750. There are just Low, Normal, High, Extra High and Auto settings. You can however still elect to do a series of HDR shots without having to re-enable the mode each time, or select a Single Photo option.
Like other recent Nikon DSLRs, the D750 offers an in-camera high-dynamic-range imaging function. When enabled, the D750 captures two images with one push of the shutter button -- one underexposed and one overexposed -- and combines them in-camera to produce a high-dynamic-range JPEG. (RAW format is not supported.) Unlike some other recent high-end Nikon bodies like the D810, though, there are no exposure differential or smoothing options on the D750. There are just Low, Normal, High, Extra High and Auto settings. You can however still elect to do a series of HDR shots without having to re-enable the mode each time, or select a Single Photo option.
| Far-field HDR mode | ||
| ||
Mouse over the links to see how the available settings affect our Far-field shot at default exposure. Click on a link to get to the full-res image.
Obviously moving subjects should be avoided, as you can see from the ghosting in the leaves and branches in some of HDR shots above. But aside from the noticeable halos and "glowing" caused by the High and Extra High settings, we think Nikon D750's in-camera HDR is one of the better implementations, though it would have been nice to have included the smoothing strength options some other Nikon bodies have, as well as the option to combine more exposures than just two.
Dynamic Range Analysis (RAW mode)While we once performed our own dynamic range measurements based on in-camera JPEGs as well as converted RAW images (when the camera was supported by Adobe Camera Raw), we've switched to using DxO Labs' results from their DxOMark website. As technology advanced, the dynamic range of modern high-end cameras in some cases exceeded the range of the Stouffer T4110 density scale that we used for our own measurements. DxO's approach based on RAW data before demosaicing is also more revealing, because it measures the fundamental dynamic range of the sensor, irrespective of whatever processing is applied to JPEGs, or to RAW data by off-the-shelf conversion software.
In the following, we use DxO's "Print" dynamic range results, which are scaled based on camera resolution. As the name suggests, this scaling corresponds to the situation in which you print at a given size, regardless of how many megapixels the camera might have. (In other words, if you've decided to make a 13x19 inch print, that's the size you're printing, whether the camera's resolution is 16 or 300 megapixels.) For the technically-minded, you can find a discussion of the reasoning behind this here on the DxOMark website. Also note that DxO Labs uses a signal-to-noise (SNR) threshold of 1 when defining the lower boundary of acceptable luminance noise in their dynamic range measurements, which corresponds to the "Low Quality" threshold of the Imatest software we used to use for this measurement.
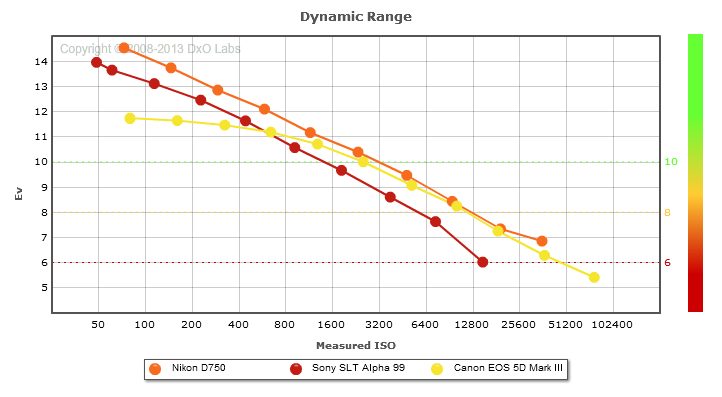 |
Here, we compare the Nikon D750's dynamic range to the Canon 5D Mark III and Sony A99, all full-frame interchangeable cameras with similar resolution and in the same ballpark in terms of pricing at time of writing.
As you can see from the above graph (click for a larger image), the D750's dynamic range is almost a full stop better than the Sony A99 at their ISO 100 settings (14.53 vs 13.65 EV), and the Nikon D750 continues to have an advantage that varies between 1/3 stop to about 1-1/3 stop depending on the sensitivity.
The D750's dynamic range is almost a whopping 3 stops better than the Canon 5D III's at their lowest ISOs (14.53 vs 11.74 EV) but the 5D III almost catches up at about ISO 1600 and offers essentially the same dynamic range as the D750 at higher ISOs. Comparing the D750 to a camera with a more recent and very similar sensor, the Sony A7, we see its dynamic range results are more similar, with the Nikon edging out the A7 at most ISOs with up to about a 2/3 stop advantage, while producing practically the same DR at a couple of ISOs.
Click here to visit the DxOMark page for the Nikon D750 for more of their test results and additional comparisons.
| 1 fc 11 lux | 1/16 fc 0.67 lux | 1/16fc No NR | |
|---|---|---|---|
| ISO 100 |  2 s f2.8 |  30 s f2.8 |  30 s f2.8 |
| ISO 3200 |  1/15 s f2.8 |  1 s f2.8 |  1 s f2.8 |
| ISO 51200 |  1/250 s f2.8 |  1/15 s f2.8 |  1/15 s f2.8 |
Low Light. The Nikon D750 performed very well here, able to capture usable images down to our lowest 1/16 foot-candle light level (about 1/16 as bright as average city street lighting at night) at even the base ISO of 100. However 1/16 fc would likely be a bit dim below ISO 100 because of the 30 second shutter speed limit (Bulb mode is required for longer exposures).
Color balance with Auto white balance is fairly neutral at one foot-candle, just a touch cool, but took on a strong magenta cast at 1/16 foot-candle, as we've seen with other Nikon DSLRs.
Noise isn't an issue at ISO 100 even with NR minimized, and is well-controlled at ISO 3200 though some fine-grained luminance noise as well as chroma noise is visible when NR is turned down to a minimum (right-most column). The top ISO of 51,200 on the other hand is rather noisy and soft, and is probably best avoided except for very small prints or web images.
Some very minor horizontal banding (pattern noise) is visible at ISO 51,200, and there's also a slight reddish tint emanating from the bottom of the frame at the top ISO, indicating some heat blooming. Longer exposures at lower ISOs may show similar heat-blooming discoloration. We didn't notice any issues with hot pixels.
The camera's phase-detection autofocus system was able to focus on our test subject down to below the 1/16 foot-candle light level unassisted with an f/2.8 lens, which is excellent, and in total darkness with the built-in AF illuminator enabled. In Live View mode, the D750's contrast-detect autofocus was able to focus down to just above the 1/4 foot-candle, which is fair.
(Keep in mind that the longer shutter speeds here demand the use of a tripod to prevent any blurring from camera movement. A useful trick is to just prop the camera on a convenient surface, and use its self-timer to release the shutter. This avoids any jiggling from your finger pressing the shutter button, and can work quite well when you don't have a tripod handy.)
How bright is this? The one foot-candle light level that this test begins at roughly corresponds to the brightness of typical city street-lighting at night. Cameras performing well at that level should be able to snap good-looking photos of street-lit scenes.
NOTE: This low light test is conducted with a stationary subject, and the camera mounted on a sturdy tripod. Most digital cameras will fail miserably when faced with a moving subject in dim lighting. (For example, a child's ballet recital or a holiday pageant in a gymnasium.) Digital SLRs like the Nikon D750 do much better than point & shoots, but you still shouldn't expect a quick autofocus lock with moving subjects.
Flash Test Results
Exposure and Range
A fairly powerful pop-up flash. Less than average exposure compensation required.
A fairly powerful pop-up flash. Less than average exposure compensation required.
 |  |
| Normal Flash, f/4, 1/60s, +0.3 EV | Slow-Sync Mode f/4, 1/13s, 0 EV |
Exposure. When it came to exposure, the D750's built-in flash underexposed our Indoor Portrait subject slightly at its default setting, requiring +0.3 EV flash exposure compensation (which is actually less than the average of +0.7 EV required for this shot). The camera's Slow-Sync flash mode produced a bright exposure without flash exposure compensation (0 EV), though with a strong orange cast from the background incandescent lighting.
| Manufacturer-Specified Flash Range |
|---|
 7 feet ISO 100 |
Manufacturer Specified Flash Range. The Nikon D750's flash is rated with a Guide Number of 12/39 (m/ft) at ISO 100. That works out to about 7 feet at f/5.6. As you can see in the flash range test shot above, the Nikon D750 produced a slightly dim exposure (about -0.5 EV lower than ideal), indicating the flash output rating is reasonably accurate.
Note: Here we shoot with manufacturer-specified camera settings, at the range the company claims for the camera, to assess the validity of the specific claims. The specified range has been calculated for the lens and aperture used in the test shot above.
Output Quality
Print Quality
Excellent prints at 30 x 40 inches and above for all ISOs up to 400; an impressively large 24 x 36 inches at ISO 800; and acceptable prints are viable at all ISOs with ISO 51,200 topping out at 4 x 6 inches.
 ISO 50 through 400 images easily allow for prints at 30 x 40 inches or larger. Despite the range of ISOs here, the prints all look practically indistinguishable and all display crisp, sharp detail and excellent colors.
ISO 800 prints safely top out at 24 x 36 inches. We saw a very slight drop in fine detail when looking really closely. Prints at 30 x 40 could work in certain situations, especially for wall display. Noise at this ISO is very low, even in the shadow areas.
ISO 1600 images look practically identical to ISO 800 shots, only with a subtle increase in some shadow noise, but with the similar excellent level of fine detail and color rendition. Therefore, we’re calling 20 x 30 inch prints the size limit at this ISO, but a 24 x 36 inch print would certainly do for wall display.
ISO 3200 prints at sizes larger than 16 x 20 begin to make noise visible. However at 16 x 20 inches, noise is practically imperceptible and the prints at this size display excellent colors and fine detail.
ISO 6400 images are slightly noisier, but overall very well-controlled for this ISO level and therefore can make prints up to 13 x 19 quite easily. A 16 x 20 inch print could be usable for less critical applications.
ISO 12,800 prints can go as large as 8 x 10 inches easily. Very fine detail is becoming reduced by noise and noise reduction processing. Colors are still vibrant and pleasing, though.
ISO 25,600 images are still impressively capable at producing usable prints up to 5 x 7 inches, and perhaps even 8 x 10 inches for less critical applications. Noise and lack of detail prevents anything larger, however.
ISO 51,200 prints max out at 4 x 6 inches, which is nonetheless very impressive, as noise itself appears quite well controlled. Fine detail is a bit lacking and "mushy" preventing us from recommending larger prints sizes.
The latest full-frame Nikon DSLR certainly does not disappoint in the printing department. All the way up to ISO 400, images from the Nikon D750 are practically noise-free and full of crisp, sharp fine detail and great colors, which allow for prints up to 30 x 40 inches, or higher -- depending on how comfortable you’re willing to push the resolution limits of the 24.3-megapixel sensor. At the mid-range to higher ISOs, prints remain very pleasing to the eye with minimal noise. ISO 800 images can print as large as 24 x 36 inches, and even ISO 6400 files produce a nice 13 x 19 inch print. At the extreme end of the ISO scale, the D750 still manages acceptable prints with a 4 x 6 print at ISO 51,200.
Testing hundreds of digital cameras, we've found that you can only tell just so much about a camera's image quality by viewing its images on-screen. Ultimately, there's no substitute forprinting a lot of images and examining them closely. For this reason, we now routinely print sample images from the cameras we test on our Canon Pro9000 Mark II studio printer, and on the Pixma MP610 here in the office. (See the Canon Pixma Pro9000 Mark II review for details on that model.)
Nikon D750 High ISO Noise Reduction
Like most Nikon pro and prosumer DSLRs, the D750 offers four High ISO Noise Reduction settings: Off, Low, Normal (default), and High, allowing you quite a bit of flexibility in choosing how you want to make the trade-off between subject detail and noise levels in JPEGs. The Nikon D750 manual doesn't say at what ISO High ISO Noise Reduction begins to be applied, so we've included crops from ISO 50 on up here. Note that the Nikon D750 user manual says when Off is selected, the amount of noise reduction is always less than the Low setting, but doesn't provide any additional details.
See for yourself how the Normal and Off settings work compared to RAW files with no noise reduction (or sharpening) applied. Click on any of the crops below to see the corresponding full-sized image.
| High ISO Noise Reduction Comparison In-Camera JPEGs vs RAW with no NR Simulated Daylight | |||
Normal
|
Off
|
RAW (no NR)
| |
| I S O 5 0 |  |  |  |
 |  |  | |
 |  |  | |
Normal
|
Off
|
RAW (no NR)
| |
| I S O 1 0 0 |  |  |  |
 |  |  | |
 |  |  | |
Normal
|
Off
|
RAW (no NR)
| |
| I S O 2 0 0 |  |  |  |
 |  |  | |
 |  |  | |
Normal
|
Off
|
RAW (no NR)
| |
| I S O 4 0 0 |  |  |  |
 |  |  | |
 |  |  | |
Normal
|
Off
|
RAW (no NR)
| |
| I S O 8 0 0 |  |  |  |
 |  |  | |
 |  |  | |
Normal
|
Off
|
RAW (no NR)
| |
| I S O 1 6 0 0 |  |  |  |
 |  |  | |
 |  |  | |
Normal
|
Off
|
RAW (no NR)
| |
| I S O 3 2 0 0 |  |  |  |
 |  |  | |
 |  |  | |
Normal
|
Off
|
RAW (no NR)
| |
| I S O 6 4 0 0 |  |  |  |
 |  |  | |
 |  |  | |
Normal
|
Off
|
RAW (no NR)
| |
| I S O 1 2 8 0 0 |  |  |  |
 |  |  | |
 |  |  | |
Normal
|
Off
|
RAW (no NR)
| |
| I S O 2 5 6 0 0 |  |  |  |
 |  |  | |
 |  |  | |
Normal
|
Off
|
RAW (no NR)
| |
| I S O 5 1 2 0 0 |  |  |  |
 |  |  | |
 |  |  | |
As you can see by comparing the Normal and Off high ISO noise reduction settings, the D750 applies noise reduction at all ISOs. You can also see the Off setting still applies some minimal noise reduction, just as Nikon says. Note that noise in low to moderate ISO JPEGs appears higher at the Low setting than noise in the converted RAW images with no noise reduction because no sharpening was applied to the RAW files. Also note that ISO 50 is an extended low ISO, and ISOs 25,600 and 51,200 are high extensions.
The Nikon D750's default high ISO noise reduction generally does a good job at reducing luminance noise and a very good job at reducing chrominance noise, however as you can see, there can be quite an impact to areas with subtle tone on tone contrast, particularly in our red-leaf fabric already at moderately low ISOs. This is often the case with more aggressive chroma noise reduction and something to mindful of. You may want to try the Low setting if you're finding too much detail is lost at high ISOs.
Still, really excellent high ISO performance overall for its resolution.
Nikon D750 Performance
Timing and Performance
Good to very good performance for its class.
Startup/Play to Record
| ||
Power on
to first shot |
~0.5 second
|
Time it takes for camera to turn on.
|
Play to Record,
first shot |
~0.5 second
|
Time until first shot is captured.
|
Startup including taking a shot was fast, as was switching from Record to Play and taking a shot. (See below for buffer clearing.)
Shutter Response (Lag Time)
| ||
Optical Viewfinder
| ||
Full Autofocus
Single Point (Center) AF |
0.206 second
|
Time from fully pressing shutter button to image capture using optical viewfinder. All timing performed with a Sigma 70mm f/2.8 Macro lens.
|
Full Autofocus
Single Area AF, Flash enabled |
0.247 second
|
Time from fully pressing shutter button to image capture. Auto Flash enabled.
|
Full Autofocus
51-point Auto Area |
0.228 second
|
Time from fully pressing shutter button to image capture using optical viewfinder.
|
Manual focus
|
0.055 second
|
For most cameras, shutter lag is less in manual focus than autofocus, but usually not as fast as when the camera is "prefocused".
|
Prefocused
|
0.054 second
|
Time to capture, after half-pressing and holding shutter button.
|
Live View
| ||
Full Autofocus
|
1.769 seconds
|
Time to capture, after half-pressing shutter button, waiting for focus confirmation, then fully pressing shutter button in Live View mode.
|
Prefocused
|
0.174 second
|
Time to capture, after half-pressing and holding shutter button in Live View mode.
|
In terms of the Nikon D750's ability to determine that it's properly focused when shooting the same target multiple times (with no change of focus setting between iteration, to remove the impact of lens AF speed), its speed was good for an enthusiast model. The D750's AF shutter lag measured at 0.206 second using single-area (center) AF mode, 0.247 second with flash enabled, and 51-point Auto Area AF lag measured 0.228 second.
Manual focus shutter lag was only 55 milliseconds. And when prefocused, shutter lag was only 54 milliseconds, which is quite good for a DSLR.
As expected, the Nikon D750's Live View mode adds considerable AF shutter lag. We measured 1.769 seconds for full autofocus lag which is quite slow, but the lens used will make a big difference here. Once prefocused, shutter lag in Live View mode was 0.174 second which is pretty good but still quite a bit slower than using the optical viewfinder.
To minimize the effect of different lens' focusing speed, we test AF-active shutter lag with the lens already set to the correct focal distance.
Cycle Time (shot to shot)
| ||
Single Shot mode
Large/Fine JPEG |
< 0.3 second
|
Time per shot, averaged over a few frames (we no longer test for buffer depths in single-shot mode).
|
Single Shot mode
RAW + L/F JPEG |
< 0.3 second
|
Time per shot, averaged over a few frames (we no longer test for buffer depths in single-shot mode).
|
Early shutter
penalty? |
No
|
Some cameras don't snap another shot if you release and press the shutter too quickly in Single Shot mode, making "No" the preferred answer.
|
Continuous Hi mode
Large Fine JPEG (Optimal quality) |
0.15 second
(6.60 frames/sec); 40 frames total; 7 seconds to clear* |
Time per shot, averaged over buffer length of 40 shots, then slowed to an average of 0.27s or 3.65 fps with a full buffer, but with a lot of variation.
|
Continuous Hi mode
14-bit RAW (Lossless compressed) |
0.15 second
(6.63 frames/sec); 14 frames total; 5 seconds to clear* |
Time per shot, averaged over 14 shot buffer, then slowed to an average of 0.44s or 2.29 fps with a full buffer.
|
Continuous Hi mode
14-bit RAW (Lossless) + L/F JPEG |
0.15 second
(6.67 frames/sec); 10 frames total; 8 seconds to clear* |
Time per shot, averaged over 10 shot buffer, then slowed to an average of 0.72s or 1.39 fps with a full buffer.
|
Continuous Hi mode
12-bit RAW (Lossless compressed) |
0.15 second
(6.65 frames/sec); 22 frames total; 6 seconds to clear* |
Time per shot, averaged over 22 shot buffer, then slowed to an average of 0.30s or 3.31 fps with a full buffer.
|
Continuous Hi mode
12-bit RAW (Lossless) + L/F JPEG |
0.15 second
(6.63 frames/sec); 14 frames total; 9 seconds to clear* |
Time per shot, averaged over 14 shot buffer, then slowed to an average of 0.67s or 1.50 fps with a full buffer.
|
Continuous Hi
DX Crop Mode 10.3MP JPEG (Optimal quality) |
0.15 second
(6.64 frames/sec); 100 frames total; 1 second to clear* |
Time per shot, averaged over set buffer length of 100 shots.
|
Continuous Hi
DX Crop Mode 10.3MP 14-bit RAW (Lossless compressed) |
0.15 second
(6.65 frames/sec); 42 frames total; 4 seconds to clear* |
Time per shot, averaged over 42 shot buffer, then slowed to an average of 0.22s or 4.55 fps with a full buffer, with a lot of variation.
|
Continuous Hi
DX Crop Mode 10.3MP 14-bit RAW (Lossless) + L/F JPEG |
0.15 second
(6.64 frames/sec); 18 frames total; 5 seconds to clear* |
Time per shot, averaged over 18 shot buffer, then slowed to an average of 0.37s or 2.748 fps when buffer was full, with a lot of variation.
|
Flash recycling
|
2.4 seconds
|
Flash at maximum output.
|
*Note: Buffer clearing times measured with a SanDisk Extreme Pro 95MB/s UHS-I SDHC card except where otherwise noted. Slower cards will produce correspondingly slower clearing times. Slow cards may also limit length of bursts in continuous mode. ISO sensitivity and noise reduction settings can also affect cycle times and burst mode performance.
| ||
Single-shot cycle times were so fast that they were difficult to accurately measure as they depend on the tester's nimbleness and ability to maintain an optimum rhythm, so your results may vary. (Note that we no longer test single-shot mode with just RAW files, as the results are usually somewhere in between.)
Continuous Hi burst mode was very good considering the resolution and sensor size, slightly exceeding Nikon's 6.5 frames per second spec in all the modes we tested.
Buffer depths we good, though not great. In best quality JPEG mode, we managed 40 frames before the D750 slowed down which is pretty good. You'll likely do better with typical scenes as our target for this test was designed to be difficult to compress. (Also note that Nikon's spec of 87 large/fine JPEGs uses the Size Priority compression setting, instead of Optimal Quality we used.) Buffer depth however fell to 14 frames in 14-bit lossless compressed RAW mode, and 10 frames in RAW+JPEG mode.
Switching to 12-bit RAW files made quite a difference, increasing buffer depth to 22 frames for RAW and 14 for RAW+JPEG. The D750 also has a lossy compression option for RAWs, however we did not test that. We also tested DX crop mode and while the frame rate didn't change, buffer depths increased significantly.
The D750's flash took 2.4 seconds on average to recycle after full-power discharge, which is good.
Bottom line, the Nikon D750 is pretty fast in most respects for its class, with fast startup, good AF speeds (when using the optical viewfinder) and excellent burst speeds for a full-frame 24-megapixel sensor. Buffer depths are good when shooting JPEGs but only fair when shooting 14-bit RAW files, however reducing bit-depth helps.
Battery
Battery Life
Excellent battery life.
Lithium-ion rechargeable battery,
(CIPA standard, Optical Viewfinder) | |
Lithium-ion rechargeable battery,
(CIPA standard, Live View LCD) |
The Nikon D750 uses a custom rechargeable lithium-ion battery pack for power, and comes with both a single battery and charger. The CIPA-rated 1,230 shots per charge using the optical viewfinder is excellent for its class. Unfortunately, Nikon does not seem to publish battery life results for when Live View mode is used, but it's a safe bet that it's considerably lower.
The table above shows the number of shots the camera is capable of on fully-charged battery, based on CIPA battery-life and/or manufacturer standard test conditions.
(Interested readers can find an English translation of the CIPA DC-002 standards document here. (180K PDF document))
Digital Cameras - Nikon D750 Test Images
Not sure which camera to buy? Let your eyes be the ultimate judge! Visit our Comparometer(tm) to compare images from the Nikon D750 with those from other cameras you may be considering. The proof is in the pictures, so let your own eyes decide which you like best!
This is our new "Still Life" test target. We're combining some of the elements from previous shots (DaveBox and Res Chart) into this and the "Multi Target" shot below, plus added a number of elements that are very revealing of various camera characteristics and foibles.
Here's what to look for in this target:
| ||||||||||||||||||||||||||||||||||||||
Our new "Multi Target" was first put into use in April, 2009, replacing the earlier "interim" design. This target incorporates a number of elements that combine aspects of the previous Multi target, as well as the previous Viewfinder Accuracy or "VFA" chart. Here's some of what you'll find in this target:
Framing marks: This chart evolved from the earlier Viewfinder Accuracy chart, so one of its major uses is to measure viewfinder accuracy. (See notes in the Viewfinder Accuracy section, at the bottom of this page, for more information on this.)
USAF resolution targets: An important use of this target is in evaluating lens quality, looking how well sharpness holds up as you move from the center to the corners of the frame. The little "USAF" resolution targets arranged at the center, in the corners, and along the diagonals are very useful for making fine judgements about blur, flare and aberrations in the image. We generally show crops of a USAF chip from a corner of the target and from the center, to show how lenses hold sharpness at wide and telephoto focal lengths.
Alignment "bullseyes:" We find these graphics from the graphic arts world (used to align sheets of film in the old film-based prepress days) very useful for seeing chromatic aberration in lenses. The bold black/white elements are good for seeing the colored fringes caused by CA in the corners of the frame.
MacBeth ColorChecker Chart: This is about as common a color standard as you can get these days, very widely available for only mildly exorbitant cost, and quite well controlled in its production. It thus serves as a good basis of comparison between cameras and between test setups. Imatest also understands the MacBeth colors very well, and uses them to produce its color accuracy map that we feature in all our reviews.
MacBeth ColorChecker SG Chart: The ColorChecker SG chart provides a wider range of colors, to give a more detailed map of a camera's color handling. We haven't begun using this chart in the color-accuracy graphs we routinely offer, but expect to do so at some point in the future. In the meantime, we sometimes refer to this chart internally, to get a more complete idea of what a camera's color map looks like.
Log C/F Target: The progressive resolution pattern located just below the center of the target is a Log C/F (logarithmic contrast vs spatial frequency) chart. Digital camera noise reduction routines work by looking at levels of local contrast, flattening-out detail at progressively lower spatial frequencies as the local contrast decreases. (This is very commonly seen in human hair, grass, foliage, and other subjects with subtly-contrasting fine detail.) This chart lets Imatest analyze just how a camera makes the tradeoff between contrast, detail, and image noise.
Color Starbursts: The six circular starburst elements arranged around the target are intended to reveal de-mosaicing artifacts and color-dependent resolution issues. The six starbursts provide examples of each combination of RGB colors intersecting each other. (That is, red, green, and blue against black, plus red against green, green against blue, and blue against red.) Given that the most common sensor RGB color filter pattern (the so-called Bayer) pattern has twice as many green pixels as red or blue, you'll generally see that the green/black starburst shows the best resolution, while the blue/red one shows the worst. The effects of different sensor geometries and color filter array patterns will be revealed here.
Musicians Image: Synthetic test patterns only tell you so much. While we have a lot of pictorial images in our other test targets, we thought it would be useful to include a small "natural" image here as well.
| ||||||||||||||||||||||||||||||||||||||
Part of the impetus in developing the new Multi Target in April 2009 was to switch to using a new 2x target for the resolution measurements, since the original ISO 12233 chart we'd used since the site first began in 1998(!) had become inadequate for testing the highest-resolution cameras. We'd for quite some time had a "homemade" 2x target, employing a shrunk version of the ISO 12233 chart, shot at 1/2 size. The resolution numbers on that chart all needed to be doubled to convert to the actual values, though, so we decided to go with a commercial 2x target to eliminate possible confusion on the part of our readers. Numbers on this new 2x resolution chart now read directly in hundreds of lines/picture height. (Because almost all of the area of this new resolution chart is now meaningful for resolution measurements, there was no longer space on it to overlay the MacBeth and other color targets on our prior Multi chart; hence the simultaneous change in our Multi target.)
| ||||||||||||||||||||||||||||||||||||||

The lighting in this shot is deliberately awful, about what you'd expect from noontime sunshine here in the Atlanta, GA area. (In fact, the color balance has been chosen to pretty well match the hazy sunshine here in mid-August.)
The reason for the harsh lighting is to provide a real "torture test" of how cameras handle conditions of extreme contrast; and in particular, how well they do holding onto highlight detail.
Look for:
To view the entire exposure series, see files D750OUTBMP0.HTM through D750OUTBMP3.HTM on the thumbnail index page.
| ||||||||||||||||||||||||||||||||||||||
This shot duplicates indoor shooting conditions in most US homes, with fairly bright incandescent room lighting. The challenge here is for the camera's flash to blend naturally with the room lighting, and produce good, neutral color overall. - Some cameras will be overly affected by the room lighting, even with their flash enabled, and the result will be a strong orange cast. Another common failing is for the highlights from the flash to take on an unnatural bluish cast.
Finally, exposure is important here, and frequently a tough challenge for the cameras. The model's white shirt is central in the scene, reflecting a lot of the light from the flash right back at the camera. As a result, most cameras underexpose this shot, and require some positive exposure compensation to produce a good result. - And that's an important consideration in itself: Does the camera even permitadjustment of its flash exposures? Many do not. These photos are a tough exposure challenge, if they come out OK, the camera in question can probably be coaxed into delivering a good flash exposure of any subject within its range.
Note too, that the normal flash shot (as opposed to the slow sync one, if the camera offers that feature) will be sharply rendered, any subject or camera movement frozen by the quick pop of the flash. That makes this shot a good one to look for the effect of over-aggressive noise suppression in the model's hair.
To view the exposure series from zero to +1.0 EV in the normal flash mode, see files D750INBFP0.HTM through D750INBFP3.HTM on the thumbnail index page.
To view the same series in the Slow-Sync flash mode, see files D750INBFSP0.HTM through D750INBFSP3.HTM on the thumbnail index page.
| ||||||||||||||||||||||||||||||||||||||
The incandescent lighting used in most US homes actually has a very strong yellow color to it. Our eyes have an amazing ability to ignore color casts like this, something digital cameras struggle to emulate.
The incandescent lighting used for this shot is thus not only very common here in the US, but also very difficult for most digital cameras to deal with. While we probably want a littleyellow color to remain in the image (to convey some of the mood of the original scene), too much will look unnatural and distort colors.
Most cameras' auto white balance systems have a great deal of difficulty with this shot, but many incandescent white balance settings struggle as well. (It seems that many cameras' incandescent settings are actually calibrated to the tungsten lighting used in professional studio systems, which isn't nearly as warm-toned as typical household lighting.)
If you intend to do much shooting indoors after dark, pay careful attention to this test, as cameras vary widely in this regard.
To view the entire exposure series, see files D750INBMP0.HTM through D750INBMP3.HTM on the thumbnail index page.
ISO Series:
"ISO equivalent" refers to a camera's light sensitivity. ISO 200 represents twice the sensitivity of ISO 100, meaning that you can use a shutter speed that's twice as fast. Higher ISO settings are often required to get any picture at all when shooting after dark, but even in full daylight, using a higher ISO can help you freeze fast action. The problem is, increasing a digital camera's ISO also increases image noise. In practical terms, this means that higher-ISO images often can't be used to produce prints as large as lower-ISO ones. The tricky thing here is that high-ISO images often look much different when printed at various sizes than they do when viewed on-screen. In particular, for any level of image noise, you'll often find that while noise is quite evident at larger print sizes, as you reduce the size of the prints, there will come a point where it suddenly ceases to be an issue. We routinely print high-ISO photos from the cameras we test on our studio printer (currently a Canon i9900) at a range of sizes, and report our findings. If you're interested in investigating the effect of image noise for yourself, don't judge cameras' performance by how their images look on your CRT, viewed pixel-for-pixel. Rather, download the test shots linked in the table below and output them on your own printer, so you can see how prints of various sizes will actually look.
One additional note about this particular test series though: Because these images are shot under household incandescent lighting, the camera has to boost its blue-channel signal quite a bit to get back to a neutral color balance. Since the blue channel is generally the one with the most noise, this makes this shot a real acid test of noise performance. Noise levels in high-ISO shots taken under daylight conditions usually won't show as much noise. (See the "Far Field" test for examples of high ISO shots captured in daylight.)
| ||||||||||||||||||||||||||||||||||||||
Like several of our tests, these images are actually photos of a high-resolution poster, shot under studio lighting. The shots for this camera were captured with our third-generation House poster, which was assembled from 45 separate 11-megapixel images, shot with a very high-quality lens, and then stitched together into a single image. The resulting image amounts to about 450 very high-quality megapixels. This should have sufficient detail to comfortably challenge cameras up to at least 80-100 megapixels. (And even with higher-resolution cameras, we believe that the camera lenses themselves would be more likely to limit resolution than would the detail in the poster.)
Why did we choose to shoot a picture of a picture? The idea was to show a typical subject (a house and surrounding foliage) in a way that would be absolutely consistent from camera to camera. Any outdoor subject is going to vary considerably from day to day, as the lighting changes with the weather, atmospheric conditions, and season. Shooting a poster lets us compare images from cameras shot weeks, months, or even years apart, with the sure knowledge that nothing has changed from one shot to another.
Things to look for here are fine detail, as seen in the foliage and tree limbs against the sky, sharpness in the corners, and the preservation of subtle detail in the shaded brick patterns. - Many cameras with overactive noise suppression severely blur the brick patterns that are in shadow.
| ||||||||||||||||||||||||||||||||||||||

While the House poster in the shot above provides absolute repeatability from test to test, it doesn't offer the range of brightness (dynamic range) that the original scene had, nor does it contain the nearly infinite range of fine detail found in nature. For these reasons, we shoot an outdoor photo of a building, to provide a more challenging (if more variable) subject for the cameras. Until Summer of 2011, we used the original house from the House poster for this "Far Field" shot, but the ever-encroaching trees made it less and less useful. The coup de grace for that subject was when the neighbor across the street relandscaped his yard so we could no longer shoot from our original position.
In place of the original house, we've switched to using the Roswell, GA City Hall building, which offers many of the elements of the original Far Field subject, but in a setting where we're guaranteed access into the future, and without the threat of trees eventually obscuring the building. In this shot, we look at how the camera handles rendering of subtle detail (the bricks, both in the sunlight and in the deep shadows under the entryway roof), how it handles bright highlights (the white columns and reflections from the dome), and shadow detail (in the dark areas beneath the shrubs on either side of the steps).
Note though, that because this is shot outdoors, the character of the light is unavoidably going to change quite a bit, depending on the atmospheric humidity and the time of year. - You thus shouldn't rely on it for absolute comparisons between cameras, since it's unlikely that conditions will be exactly the same from one test to the next.
| ||||||||||||||||||||||||||||||||||||||
Because most of its various elements are now contained or represented in the combination of the Still Life and Multi Target shots, we no longer routinely shoot the Davebox by itself, as would normally appear in this space. (We do however, still use it for our low light test below.)
| ||||||||||||||||||||||||||||||||||||||
Low-Light Tests
Low light photography is an area where there are really enormous differences between digital camera models. We used to shoot this test at all ISOs (in one EV steps) and five light levels but because cameras now often offer over a dozen ISO settings, the number of shots required was becoming unreasonable. So, this test is now shot at only three ISO settings (low, medium and high) and at the highest and lowest light levels we used to test at (a light level about equivalent to typical city street lighting at night (one foot-candle), and at 1/16 foot-candle where many cameras struggle). Shots in the rightmost column of the table below are taken with long exposure noise reduction disabled and high ISO noise reduction minimized. You may also see the effect of poor low-light autofocus in some of these shots, although we use a different test setup to check autofocus performance more directly. (The results of which are reported on in the main Test Results section.) Things to look for here include:
(Note: If you'd like to use a light meter to check light levels for subjects you might be interested in shooting, a light level of one foot-candle corresponds to a normal exposure of two seconds at f/2.8 and ISO 100.)
| ||||||||||||||||||||||||||||||||||||||
Manufacturer-Specified Flash Range
Lately, many manufacturers specify flash range with the camera set to Auto mode, in which the camera is free to boost its ISO setting to help increase the flash range. This does increase the range, but it's easy to have too much of a good thing: Too high an ISO can leave you with too much image noise. The variable ISO setting also means that there isn't an easy way to compare the range with the fixed-ISO shots in our standard flash range series. So now, we also test the flash under the manufacturer-specified conditions (whatever they may be, but frequently with the camera set to Auto mode), and the look at both how brightly the scene is lit, and how much image noise is present in the resulting images.
Flash range for SLRs will vary with the lens used (depending on the maximum aperture), so their flash range is commonly expressed as a Guide Number, or GN for short. The guide number is a distance, in either feet or meters, at a given ISO. To find the maximum flash range at a given aperture, just divide the guide number by the aperture. For instance, a guide number of 56 feet would translate to a range of 10 feet with a lens set to an aperture of f/5.6. The range would be twice that if you had an f/2.8 lens (56/2.8 = 20).
| ||||||||||||||||||||||||||||||||||||||
Viewfinder Accuracy
Viewfinder accuracy is an important parameter, especially for shots where framing is critical. The optical viewfinders on most digital cameras match the (poor) accuracy of those on film cameras, typically showing only about 85% of the actual final frame area. It's likely that this is a deliberate design choice by the camera engineers, to help avoid users accidentally cutting off the heads of their subjects. We disagree with this approach, or at least feel that it should be mitigated a bit, perhaps by increasing the accuracy to 90 to 95%.
Unlike the optical viewfinders, the LCD viewfinders on most digital cameras tend to be quite accurate. There are exceptions though, and it's unfortunately not uncommon to find an LCD monitor that only shows 90% or less of the final frame.
Things to look for on this test chart are:
| ||||||||||||||||||||||||||||||||||||||


Nikon D750 Image Quality Comparison
Below are crops comparing the Nikon D750 with the Nikon D810, Canon 5D Mark III, Fujifilm X-T1, Pentax K3 and Sony A7. All of these models sit at relatively similar price points and/or categories in their respective product lineups as advanced enthusiast or professional-level cameras.
NOTE: These images are best quality JPEGs straight out of the camera, at default settings including noise reduction and using the camera's actual base ISO (not extended ISO settings). All cameras in this comparison were shot with our very sharp reference lenses. Clicking any crop will take you to a carrier page where you can click once again to access the full resolution image as delivered straight from the camera. For those interested in working with the RAW files involved: click these links to visit each camera's respective sample image thumbnail page: Nikon D750, Nikon D810, Canon 5D Mark III, Fujifilm X-T1, Pentax K3 and Sony A7 -- links to the RAW files appear beneath those for the JPEG images, wherever we have them. And remember, you can always go to our world-renowned Comparometer to compare the Nikon D750 to any camera we've ever tested.
Nikon D750 versus Nikon D810 at base ISO
 |  |
 |  |
 |  |
Nikon D750 at ISO 100
|
Nikon D810 at ISO 64
|
Despite the resolution difference here -- 24.3 for D750 and 36.3 for D810 -- both cameras display an impressive level of fine detail at base ISO. Details are very crisp, though not surprisingly the D810 by sheer resolution displays more fine detail. Although slightly different in appearance, both camera display some minor moiré in the red fabric.
| |
Nikon D750 versus Canon 5D Mark III at base ISO
|  |
|  |
|  |
Nikon D750 at ISO 100
|
Canon 5D Mark III at ISO 100
|
The Nikon D750 here edges out the Canon in all three crops, though the biggest difference can be seen in the fabric swatches, where the Nikon produces much crisper fine details. Detail on the bottle surface and the mosaic tile pattern both look just bit crisper and sharper than on the Canon image.
| |
Nikon D750 Conclusion
| Pro: | Cons: |
|---|---|
|
|
The much-loved Nikon D700 finally gets its long-awaited upgrade as the Nikon D750. With the 2008 debut of the D700, Nikon finally had an affordable, more compact, enthusiast-level full-frame camera alternative to the large and expensive D3. Now, Nikon has a trio of such cameras, with the D750 squeezing in above the D610 and below the D810, and forms a hybrid camera of sorts by borrowing features and specs from both the D610 and D810.
Featuring a similar high-resolution 24.3-megapixel full-frame sensor as in the D610, the D750, on the other hand, pairs it with the faster EXPEED 4 image processor from the D810. The metering sensor and autofocus system are also borrowed from the D810 (though the AF system here is tweaked for better low-light AF), while the exposure system -- like maximum shutter speed and flash sync -- as well as life span of the shutter is shared with the lower-end D610. Of course, the D750 has a few unique tricks up its sleeve too, such as being the first full-frame Nikon DSLR with a tilting rear LCD, a slimmer body design with a deeper handgrip, and built-in Wi-Fi connectivity. The battery life is also rated better than both the D610 and the D810.
What this all boils down to is a very impressive, very capable camera. In both our lab and real-world tests, the D750 produced outstanding high-quality images. The dynamic range at lower ISOs was fantastic with nice colors, though hue accuracy was a bit below average. The D750 also displays excellent high ISO performance with well-controlled noise levels and great fine detail performance up to ISO 6400. And, while the sensor does have an anti-aliasing filter, it's relatively weak, leading to very highly-detailed images, however there can be visible moiré with certain subjects.
The D750 is also a rather speedy camera, and our tests of its Continuous Hi burst rate actually slightly exceeded Nikon's stated 6.5fps rate, which is quite impressive for a high-resolution full-frame DSLR. Buffer depths were also good, especially when shooting JPEG-only, however, RAW format fills the buffer much more quickly. At full, 14-bit RAWs, the D750 managed just 14 frames over the 40 JPEG frames we managed in our lab tests. Dropping the bit-depth to 12-bit RAWs improved buffer capacity to around 22 frames.
Autofocus performance is very good for its class as a high-end enthusiast model. In our real-world testing, the D750 was able to quickly and accurately autofocus on a variety of subject in multiple lighting conditions, including very low light conditions. The 51-point AF system allows for lots of customizability and flexibility with composition as well as tracking moving subjects, however it would be nice if the AF points covered a wider area of the frame. Live View AF, for both photos and video, is still lacking, as the D750 uses much slower contrast-detect AF.
Altogether, the Nikon D750 is another excellent full-frame DSLR from Nikon. Sitting comfortably in their camera lineup above the "entry-level" full-frame D610 and beefy, high-res 36.6MP D810, the D750 offers photographers a bit more in the performance category like a higher-end model, but more control in the megapixel department with high-res -- but not too high-res -- 24MP files. For videographers, too, the D750 offers a host of pro-level amenities, such as an articulated LCD, uncompressed HDMI out and stepless aperture adjustment, to make a great all-in-one multimedia camera.
And while, yes, a batch of early production models had issues with flare and dark banding, Nikon was quick to recognize this and address affected customers' concerns with free repairs. Repaired models and subsequent production models no longer display this issue, including one of the samples we had repaired.
For its impressive image quality, performance and features, the Nikon D750 is a well-rounded, all-in-one multimedia machine and a solid choice for a Dave's Pick.


No comments:
Post a Comment