| 18.00 Megapixels | Canon EF/EF-S | APS-C size sensor |
|---|---|---|
 | ||
| Basic Specifications | |
|---|---|
| Full model name: | Canon EOS 60D |
| Resolution: | 18.00 Megapixels |
| Sensor size: | APS-C (22.3mm x 14.9mm) |
| Kit Lens: | 7.50x zoom 18-135mm (29-216mm eq.) |
| Viewfinder: | Optical / LCD |
| Native ISO: | 100 - 6400 |
| Extended ISO: | 100 - 12,800 |
| Shutter: | 1/8000 - 30 seconds |
| Max Aperture: | 3.5 (kit lens) |
| Dimensions: | 5.7 x 4.2 x 3.1 in. (145 x 106 x 79 mm) |
| Weight: | 43.5 oz (1,234 g) includes batteries, kit lens |
| Availability: | 09/2010 |
| Manufacturer: | Canon |
| Full specs: | Canon 60D specifications |
60D SUMMARY
The design of the Canon 60D is slightly smaller, and more specifically aimed at the advanced amateur market, better fitting into the niche occupied by the Nikon D90 and now the D7000.
PROS
Excellent 18-megapixel sensor with superb detail; Very good high ISO performance, especially for 18-megapixel subframe sensor; 3.0-inch, 1,040K-dot Vari-angle LCD is very useful for video and Live View; Sharp 18-135 kit lens with above average zoom range and I.S.; Full HD (1920x1080) movies at 30/25/24p, 60/50p at 1280x720.
CONS
Body not as rugged as mag-alloy 50D; AF assist only works when flash is up, though flash can be forced off; Auto-exposure not reliable in very low light; No continuous autofocus in Movie mode.
Canon EOS 60D Operation
The Canon EOS 60D retains the enthusiast-friendly interface like that of the preceding 40D and 50D models, with traditional monochrome Status LCD and viewfinder LED displays, plus a Status display that can be brought up on the 3-inch rear-panel LCD. Finally, Live View mode also has a Status display, including a live histogram.
The control layout has changed significantly since the 40D. Perhaps most significantly, the tiny rear-panel multi-controller joystick is gone, with its functionality instead integrated into an expanded control dial cluster. This now comprises three controls in one area. The outer, rotating ring serves as a Quick Control dial, inside which are nested an eight-way Multi-controller, and a central Set button. The combination is significantly easier to use than the tiny, fiddly joystick of previous models. Accommodating these new controls, as well as the tilt/swivel LCD panel assembly, many other controls have moved around the camera body, and a number of new ones have been added. The Power switch now resides under the Control dial, which adds a central locking button to prevent accidental mode changes. The Delete button has been moved directly beneath these. On the top deck, there's now an extra button in front of the status LCD, and all the buttons in this row are now single-purpose: autofocus, drive, ISO, metering, and info display illumination. On the rear of the camera, the Live View / Movie button is now easy to access with a thumb, to the right of the viewfinder. To the right of the LCD, and above the Quick Control dial, are the Menu and Info buttons, along with a new Quick Control button. Beneath the dial, there's the Playback button, and a new Unlock button that also serves duty as a Direct Print button.
Canon EOS 60D Top-Panel LCD Display
 The Canon 60D features a top-panel LCD display, which reports most of the camera's main exposure and menu settings. The display is black and white, and only shows the settings that are applicable during use, though the illustration below shows the full range of settings that can appear. (Illustration courtesy Canon USA.)
Note that compared to the 50D, both file formats and white balance modes have been removed from this display, along with the indication of whether camera sounds are enabled. There aren't any added icons on the display, but the 60D can now show the new single-axis electronic level using the same portion of the LCD display that's ordinarily used as an exposure level indicator.

Canon EOS 60D Record Mode Displays
When the INFO button is pressed, the 60D's rear panel LCD monitor also offers a status display, similar to ones found on models without a top status LCD. Like the 50D, this display allows you to adjust settings directly from this display using the Multi-controller and control dials, although you must now press the Quick Control button first. The image below shows callouts for all the information shown in this shooting display. (Illustration courtesy Canon USA.)

| Canon EOS 60D Record Displays | |
 |  |
Pressing the Info button once enables the normal record mode display.
|
Pressing it a second time turns the display into a single-axis level, which indicates roll around the central axis of the lens. When the camera is perfectly level in portrait or landscape orientation, the horizon line turns green.
|
 |  |
Pressing the Info button for a third time switches to a shooting settings display, summarizing common exposure variables.
|
Regardless of which display mode you're currently using (and even when the LCD display is switched off altogether), pressing the Quick Control button turns the display into an interactive Quick Control screen. With the exception of the bottom line, which identifies the current selection, the layout is identical to that of the shooting settings display. The Multi-controller is used to switch between items, and the values for most can be adjusted directly with either control dial. You can also press the SET button to display the dedicated menu for the currently selected item.
|
Additionally, the EOS 60D's rear-panel LCD monitor can be used as a viewfinder, via the camera's Live View mode (see the Live View tab). A sampling of exposure information appears on-screen, and if the Exposure Simulation option is enabled, the image display reflects what the expected exposure outcome will be. An optional histogram can be overlaid in the upper right corner of the screen.
Canon EOS 60D Playback Mode Displays
The display mode used in Record Review is the same as was last used in Playback mode, or you can hit the DISP button to cycle to a different mode. Likewise, in Playback mode, you can cycle between the available display options by pressing the DISP button repeatedly. You can also select between the normal luminance-based histogram and the new RGB histogram option via a Playback-mode menu item.
| Canon EOS 60D Playback Displays | |
 |  |
This is the default display in playback mode. The file number is displayed upper right, the shutter speed, aperture, and exposure compensation (if applicable) in the upper left, and the file sequence number are shown below left.
|
Pressing the Info button cycles through the four available displays. The second display option shows a histogram and more detailed exposure information. A setting in Playback Menu 2 lets you choose between a conventional luminance-only histogram (as shown above), or separate red, green, and blue channel histograms.
|
 |  |
The third playback display option shows both RGB and luminance histograms side by side, along with an intermediate level of exposure information.
|
The final playback display option shows the image with no overlay. In the screenshot above we've enabled the blinking highlight warning, but it isn't limited solely to this display mode. It's probably most useful here, where the preview is as large as possible, and isn't obscured by overlays, but it can also be activated in any of the other display modes.
|
 |  |
If you press the Zoom Out button while viewing a single image on the LCD screen, it'll take you first to a 4-image thumbnail display, and then to a 9-image one, if you press it once again. The arrow keys let you navigate among the thumbnail images. It's not shown here, but by pressing the DISP button in this mode, you can toggle an overlay with data for the currently-selected image. Contents are the same as for the default single image display, showing image size/quality and file numbers.
|
You can also zoom in on an image, up to 10x at the highest resolution. The small navigator window in the lower right-hand corner shows you what part of the larger image you're currently viewing. The Multi-controller lets you navigate around the full image, and the zoom in / zoom out keys increase or decrease the magnification level. We like that you can step between images while maintaining the zoomed display. This makes it easy to compare focus or other fine details from one shot to the next.
|
 |  |
By turning the Main dial on the Canon 60D in Playback mode, you can "jump" through images in a variety of ways. An option on the Playback menu sets options of jumping through images 1, 10, or 100 images at a time, between shots captured on different dates or stored in different folders, between groups of movies, or groups of still shots. You can also jump between images by rating, either viewing only rated images, only unrated images, or only those with a specific rating. The jump menu setting only applies when you're in single-image playback mode. In thumbnail display mode, the Main Dial always jumps ahead one screen of thumbnails at a time, regardless of the menu setting for the Jump option.
|
Images are rated from the Rating option in Playback Menu 2. The Quick Control steps through images one at a time, and the Main Dial as configured in the previous menu. The rating for each image is selected with the Multi-controller, and a count of the number of images with each rating is shown across the top of the screen. The rating is stored in the EXIF header of each image, and can also be viewed with compatible software on your computer.
|
 |  |
The Canon 60D offers a fairly robust slide show function, which allows a predefined time per slide from one to 20 seconds, and a choice of three optional transition effects. As well as including all images, t's possible to limit slideshow playback to just stills or movies, just a specific date or folder, and just images with a specific rating.
|
Pressing the Delete button in playback mode lets you delete the currently displayed image. If you want to erase multiple images at once, though, you can do so through Playback Menu 1.
|
 |  |
For those who like to print their images without using a computer, the Canon 60D can set up DPOF print orders on the memory card. You can select the usual options -- number of prints for each image, whether to overlay the date and file number on each print, etc.
|
The Canon 60D also includes several filter effects that can be applied to images post-capture, each offering a small amount of control over the look of the effect. These include Grainy B/W, Soft Focus, Toy Camera Effect, and Miniature Effect.
|
 |  |
You can downsample images in-camera, using the Resize option. It's not possible to interpolate larger images from smaller ones in-camera, however.
|
Like many of its competitors, the Canon 60D includes the ability to process Raw files in-camera, creating a JPEG image with your choice of settings.
|
Canon EOS 60D Optics
Kit Lens
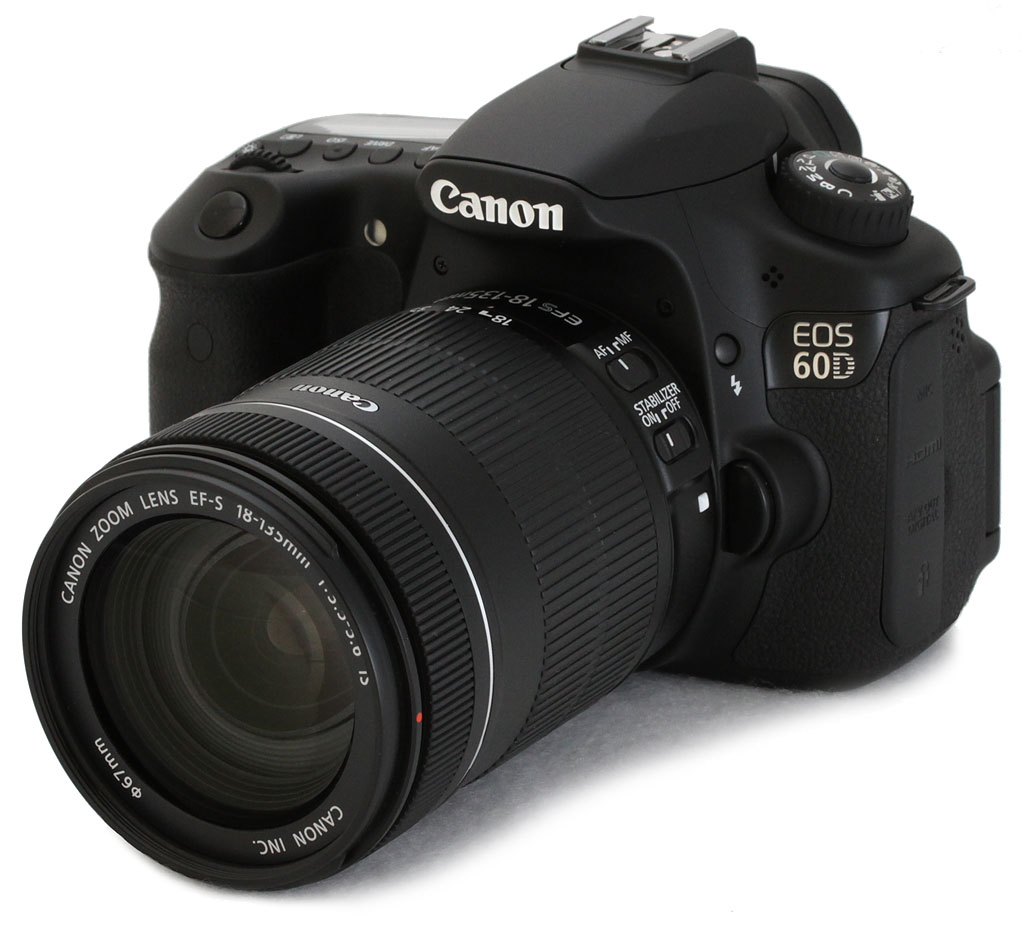 As of this writing (mid December, 2010), the Canon EOS 60D digital SLR camera is available body-only, bundled with the Canon EF-S 18-135mm f/3.5-5.6 IS lens, or bundled with the EF-S 18-200mm f/3.5-5.6 IS lens.
The 18-135mm kit lens has a 7.5x zoom ratio, with a 35mm equivalent focal range of 29-216mm due to the 60D's 1.6x "focal length crop" (see below). The lens is constructed of 16 elements in 12 groups. Focusing is internal, and the 18-135mm uses a micro DC motor for autofocus instead of the ultra-sonic motor found on models with the USM designation. An AF/MF switch is provided. The lens features built-in image stabilization (IS) that is capable of up to four stops of correction. A Stabilizer On/Off switch is also provided. Other specifications include a 6-bladed (rounded) diaphragm, minimum aperture of f/22-f/38 (or f/36 if using 1/3 stop increments), maximum magnification ration of 0.21x (or 1:4.8) at 135mm, and 67mm filter thread. Dimensions are 101 long with a 75.4mm diameter (4.0 x 3.0 inches), and weight is 455g / 16.0 oz. The lens has a MSRP of US$499.99 if bought separately, but costs significantly less when purchased bundled with the camera. A lens hood and soft case are optional accessories. See below for our test results with this lens mounted on the Canon 60D, and see our full review of this lens onSLRgear.com.
The 18-200mm kit lens has an 11.1x zoom ratio, with a 35mm equivalent focal range of 29-320mm when the focal length crop is taken into account. This lens is also constructed of 16 elements in 12 groups, features internal focusing, and uses a micro DC autofocus motor which is enabled or disabled with an AF/MF switch. Again, the built-in image stabilization system is rated for up to four stops of correction, and is enabled or disabled with a provided switch. Other specifications include a 6-bladed (rounded) diaphragm, minimum aperture of f/22-f/38 (or f/36 if using 1/3 stop increments), maximum magnification ration of 0.24x (or 1:4.2) at 200mm, and 72mm filter thread. Dimensions are 102 x 78.6mm / 4.0 x 3.1 inches, and weight is 595g / 21.2 oz. This lens has a MSRP of US$699.99 if bought separately, and again costs significantly less when purchased bundled with the camera. As with the 18-135mm lens, both a lens hood and soft case are available as optional extras. See our full review of the 18-200mm lens on SLRgear.com.
Lens Compatibility
The Canon EOS 60D will work with pretty much any EF-mount lens ever made, as well as with the special EF-S lenses designed for cameras with APS-C size sensors. Designed with a smaller image circle (the area covered by the image on the film/sensor plane), EF-S lenses tend to be smaller and lighter than full-frame models with the same focal length and maximum aperture. EF-S lenses can't be used on full-frame Canon cameras, nor on their models with 1.3x crop factors, like the current EOS-1D Mark III, but small-sensor cameras like the 60D can use any full-frame lenses in Canon's arsenal.
The sub-frame sensor on the Canon 60D means that it has a smaller angle of view (by a factor of 1/1.6x) than a full-frame camera with any given lens. While most properly called a "crop factor" or "focal length crop", the 1.6x ratio is most commonly referred to as the "focal length multiplier" since that's how it works in practice: Any lens used on the Canon 60D will have the same field of view as one with a 1.6x greater focal length will when attached to a 35mm camera. For example, a 100mm lens on the Canon 60D will show the same field of view as a 160mm lens on a camera with a 35mm frame size.
Lens Peripheral Illumination Correction
 The Canon 60D provides what the company calls Lens Peripheral Illumination Correction, which corrects for lens shading (commonly called "vignetting"), producing more uniform exposure across the frame by compensating for the light falloff seen with some lenses in the corners of the frame. Lens Peripheral Illumination Correction first appeared in the 50D and has since featured in several of Canon's consumer and enthusiast DSLRs. Peripheral Illumination Correction works with over 85 different Canon lens models, in both RAW and JPEG workflows. For JPEG shooting, the correction is made at capture time, while RAW shooters can access the function in Canon's Digital Photo Professional software, although Canon shooters should note that the latter approach offers the highest degree of correction. In-camera correction of JPEGs operates with somewhat reduced strength, especially when shooting at higher ISO sensitivities, given that the correction can make image noise more pronounced. From the factory, the 60D body ships with correction data for about 25 lens models. Canon's EOS Utility software allows correction data for lenses (including models as-yet unreleased) to be uploaded to the Canon 60D, up to a maximum of 40 lenses.
Autofocus
The Canon 60D's autofocus sensor is unchanged from that used in the previous 40D and 50D models. and features a 9-point diamond array, with nine cross-type f/5.6 autofocus points, meaning that they're all sensitive to vertical or horizontal lines. Nestled in the center is an additional precision dual-cross AF sensor that is arrayed diagonally and used when you mount a lens of f/2.8 or faster. All nine AF points can be selected automatically or manually, and the autofocus sensor has a working range of -0.5 to 18 EV (at 23�C / ISO 100). The Canon 60D includes the ability to detect the light source (including the color temperature and whether or not the light is pulsing), and then take these into account and microscopically shift the focus as necessary. Autofocus modes include One-shot, Predictive AI Servo AF, and AI Focus AF, which automatically selects between the One-shot and AI Servo modes. Of course, there is also a manual focus mode.
Unlike the 50D and 7D, the Canon 60D lacks a Lens AF Microadjustment custom function, which would allow you to tune the camera's autofocus system so as to compensate for lenses that back or front-focus. Not all lenses and bodies are tuned perfectly, but this tool can help make a lens / body pairing that yields slightly soft results a whole lot better. It's a disappointing omission, as its a feature available in some prominent models from competing manufacturers, at around the same price point.
 In Live View mode, the Canon 60D offers three autofocus modes ,as per other recent Canon digital SLRs. The first of these is what Canon refers to as Live Mode AF, whereby the camera applies contrast detection algorithms to the data streaming from the image sensor. This allows focusing without interrupting the live view, but has the disadvantage that it is significantly slower to achieve a focus lock, which makes it less useful for handheld photography, or when shooting moving subjects. The second mode is Face Detection Live Mode. As you may expect, this mode detects and focuses on human faces. If more than one face is detected, the multi-controller can be used to select a different face. Alternatively, in what Canon refers to as Quick Mode AF, the mirror is briefly dropped to allow an autofocus operation using the camera's phase detection autofocus sensor. This mode offers quick autofocusing, but with the disadvantage that there is an interruption of the live view stream during the AF operation. Live View mode also offers a selectable 5x / 10x magnified view of the selected focusing point when the photographer elects to focus manually.
AF-Assist Illuminator
 The Canon 60D uses the built-in flash head as its AF-assist illuminator, rather than a bright light built into the camera's body. (The small orange LED lamp on the front panel is used only for red-eye reduction, and as a self-timer indication.) In practice, this works well: the flash is quite bright, and probably has a longer range than an on-body illuminator bulb, being rated at 4 meters or 13.1 feet. If you attach a 550EX, 580EX or 580EX II external flash unit to the Canon 60D, its internal infrared AF-assist illuminator is used instead of the flash head itself, providing a useful working range of about 50 feet with a less obtrusive light source. For non-flash photography, Canon's ST-E2 wireless sync transmitter can also be used for AF assist. The ST-E2's AF-assist light has a useful range of about 25 feet.
Without an external strobe attached, and when in Creative Zone modes (Program, Priority, Manual, and Bulb), the internal strobe will fire its AF assist pulses if needed whenever the flash is raised. In the Basic Zone, AF Assist fires in all but Flash Off, Landscape or Sports scene modes.�It never fires in Movie mode, even before capture starts. Using Custom Function III-4, AF assist can be disabled altogether, set to fire from the external flash only, or set to fire with external strobes including an IR assist beam only. You can also prevent the 60D from firing either the internal flash or external Speedlites altogether, by going into the Flash Control menu. This still allows the AF-assist pulses to fire; but without flash capability until you turn it back on.
Dust Reduction Technology
 First introduced on the Canon Rebel XTi, Canon's system-wide approach to reducing the impact of dust on the image sensor is also included on the Canon 60D with a slight update to the anti-static coatings used.
A key feature of any SLR is the ability for the user to easily swap lenses. This expands creative options enormously, but every time the lens is removed, dust from the environment is free to enter the camera body. From there, it's only a matter of time before some of it makes its way to the surface of the sensor ,where it casts shadows that appear as dark blobs in your images. In truth, it's the anti-aliasing filter that collects dust, rather than the sensor itself, but common parlance refers to "sensor cleaning." For the sake of familiarity, we'll generally refer to sensor cleaning here, but will make mention of the anti-alias or low-pass filter as seems appropriate. Every DSLR ever sold has offered a sensor-cleaning mode, in which the mirror is locked up and the shutter opened to permit the sensor to be cleaned with compressed air, a solvent-carrying swab, or other means. As the market has matured and more DSLRs have found their way into the hands of novice users, it has become clear that some automated way of dealing with sensor cleaning is needed.
The principal approach other manufacturers have used to deal with dust has been to make the system self-cleaning, vibrating either the anti-aliasing filter itself or a protective cover glass lying above it, to shake loose adhering dust particles. Once dislodged, a strip of sticky material at the bottom of the sensor cavity or mirror box catches and holds them. This approach was pioneered by Olympus, but has since been adopted by Canon, Nikon, Pentax, Panasonic, and Sony, in various forms. Some cameras use a dedicated piezoelectric element to provide the vibration, while others perform double duty with the sensor shift mechanism used for their image stabilization, with widely varying vibration frequencies and efficacies. In addition, some manufacturers have adopted coatings on the low-pass filter intended to prevent dust particles from adhering in the first place.

 Dust reduction.�The Canon 60D includes Canon's EOS Integrated Cleaning System, first introduced on the EOS Rebel XTi camera. The camera's Self-Cleaning Sensor Unit uses a piezoelectric element to shake dust particles off of the low-pass filter in front of the sensor. The dust is then trapped by an adhesive strip along the base, preventing it from causing further nuisance. Cleaning is engaged each time the camera is powered up or shut down, or manually through the "clean now" function. The second part of the cleaning system involves post processing with a compatible personal computer and the supplied Digital Photo Professional software. Via a menu option, the camera maps any stubborn dust spots that remain on the sensor after cleaning, saving their locations as Dust Delete Data that can subsequently be used to subtract the spots during post-processing. A third option includes a manual sensor cleaning function which raises the mirror and allows users to clean dust that may have stuck to the low-pass filter.
No matter how good an automatic cleaning system, there�are�going to be some stubborn dust particles that it can't dislodge. To deal with these, the Canon 60D has the ability to shoot a dust reference photo, and then transfer that information to Canon's Digital Photo Professional software, which can use it to eliminate the shadows cast by dust particles on the images. Canon's "Dust Delete" processing works for both JPEG and RAW format files. The dust map ("Dust Delete data") that the software uses to perform its magic is stored in the headers of files created by the camera. There's thus no need to keep track of a separate dust image file, the information is always available in the file headers, assuming you've actually performed the dust-mapping process. You can update the Dust Delete data any time you think the camera might have been exposed to dust, or after you've manually cleaned the sensor. The latest dust map is automatically incorporated into the EXIF headers of all JPEG images, or the headers of any RAW files.
Located in Shooting Menu 3, the Dust Delete Data option displays a screen that shows when the last Dust Delete reference image was captured. Selecting OK on this screen initiates a cleaning cycle, after which the camera prompts you to take a picture of a blank white surface. (The camera automatically defocuses the lens and sets the aperture appropriately, to produce the best possible dust image.) The camera then processes this data, and reports whether it was successful or not. If the surface you used to capture the image wasn't sufficiently uniform, you'll get an error message, but if the image was good, you'll see a confirmation screen. The Dust Delete Data just generated will now be included in the headers of any JPEG or RAW images captured, until you decided to capture a new dust reference image.
Don't count on the anti-dust system to do everything, though.
Despite Canon's advanced anti-dust technology, we feel compelled to point out that we've thus far seen�no�anti-dust system that completely eliminates the need for sensor cleaning. Sooner or later, you're going to need to clean your sensor, so we strongly recommend purchasing a good-quality sensor cleaning kit right along with your DSLR. Automated anti-dust systems like Canon's will certainly help with some of the dust, typically the dust that the nylon brush-based cleaning systems can also handle. Inevitably, though, you'll encounter dust that sticks to the sensor's cover glass tenaciously; dust that only a wet/dry cleaning approach can remove. We ourselves use and recommend products from�Copper Hill, which we've found to be both highly effective and among the most reasonably priced on the market.
Canon 60D Optical Test Results
Below are the results of our optical tests with the bundled 18-135mm kit lens.
Kit Lens Test Results
Zoom
The Canon EF-S 18-135mm IS (Image Stabilized) kit lens offers better-than-average zoom ratio, with pretty good performance.
The Canon EF-S 18-135mm IS (Image Stabilized) kit lens offers better-than-average zoom ratio, with pretty good performance.
 |  |
| 18mm @ f/8 | 135mm @ f/8 |
The Canon 60D is offered with an EF-S 18-135mm f/3.5-5.6 IS kit lens, with a generous (for an SLR kit lens) optical zoom range of ~7.5x. The 35mm equivalent range is about 29-216mm, because of the 60D's 1.6x "crop factor". Sharpness is very good across most of the frame at 18mm, though there's moderately high chromatic aberration and some coma distortion visible in the corners. Corners are just a touch soft as well. Sharpness at full telephoto is quite good too, with excellent detail across the frame, though chromatic aberration is still a bit high. All in all, this is a pretty sharp optic for a kit lens especially considering the zoom range, and the built-in image stabilization will come in handy for low-light or telephoto shooting. While chromatic aberration is a bit high, it is easily corrected with some post-processing. Here's an example of the wide-angle shot above with most of the chromatic aberration removed in Adobe Camera Raw. You can also correct it with Canon's bundled DPP software.
Macro
A fairly large macro area with soft detail. Flash throttled down well.
A fairly large macro area with soft detail. Flash throttled down well.
 |  |
| Macro with 18-135mm IS Kit Lens | Macro with Flash |
The Canon 60D's macro performance will of course depend entirely on the lens in use. With the 18-135mm IS kit lens set to 135mm, the Canon 60D captured a fairly large (even for an SLR lens) minimum area measuring just 3.92 x 2.62 inches (100 x 67 millimeters). Details were pretty soft in the center, and softer still in the corners. (Most lenses have some softening in the corners at macro distances.) Some noticeable vignetting (corner shading) was also present. Both the softness and vignetting would likely improve by stopping down to f/8, though. (The above macro shots were taken at f/5.6.) The Canon 60D's flash throttled down for the macro area very well. There was no detectable shadow from the lens barrel, resulting in a good exposure with the flash.
Geometric Distortion
Higher than average barrel distortion at wide-angle and moderate pincushion distortion at telephoto with the 18-135mm IS kit lens.
Higher than average barrel distortion at wide-angle and moderate pincushion distortion at telephoto with the 18-135mm IS kit lens.
| Barrel distortion at 18mm is 1.2 percent |
 |
| Pincushion distortion at 135mm is 0.4 percent |
 |
The Canon EF-S 18-135mm IS lens produced about 1.2 percent barrel distortion at wide-angle, which is higher than average and noticeable in some of its images. At the telephoto end, there was about 0.4% pincushion distortion, which is also higher than average though not quite as noticeable. The Canon 60D does not appear to be correcting for any geometric distortion in its JPEGs, as uncorrected RAW files have identical amounts. Geometric Distortion is the tendency for the lens to bend straight lines outward (like a barrel -- usually at wide-angle) or inward (like a pincushion -- usually at telephoto).
Chromatic Aberration and Corner Sharpness
Moderately high chromatic aberration at wide-angle and telephoto with the 18-135mm IS kit lens. Only slight softening in the corners.
Moderately high chromatic aberration at wide-angle and telephoto with the 18-135mm IS kit lens. Only slight softening in the corners.
 |  |
| Wide: Upper right C.A.: Moderately high and bright Softness: Slightly soft | Wide: Center C.A.: Moderate Softness: Sharp |
 |  |
| Tele: Upper right C.A.: Moderately high and bright Softness: Slightly soft | Tele: Center C.A.: Very low Softness: Sharp |
Chromatic Aberration. Chromatic aberration in the corners with the Canon 60D's 18-135mm kit lens is moderately high at both wide-angle (18mm) and telephoto (135mm) settings. The amount and intensity of the color fringing reduces as you move toward the center of the image, but is still slightly evident in the center at wide-angle. C.A. is negligible in the center at full telephoto. The Canon 60D does not appear to be correcting for C.A. in its JPEGs, as uncorrected RAW files exhibit similar amounts.
Corner Softness. The Canon 60D's 18-135mm IS kit lens produced some slightly soft corners in a few shots. At full wide-angle, corners on the right side of our test targets were somewhat softer than the center, but the blurring didn't extended very far into the frame. The left side, however, showed less softening in the corners. The center of the image was quite sharp. At full telephoto, all four corners were only slightly soft with the top right being the softest. The image was pretty sharp in the center. There is also some corner shading or "vignetting" wide-open, as evident by the darker corner crops above.
Overall, a pretty good performance for a kit lens here, especially one with a 7.5x zoom ratio. Also keep in mind the above lab target shots are taken with the lens "wide-open" and sharpness and corner shading generally improve when a lens is "stopped-down" a couple of f-stops from full aperture. The main optical issues with this lens are chromatic aberration, corner-shading and geometric distortion, all of which can be corrected for or reduced in most advanced image editing software. As mentioned previously, the Canon 60D has the capability of reducing corner shading automatically in-camera by enabling Peripheral Illumination Correction.
Canon 60D Exposure
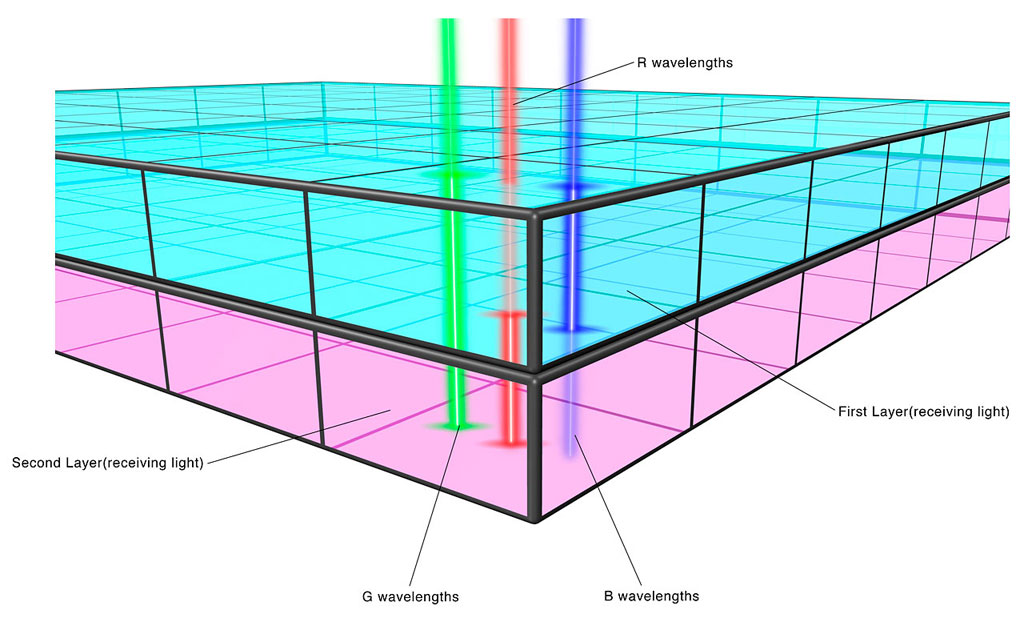 The Canon 60D adopts the same exposure system which debuted in the company's flagship APS-C format digital SLR, the EOS 7D. Dubbed IFCL -- which stands for Intelligent Focus, Color, Luminance -- the new metering system takes into not only account subject luminance, but also both color information and focus distance. Because silicon light sensors are significantly more sensitive to longer-wavelength light, unless an exposure sensor's response is substantially tweaked via a filter system of some sort (which naturally decreases sensitivity), it will tend to underexpose red-colored objects or scenes, and overexpose ones dominated by blue or green hues. To prevent this issue, the 60D takes advantage of color information provided by its dual-layer autoexposure sensor, with the upper layer being sensitive to Blue/Green light, and the lower layer to Green/Red light. The Canon 60D should hence be able to markedly improve exposure accuracy in situations where the subject is dominated by colors at one end or the other of the color spectrum.
 The Canon 60D's autoexposure sensor divides the frame into 63 separate zones, the data from which can be evaluated in a variety of ways, depending on the AE mode you're operating in. AE and AF zones are aligned, allowing exposure information to be associated with specific AF sensors and the area around them.
The 60D's AE system also integrates distance information from the autofocus system into the exposure metering process, thanks to a rather clever assumption: If you've identified the subject as being located a certain distance away from the camera, nearby objects that are close to the same distance are most likely part of the subject, too. Thus, rather than simply relying on a spot AE reading centered on the primary AF point, or blindly combining exposure information from a cluster of AE points in some arbitrary geometric grouping around the active AF point, the Canon 60D instead gives stronger weighting to exposure sensor segments that lie beneath adjacent AF points showing a similar distance reading.
Although we've not had confirmation of this from Canon, we suspect that the color-sensitive capability of the new AE sensor plays a role here too: It seems highly likely that the 60D's exposure system takes color into account and considers contiguous areas of similar color to be an indication of the extent of the subject as well.
Metering Options
The Canon 60D's exposure metering options include 63-zone Evaluative, Center-weighted Average, Partial (6.5% of viewfinder at center), and Spot (2.8% of viewfinder) options. Metering sensitivity range is specified at 1-20 EV (at 23°C/73°F, with EF 50mm f/1.4 USM lens, ISO 100).
The Canon 60D's Exposure Compensation setting allows the user to increase or decrease the metered exposure by up to five stops positively or negatively, in one-third or one-half EV increments -- a much more useful range than the two stops either side of nominal exposure offered in the previous 50D model. Although Evaluative metering is linked to the active AF point (whether automatically or manually selected), Spot metering is fixed to the center of the viewfinder (unlike Nikon SLRs, which can spot meter at any selected AF point).
 |
Here you can see the coverage of the 60D's four metering modes, accompanied by the positions of the nine autofocus points. From left to right: 63-zone Evaluative, Center-weighted Average, 6.5% Partial, and 2.8% Spot metering.
|
In Live View mode, evaluative metering is always used, however Canon does not specify how many zones. The sensitivity range for Live View metering is specified at 0-20 EV (again, at 23°C/73°F, with EF 50mm f/1.4 USM lens, ISO 100).When Face Detection AF is enabled in Live View mode, the Canon 60D biases the exposure in an attempt to properly expose for a detected face.
ISO Sensitivity Options
 The Canon 60D offers regular ISO equivalents of 100, 200, 400, 800, 1,600, 3,200 and 6,400, with the option to use fractional settings in 1/3-EV increments (100, 125, 160...). The EOS 60D also offers a high-range ISO setting enabled when ISO Expansion is turned on, which is equivalent to ISO 12,800. An Auto ISO mode adjusts the ISO as the camera deems necessary, from 100 to 6,400 in Creative Zone modes, or 100 to 3,200 in Basic Zone modes. When shooting in Creative Zone modes, it's possible to set an upper limit on the Auto ISO range. This upper limit can be set to any sensitivity between ISO 400 and ISO 6,400, but you can't specify the minimum shutter speed the camera should use before raising the ISO. The limit is ignored for flash photography, unless using bounce flash with an external Speedlite flash strobe. Auto ISO when using a flash defaults to ISO 400, but will throttle down as low as ISO 100 to prevent overexposure, and will range as high as ISO 1,600 for bounce flash, if allowed by the Auto ISO limit.
Automatic Exposure Bracketing
 An automatic exposure bracketing feature lets you set the Canon 60D's total exposure variation (across three shots) at anywhere from +/- one-third or one-half EV, up to +/- 3 EV, a rather wider range than was available in the 50D. Exposure bracketing and exposure compensation are additive, in other words the automatic variation is centered around whatever level of manual exposure compensation you have dialed in. Thus, you could manually set a positive exposure compensation of 1 EV, and then have the camera give you a variation of +/- 2/3 EV around that point. (This also means that the bracketed exposures can go outside of the standard exposure compensation range, allowing one shot as far as 8 EV from the metered exposure.) The number of shots in a sequence is fixed to three, and the sequence order can be changed to either 0, -, + (metered, under, over), or -, 0, + (under, metered, over).
AE/FE Lock (" * " button)
 The Canon 60D has the same simplified AE Lock button as the 40D, which unbundled the AF Lock feature from the old button on the older EOS cameras like the 20D and 30D. Marked with an asterisk (*) symbol, the AE Lock button simply holds the exposure at one setting while you recompose the image, at least by default. (More on that in a minute.). It's very useful when spot metering, but also when dealing with subjects where you want to draw your exposure from one place, while autofocusing on another. The exposure remains locked for as long as the metering system is active, and if you need to maintain the same exposure across multiple shots with a longer duration between each frame, then you can simply hold down the AE Lock button. Pressing the button with the pop-up flash activated or with an external flash mounted activates the FE Lock (Flash Exposure) function, which fires the flash and locks the proper exposure for the following frame.
AF-ON button
 By default, the AF-ON button allows you to set focus before depressing the shutter button. On pressing the AF-On button, the 60D's metering system will come to life, and autofocus will begin. If you release the AF-On button, then the camera will release the metering lock, and will refocus if you subsequently press the Shutter button. If you keep the AF-On button depressed, though, then the Shutter button will simply initiate the exposure, with focus and metering remaining as set when the AF-On button was pressed. This default behavior can be changed in a variety of ways, as described momentarily.
The AF-ON button also controls autofocus operations in Live View and Movie shooting. The Canon 60D now has two styles of autofocus operation in Live View mode: the standard phase detection method, which requires the reflex mirror to be briefly swung back into the optical path, thus disrupting the live view briefly, or a contrast detection method which does not. Both methods have their advantages and disadvantages, but the contrast-detect method offers an uninterrupted user experience. A third method incorporates a face detection into the contrast detection method, offering the face-detecting mode of autofocus now commonly seen on consumer point-and-shoot cameras. The same three choices are available in Movie shooting, although phase detection isn't available during movie capture. If set to use phase detection AF before recording, the 60D will seamlessly switch to using contrast detection after the recording is started.
Control Customization
 Through Custom Function IV-1, the behavior of the Shutter, AF-On, and AE Lock buttons can be changed. By default, autofocus and metering are initiated with a half-press of the shutter button or the AF-On button, while a single press of the AE Lock button locks exposure until the 60D's metering system powers down. There are no less than eight alternatives to this behavior. The first unbundles focus functions from the shutter button, so that the AF-On button must be used to lock focus. The second option does the same, but switches the functions of the AF-On and AE Lock buttons. A third option locks exposure with either the AE Lock button or a shutter button half-press, while AF and metering are handled by the AF-On button. Option four again reverses the functionality of the AF-On and AE Lock buttons from the third option. The fifth options replicates the second one, but also triggers autofocus with a half press of the shutter button. Option six uses the shutter button to start metering and autofocus, the AF-On button to cease autofocus operation, and the AE Lock button as its name would suggest. The next option again reverses the behavior of the AF-On and AE Lock buttons. Option eight is similar to number six, but disables the AF-On button altogether. Finally, option nine instead disables the AE Lock button, and uses the AF-On button for this function instead.
 Custom Function IV-2 allows functions to be assigned to the Set button, located in the center of the Multi-controller. By default, this button serves no purpose in Record mode. If desired, however, it can provide quick access to image quality, picture style, white balance, flash exposure compensation, or viewfinder electronic level functions. When set to this last, information from the single-axis roll level is used to provide a level display using the exposure level scale in the viewfinder. Finally, Custom Function IV-3 allows the direction of the Main and Quick Control dials to be reversed when adjusting the Aperture or Shutter values in Priority, Manual, or Bulb-mode shooting. Rather counterintuitively, this option is ignored when in movie mode, and doesn't affect dial rotation for exposure compensation, nor for Program Shift.
 In Movie mode, there is similar functionality to Custom Function IV-1, but it is set through an option in the Movie menu, since the Custom Function menu can't be accessed in Movie mode. The option set here is separate from that for still image shooting, allowing different control mappings in each mode. A separate option allows autofocus with the shutter button to be enabled or disabled in Movie mode.
White Balance Options
 As you'd expect, the Canon 60D offers a full range of White Balance settings, including an Auto setting, six presets, and a Custom setting. The six presets include Daylight (5,200K), Shade (7,000K), Cloudy (6,000K), Tungsten (3,200K), White Fluorescent (4,000K), and Flash (6,000K). The Custom setting bases color balance on a previous exposure, meaning you can snap an image of a white card and then base the color temperature on that image. There's also a direct Kelvin color temperature setting, which can be set within 100K steps, from 2,500 to 10,000K.
A fairly sophisticated White Balance Shift tool lets you shift the color balance toward more or less green, amber, magenta, or blue, using a +/-9 step grid format. You move a highlighted square through the grid to adjust the color balance. Also available is a White Balance bracketing option, which snaps only one image, then writes three successive files from that single exposure. Bracketing steps are from +/- 3 stops in whole-stop increments. (Each stop corresponds to five mireds of a color conversion filter, for a total range of +/- 15 mireds. This corresponds to about a +/- 500K shift at a normal daylight color temperature of 5,500K.) WB Bracketing is set on the same grid as the White Balance correction grid.
Picture Styles
 As with other recent Canon DSLRs, the Canon 60D offers a Picture Style option through the LCD menu, which lets you select from Standard, Portrait, Landscape, Neutral, Faithful, Monochrome, or three User Defined settings. In each of the preset modes, the Contrast, Saturation, Sharpness, and Color Tone are set for specific conditions. For Monochrome, Saturation is replaced with Filter effect (options are: None, Yellow, Orange, Red or Green), and Color Tone is replaced with Toning Effect (None, Sepia, Blue, Purple or Green). The three User Defined options let you manually adjust each variable, then save it as a custom parameter. Of course, you can also set the camera's color space to sRGB or Adobe RGB.
Auto Lighting Optimizer (ALO)
 First seen on the Rebel XSi, Canon's Auto Lighting Optimizer (ALO) function lets you expose for the highlights, preserving detail there, while the camera adjusts the image to open up the shadows. This happens on the fly, as the files are being written to the memory card, so there's no post-capture intervention by the user required to take advantage of this function. We weren't terribly impressed with ALO on the XSi, however newer Canon models including the 60D offer four different settings for it, and the control on the 60D seems quite effective. The ALO setting is made via Record Menu 2, where you can select options of Disable, Low, Standard (the default), or Strong.
Highlight Tone Priority (HTP)
 Also included on the Canon 60D is Highlight Tone Priority (HTP for short), a feature that's been on Canon SLRs for some time now, and one that works quite well when dealing with subjects with important detail in strong highlights. (Think of the standard wedding dress shot, and you'll get the idea.) Digital cameras normally expose more like slide film: Once you hit a certain exposure level, detail just vanishes. This really becomes an issue when you're dealing with contrasty lighting and a subject with lots of highlights in it.
HTP's action is pretty subtle, but the results are very evident when dealing with strong highlights under harsh lighting. The way it works is to set the camera's base ISO up one notch, to 200, so it's only half-filling the sensor's pixels with charge during the exposure. The Canon 60D then alters its tone curve, basically compressing the top half (that would normally be blown out) into a smaller range, thereby preserving the highlight detail. You can do this yourself when working from RAW files, you just need to significantly underexpose most of the scene, and then fiddle with the tone curve to drastically reduce the contrast, but only in the extreme highlights. If that sounds difficult, it is; it can be a real time-sink, and very difficult to make the end result look natural. Canon's HTP does this for you automatically, though, and the results look just great: You have no sense that the camera has been making radical adjustments to its tone curve; you just see all the detail in the highlights that otherwise would be missing. HTP is controlled via Custom Function setting II-3, giving you options to Disable (the default) or Enable it.
Noise Reduction Options
 The Canon 60D offers two types of adjustable noise reduction. Long Exposure noise reduction can be performed for exposures one second or longer, and works by taking a second "dark frame" of equal duration with the shutter closed, and then subtracting it from the first frame. This reduces or eliminates most noise generated by the sensor during long exposures at low ISOs, but can make noise worse at higher ISOs (at ISO 1,600 and above). Available settings are Off, Auto and On, and are accessed from Custom Function II-1. The Off setting is the default. The 60D also offers the user four levels of high ISO sensitivity noise reduction. Options are Standard, Low, Strong, and Disable, with Standard being the default. Though the name implies this noise reduction is only applied at high ISOs, the Canon 60D applies it to all ISOs. This explains why the 60D's chroma noise in shadows and darker tones is lower than most DSLRs at low ISOs, when using the default Standard setting. These settings are accessed in Custom Function II-2. High ISO noise reduction is not applied to RAW files.
Continuous Shooting Mode and Self-Timer
 The Canon 60D's Continuous Shooting mode is rated by Canon at 5.3 frames per second in high speed mode, for a total of 58 Large/Fine JPEG shots or 16 RAW before the buffer fills, or 3 frames per second in low speed mode. When shooting JPEGs of a very complex scene with a lot of sharp, fine detail may also compress less and result in lower buffer capacities, as was seen in our testing.
The camera's Drive setting also accesses two Self-Timer modes, which open the shutter 10 or 2 seconds after the Shutter button is pressed, giving you time to dash around in front of the camera. Either Self-Timer mode can also be used with an optional RC-6, RC-5, or RC-1 infra-red remote control unit, allowing an image to be captured immediately or with a two-second delay after pressing the remote's shutter release button.
Canon EOS 60D Performance
Timing and Performance
Average to very good speed for a prosumer digital SLR.
Startup/Shutdown
| ||
Power on
to first shot |
~0.4 second
|
Time it takes to turn on and capture a shot. (Short enough that it's hard to measure.)
|
Shutdown
|
~0 seconds
|
How long it takes camera to turn off before you can remove the memory card.
|
Buffer clearing time
|
19 seconds
after 34 large/fine JPEGs* |
Worst case buffer clearing time. -- This is the delay after a set of shots before you can remove the card.
|
22 seconds
after 15 RAW files* | ||
24 seconds
after 7 RAW+L/F JPEG files* | ||
*Note: Buffer clearing times measured with a SanDisk Extreme III 30MB/sec 8GB SDHC card. Slower cards will produce correspondingly slower clearing times. Slow cards may also limit length of bursts in continuous mode. ISO sensitivity and noise reduction settings can also affect cycle times and burst mode performance.
| ||
The Canon 60D turned in a average startup time for an SLR, which is to say fast enough that it's difficult to measure. Sensor cleaning was enabled on start-up and shut-down, though at start-up pressing the shutter button aborts sensor cleaning, as it should. The Canon 60D's buffer clearing times were long but not a surprise given the buffer size and file sizes. Note that the Canon 60D manual says "SDHC and SDXC cards featuring UHS (Ultra High Speed) enable a maximum writing speed of SD Speed Class 10". We asked Canon for clarification on this, and they said the Canon 60D is not UHS-I compliant but should work with UHS cards at up to SD Class 10 speeds.
| Mode Switching | ||
|---|---|---|
Play to Record,
first shot |
~0.3 second
|
Time until first shot is captured.
|
Record to play
|
~1.2 seconds
|
Time to display a large/fine file immediately after capture.
|
Display
recorded image |
~0.7 second
|
Time to display a large/fine file already on the memory card.
|
The Canon 60D's mode switching times are good, though Record to play is a bit sluggish.
| Shutter Response (Lag Time) | ||
|---|---|---|
Full Autofocus
Single-point AF Optical Viewfinder |
0.253 second
|
Time from fully pressing shutter button to image capture. (All AF timing measured with Sigma 70mm f/2.8 Macro lens.)
|
Full Autofocus
Auto Selection AF Optical Viewfinder |
0.159 second
|
Time from fully pressing shutter button to image capture.
|
Full Autofocus
Single-point AF TTL flash enabled Optical Viewfinder |
0.292 second
|
Time to capture while forcing flash to fire. Metering pulses from flash often slow shutter response.
|
Prefocused
Optical Viewfinder |
0.063 second
|
Time to capture, after half-pressing and holding shutter button.
|
Continuous AF
Optical Viewfinder |
0.251 second
|
This mode usually shows no speed increase with our static subject; we have no way to measure performance with moving subjects.
|
Manual Focus
Optical Viewfinder |
0.083 second
|
For most cameras, shutter lag is less in manual focus than autofocus, but usually not as fast as when the camera is "prefocused".
|
Live View
| ||
Full Autofocus
Live View "Quick Mode" (Phase Detect) |
0.999 second
|
Time from fully pressing shutter button to image capture. This is phase-detect autofocus, the camera drops the mirror to focus, then raises it to grab the shot.
|
Full Autofocus
Live View "Live Mode" (Contrast Detect) |
1.100 seconds
|
Time from fully pressing shutter button to image capture. This is contrast-detect autofocus, the camera reads Live View data from the image sensor to determine focus.
|
Prefocused
Live View |
0.122 second
|
Time to capture, after half-pressing and holding shutter button.
|
The Canon 60D's full autofocus shutter response using our standard single-point AF test was slightly slower than average for an SLR, at 0.253 second. Interestingly, switching to auto selection AF and allowing the camera to choose the focus point reduced shutter lag to 0.159 second, which is very good. As expected, enabling the built-in flash increased full AF lag a bit, to 0.292 second. (The camera emits flash metering pulses and analyses the results before taking the final flash exposure.) "Prefocusing" the camera by half-pressing and holding down the shutter button before the final exposure resulted in a lag time of only 0.063 second which is very good for a prosumer SLR. Shutter lag in Manual focus was a bit slower than prefocused, at 0.083 second, which is still quite fast. In Continuous focus mode, shutter lag was 0.251 second.
The Canon 60D's AF lag times in Live View mode were longer than using the optical viewfinder (as expected). We measured 0.999 second using "Quick Mode" which is a bit slow for phase-detect AF, and 1.10 seconds using Live Mode AF which is pretty good for contrast-detect on an SLR. Prefocused, the Canon 60D's shutter lag was very fast for Live View mode, at 0.122 second.
To minimize the effect of different lens' focusing speed, we test AF-active shutter lag with the lens already set to the correct focal distance. We also use the same Sigma 70mm f/2.8 macro with every camera (on all platforms except Four Thirds/Micro Four Thirds and Nikon consumer models lacking an in-body focus motor), to further reduce variation, and because our tests showed that focus-determination time with this lens was close to the fastest, across multiple camera bodies from different manufacturers. Being an older design with a non-ultrasonic motor, it wouldn't be the fastest at slewing from one focus setting to another, but that's exactly the reason we measure focus determination speed, which is primarily a function of the camera body, vs focus adjustment speed, which is primarily a function of the lens.
| Cycle Time (shot to shot) | ||
|---|---|---|
Single Shot mode
Large/Fine JPEG |
0.25 second
|
Time per shot, averaged over >20 shots, 0.3 second to clear.
|
Single Shot mode
RAW |
0.24 second
|
Time per shot, averaged over 14 shots, 22 seconds to clear.
|
Single Shot mode
RAW + Large/Fine JPEG |
0.24 second
|
Time per shot, averaged over 7 shots, 24 seconds to clear.
|
Early shutter
penalty? |
No
|
Some cameras don't snap another shot if you release and press the shutter too quickly in Single Shot mode, making "No" the preferred answer.
|
Continuous Hi mode
Large/Fine JPEG |
0.19 second (5.26 frames per second);
34 frames total; 19 seconds to clear* |
Time per shot, averaged over 34 shot buffer capacity, then slowed to an average of 0.99 second or 1.01 frames per second when buffer was full, with a lot of variation.
|
Continuous Hi mode
RAW |
0.19 second (5.32 frames per second);
15 frames total; 22 seconds to clear* |
Time per shot, averaged over 15 shot buffer capacity, then slowed to an average of 1.55 seconds or 0.65 frames per second when buffer was full, with a lot of variation.
|
Continuous Hi mode
RAW + Large/Fine JPEG |
0.19 second (5.36 frames per second);
7 frames total; 24 seconds to clear* |
Time per shot, averaged over 7 shot buffer capacity, then slowed to an average of 1.55 seconds or 0.65 frames per second when buffer was full, with a lot of variation.
|
Flash recycling
|
2.6 seconds
|
Flash at maximum output.
|
*Note: Buffer clearing times measured with a SanDisk Extreme III 30MB/sec 8GB SDHC card. Slower cards will produce correspondingly slower clearing times. Slow cards may also limit length of bursts in continuous mode. ISO sensitivity and noise reduction settings can also affect cycle times and burst mode performance.
| ||
Shot-to-shot cycle times in the Canon 60D's single-shot mode were very good for an SLR, at about 0.25 second for any quality. Buffer length was more than 20 shots for JPEGs, but dropped to 14 for RAW and 7 for RAW+ Large/Fine JPEGs in single-shot mode.
Continuous mode speeds were about average for a prosumer model these days, and they matched Canon's specification of about 5.3 frames/second in any quality mode. A low-speed continuous mode is also available, rated at 3 frames/second.
Measured buffer depths in high-speed continuous mode were good at 34 frames for large/fine JPEGs, 15 frames for RAW mode and 7 frames for RAW+ L/F JPEG. (Note that in our cycle time testing we shoot a target consisting of a fine-grained digital noise pattern, designed to be very hard to compress. This gives us worst-case buffer capacity numbers: You're likely to see greater buffer capacity when shooting more normal subjects.)
The Canon 60D's flash took an average of 2.6 seconds to recharge after a full-power discharge. This is very good, though it varied a lot (from 1.09 to 3.14 seconds) in our testing.
| Download Speed | ||
|---|---|---|
Windows Computer, USB 2.0
|
8,505 KBytes/sec
|
Typical Values:Less than 600=USB 1.1;
600-769=USB 2.0 Low; Above 770=USB 2.0 High |
Connected to a computer or printer with USB 2.0, the Canon 60D's download speeds were quite fast.
Bottom line, the Canon 60D was average to slightly faster than average in most aspects of its operation for a prosumer SLR. While continuous mode speeds weren't state-of-the-art, they are fast enough for most moving subjects, and shutter lag and cycle times were quite good. Buffer sizes were good, especially considering the size of its 18-megapixel files, though clearing times were sluggish with our 30MB/s SDHC card.
Battery and Storage Capacity
Battery
Excellent battery life for a lithium-ion SLR design.
Excellent battery life for a lithium-ion SLR design.
| Operating Mode | Number of Shots |
|---|---|
Lithium-ion Rechargeable Battery,
(CIPA standard, Optical Viewfinder) |
1,100
|
Lithium-ion Rechargeable Battery,
(CIPA standard, Live View LCD) |
320
|
The Canon 60D uses a custom rechargeable lithium-ion battery for power, and ships with a charger. Battery life is well above average when using the optical viewfinder, though as expected, Live View really taxes the battery, so we recommend you pick up a spare battery and keep it freshly charged and on-hand for extended outings.
The table above shows the number of shots the Canon 60D is capable of (on a fully-charged rechargeable battery), based on CIPA battery-life and/or manufacturer standard test conditions.
(Interested readers can find an English translation of the CIPA DC-002 standards document here. (180K PDF document))
Storage
The Canon 60D accepts SD/SDHC/SDXC memory cards, and does not ship with a card. Canon recommends a Class 6 card or faster for recording HD movies. UHS-I compliant cards are supported, but the camera does not take advantage of their increased bus speeds.
The Canon 60D accepts SD/SDHC/SDXC memory cards, and does not ship with a card. Canon recommends a Class 6 card or faster for recording HD movies. UHS-I compliant cards are supported, but the camera does not take advantage of their increased bus speeds.
| Image Capacity with 1GB Memory Card | Fine | Normal | RAW | MRAW | SRAW | RAW + L/F JPEG | |
|---|---|---|---|---|---|---|---|
5,184 x 3,456
|
Images
(Avg Size) |
122
8.4 MB |
247
4.1 MB |
32
31.5 MB | - | - |
25
41.0 MB |
Approx.
Comp. |
6:1
|
13:1
|
1.0:1
| - | - |
-
| |
3,456 x 2,304
|
Images
(Avg Size) |
235
4.4 MB |
482
2.1 MB |
-
| 47 21.6 MB | - |
35
29.3 MB |
Approx.
Comp. |
6:1
|
11:1
|
-
| 0.6:1 | - |
-
| |
2,592 x 1,728
|
Images
(Avg Size) |
417
2.5 MB |
795
1.3 MB |
-
| - | 75 13.7 MB |
45
22.8 MB |
Approx.
Comp. |
6:1
|
10:1
|
-
| - | 0.6:1 |
-
| |
We strongly recommend buying a fast, large capacity SDHC/SDXC memory card for the Canon 60D: at least a 4GB card, preferably a 8 or 16GB one, to give yourself extra space for extended outings, or when shooting RAW files or video. (Check the shopping link above, cards are really cheap these days, so no reason to skimp.)
Canon 60D Video Recording
High-definition video capture has become commonplace in digital SLRs across the board, all the way from models aimed at amateurs and the budget-conscious to those intended for professional use. The precise feature set on offer varies widely, however, and along with this the utility of video capture for a variety of purposes.
The Canon EOS 60D offers an unusually robust feature set that gives the photographer plenty of control over both the video and audio portions of movie capture. Both shutter and aperture are available for manual control, and the 60D also provides multiple frame rate options, including three that match HD television timing specs. It's also possible to capture sound from an external microphone, as an alternative to the internal monaural mic, and even to control audio recording levels manually, a very useful but equally rare capability among current video-capable DSLRs. Like most digital SLR video modes, the Canon 60D doesn't allow continuous autofocus during video recording, but it does offer the ability to perform single AF operations, albeit with AF noise clearly picked up by the 60D's internal microphone.
Canon EOS 60D Video: Image Size, Frame Rate, and Encoding

Video capability. The Canon EOS 60D offers three resolution levels for video recording, with various frame rates available depending on encoding and resolution.
Individual movie clips captured by the Canon EOS 60D are limited to a maximum of 29 minutes, 59 seconds, thanks to European tax regulations, although as it turns out, the 4GB limit on video file sizes will in practice restrict you to shorter movie clips anyway. The Canon 60D records its movies as .MOV files using variable bitrate MPEG-4 AVC / H.264 compression, which is much more conservative of memory card space than the Motion JPEG format used by some cameras, and avoids some of the severe image quality loss suffered by AVCHD cameras when faced with significant amounts of change in image content between frames. (AVCHD uses a subset of the H.264 standard, among other things mandating a limit in recording bandwidth, which translates into a lesser ability to convey rapidly-changing detail.) The choice of H.264 comes with the requirement of greater processing power, though -- not only from the camera when recording, but also when playing back or editing videos. The more sophisticated encoding used in the H.264 standard requires quite a bit of processor power to pull it apart and put it back together again, so frame-accurate editing of H.264 requires a fast processor and capable editing program.
Here's a list showing what to expect for file sizes with the Canon EOS 60D's video recording:
Canon 60D Video Options
| ||||
|---|---|---|---|---|
H.264 Format (.MOV file container)
| ||||
Resolution
|
Encoding
|
Frame Rate
|
Clip Length
|
File Size
|
1,920 x 1,088
(1080p Full HD) |
NTSC
|
24p (23.976 fps)
|
29 minutes,
59 seconds |
~330 MB/min
|
NTSC
|
30p (29.97 fps)
| |||
PAL
|
24p (23.976 fps)
| |||
PAL
|
25p (25 fps)
| |||
1,280 x 720
(720p HD) |
NTSC
|
60p (59.94 fps)
|
29 minutes,
59 seconds |
~330 MB/min
|
PAL
|
50p (50 fps)
| |||
640 x 480
(VGA SD) |
NTSC
|
60p (59.94 fps)
|
29 minutes,
59 seconds |
~165 MB/min
|
PAL
|
50p (50 fps)
| |||
Canon recommends using an SD card with at least a Class 6 rating to capture and playback movies.
Here are some examples of video from the Canon EOS 60D, showing typical results under daylight conditions.
Canon EOS 60D Video Samples
| |
|---|---|
 | |
 |  |
 |  |
Canon EOS 60D Video-Mode Focusing
Unlike some other video-capable digital SLRs, the Canon EOS 60D offers autofocusing during video recording, but it's only available in single servo mode. You can trigger a contrast-detect AF cycle either before or during a recording by pressing the AF-On button, or optionally, by half-pressing the shutter button. Depending on the lens and microphone in use, and the degree of focus adjustment required, AF noise is likely to be picked up on the audio track. (With the 18-135mm kit lens, and the 60D's internal microphone, AF noise is audible as a high-pitched whine.) You can also manually focus the lens during a recording, and the true manual operation of AF on Canon's lenses means you can do this more or less silently, simply by being careful about turning the focus ring. (Some cameras use "fly by wire" focusing, whereby the focus ring only instructs the camera to move the lens elements rather than moving them directly via a mechanical coupling. This can mean that small clicks are heard on the audio track every time the focus setting is changed, regardless of how slowly you turn the focus ring. With true manual operation of its lenses, the Canon EOS 60D doesn't have this problem, although it's possible that third-party or older Canon lenses might produce audible noise while their focus was adjusted.)
As we've noted in other SLR reviews, the good news with focusing for video is that you can get surprisingly good depth of field in video mode by stopping the lens down, thanks to the relatively low resolution of the video image, something that's possible with the 60D if you're also happy to manually set the shutter speed. (ISO sensitivity can still be controlled either automatically or manually, so it's still possible to let the camera handle the overall exposure level, while manually specifying the aperture and shutter speed.) With a pixel resolution of only 2.1 megapixels in the Canon EOS 60D's highest-resolution 1080p Full HD mode, 0.9 megapixels in 720p HD mode, and just 0.3 megapixels in VGA mode, images that would be unacceptably blurred as 18 megapixel still shots look perfectly fine as video frames. This not only provides greater depth of field at any given aperture, but is also more forgiving of diffraction limiting at very small lens apertures. Diffraction at small apertures means you'd usually want to avoid f/16 or f/22 for still images, but again, the results generally look perfectly fine at video resolutions. Bottom line, with the EOS 60D's lens set to f/16 or f/22 (assuming you're shooting under fairly bright conditions), you'll be surprised by how little focus adjustment is needed during a typical video recording. An example can be seen at the end of the video samples table above.
Note that if shooting with manual exposure and manual sensitivity, and your exposure level is too low for contrast detection AF, the 60D will automatically raise the exposure level sufficiently to allow AF, then drop it once the operation is complete. This sudden increase in brightness can be extremely noticeable in your recorded video.
Canon EOS 60D Depth of Field Control
| |
|---|---|
 |  |
Canon EOS 60D VGA Movie Crop
The Canon 60D's movie mode inherits an option previously seen on the consumer-class Rebel T2i, namely the VGA Movie Crop function, and at the time of this writing, we believe it to still be unique among SLR and SLD movie modes from any brand. The Movie Crop function aims to solve a problem faced by consumers: expensive telephoto lenses generally carry hefty price tags that place them far out of reach of the casual amateur. Ordinarily, the Canon 60D's movies are recorded using data from across the image sensor area. With Movie Crop mode enabled, however, the 60D instead crops only the centermost pixels from its sensor data for recording, and discards the rest. The feature is only available when recording at VGA (640 x 480 pixel) resolution, and yields an effective 7x magnification.
There's no free lunch, of course. While magnifying your subject to bring you close to the action, the Movie Crop mode also magnifies image defects. Since lens defects are generally most prominent towards the corners, the crop mode avoids the worst of these issues by using the sweet spot at the center of the lens. The effects of focus errors, diffraction limiting, and high ISO noise can prove another matter entirely. Videos shot in the VGA Crop mode are decidedly soft compared to the standard VGA mode, and can quickly get noisy if ambient lighting isn't ideal. For consumers and enthuisiastic amateurs, though, such defects will likely prove relatively acceptable, when compared to the cost of obtaining a lens of equivalent focal lengths.
Canon EOS 60D Video Exposure Control
Many video-capable SLRs only offer automatic exposure in their movie modes, but the Canon EOS 60D gives you a choice of either automatic or manual exposure modes. In Auto mode, the camera adjusts the shutter speed and aperture as needed for a correct exposure, keeping things simple. 3.0EV of exposure compensation is available in 1/3 EV steps, to ensure exposure is as intended. Auto exposure mode is the default when you first place the Mode dial in the Movie position, and Manual mode is accessed from the Movie Exposure option in Movie Menu 1.
In Manual mode, simultaneous control of both the shutter speed, aperture, and (optionally) the ISO sensitivity is possible. ISO can be set either in 1/3 EV or 1 EV steps, adjustable through the ISO Speed Setting Increments option in Movie Menu 1. The ability to control depth of field or freeze action is very useful, giving you significantly more creative control over your videos. (Given the slow default shutter times of most video-capable digital SLRs, the 60D included, a higher shutter speed to freeze fast motion is almost a necessity for good-quality video of anything moving.) Note, though, that although you can control shutter speed, this doesn't prevent the so-called "Jello effect", more properly known as rolling shutter artifacts. Like other digital SLRs, the progressive manner in which the Canon 60D clocks data off its sensor means that sudden camera or subject movements can cause distortion, although this is less of an issue for the 60D than in some cameras.
The Canon 60D's movie menus also allows you to enable or disable Highlight Tone Priority, and to set the Auto Lighting Optimizer function to Disable, Low, Standard, or Strong. The two functions can't be used together, and when enabled, Highlight Tone Priority restricts the ISO sensitivity range to ISO 200 - 6,400 equivalents. Highlight Tone Priority for movies works in much the same manner as it does for stills, by bumping the 60D's ISO up one notch, and then only half-filling the sensor's pixels with charge during the exposure. This is coupled with an altered tone curve to prevent loss of highlight detail, albeit at the expense of increased noise levels in shadows and mid-tones. Auto Lighting Optimizer functions at the other end of the scale, adjusting the tone curve so as to open up shadows. Picture styles and white balance can also be set for video recording, in much the same manner as for still images.
Canon EOS 60D Low-Light Shooting
|
|---|
 |
1,920 x 1,088, 24fps
Programmed Exposure, f/5.0, ISO 3,200 1 foot-candle (roughly equivalent to city street lighting at night) (14 seconds, 79.4 MB) |
Canon EOS 60D Video: Audio recording

External Mic. The EOS 60D's Mic jack resides on the camera's left side under a rubber panel, alongside the camera's other various connectors.
Like most competing SLRs with video recording capability, the Canon 60D sports an internal monaural microphone that can record an audio track. Internal mics are somewhat problematic, though, in that they're prone to picking up noise produced by moving your hands on the camera or actuating any controls while recording. We haven't noticed pronounced differences in how much camera-handling noise various models' internal mics pick up; the Canon 60D's seems fairly typical in that regard. In a big bonus for serious video users, the Canon EOS 60D also sports a microphone jack under a rubber flap on its left side, to which you can attach an external stereo microphone.
 Better still, the Canon 60D allows manual control of recording levels -- whether using the internal mic or an external one -- through the Sound Recording menu, which is accessed from Movie Menu 2. As of this writing, very few video-capable SLRs offer options for manual levels control. Instead, they generally adjust levels on the fly, which can prove distracting as the volume ramps up and down to account for changes in ambient noise levels. For this reason, pros would typically prefer to set levels themselves, and then make adjustments in post-processing where needed. With most DSLRs, the only way to do so is to record audio separately on a dedicated device, and then sync and replace the audio track in post processing.
To assist in setting levels, the 60D provides a stereo levels gauge, as shown in the screenshot above left. 64 levels of adjustment are available, and the recommended procedure when setting levels manually is to watch the gauge for a short period, adjusting levels so that the -12dB mark is reached only occasionally, and the 0dB mark is never exceeded. Of course, you can also let the 60D set levels automatically, in which case it behaves like most other video-capable DSLRs on the market. The same menu provides an optional wind filter which reduces low-frequency noise levels, and also allows audio recording to be disabled entirely through an option in Movie Menu 2.
Canon EOS 60D Movie Recording User Interface
The Canon EOS 60D's video mode is accessed via a dedicated position on the camera's mode dial. A Live View / Movie button to the right of the viewfinder is used to start and stop recording when the Mode dial is in the Movie position, and acts as a Live View button in other modes. Setting adjustments in movie mode are made via three dedicated Movie menus, which are only available when the camera is in Movie mode. Still images can be captured in Movie mode, interrupting the movie for about 1 second, by pressing the Shutter button. Autoexposure is used, unless manual exposure is chosen. Flash is not supported. It's possible to enable or disable autofocus using the Shutter button, and to assign a number of options to the shutter, AF-On and AE-Lock buttons, through Movie Menu 1. (The list of options mirrors that for still image shooting, and is detailed in full on the Modes & Menus page.)
In Playback mode, the Canon 60D allows you edit out or trim the first and/or last scenes of a movie, in one second increments. You can save the trimmed movie to a new file (if there is space on the card), or choose to overwrite the original. Movies can be played back at normal speed, or in slow-motion, with adjustable playback frame rate. There are "VCR" like controls for advancing to the next or last frame, or playing from the previous or first frame.
Computer Requirements for Viewing HD Video
A typical computer these days has little trouble dealing with still images, but high-definition video can be another matter. Depending on the file format involved, it can take a pretty beefy computer to handle HD-resolution video playback without stuttering or dropping frames. The AVC / H.264 image compression used by the Canon EOS 60D is one of the more compute-intensive formats, and its 1,920 x 1088 (1080p) resolution means there's a lot of data in each frame to deal with at full resolution. The net result is that you'll want a relatively recent and powerful computer to play full-res high-def video files from the EOS 60D on your computer. At lower resolutions, the requirements will be more modest. We found that we could run the 60D's video acceptably at half size on an older G5 Power Mac with dual 2.3GHz processors, so long as nothing else was running simultaneously, so it definitely seems less processor intensive than full HD video from many other cameras, including some using Motion JPEG compression.
You can of course view your movies on a TV, either via the composite A/V Output, or on an HDTV via the HDMI output. Both terminals cannot be used simultaneously.


No comments:
Post a Comment