| 24.10 Megapixels | Nikon F | APS-C size sensor |
|---|---|---|
 | ||
| Basic Specifications | |
|---|---|
| Full model name: | Nikon D5200 |
| Resolution: | 24.10 Megapixels |
| Sensor size: | APS-C (23.5mm x 15.6mm) |
| Kit Lens: | 3.00x zoom 18-55mm (27-83mm eq.) |
| Viewfinder: | Optical / LCD |
| Native ISO: | 100 - 6400 |
| Extended ISO: | 100 - 25,600 |
| Shutter: | 1/4000 - 30 seconds |
| Max Aperture: | 3.5 (kit lens) |
| Dimensions: | 5.1 x 3.9 x 3.1 in. (129 x 98 x 78 mm) |
| Weight: | 29.2 oz (827 g) includes batteries, kit lens |
| Availability: | 01/2013 |
| Manufacturer: | Nikon |
D5200 SUMMARY
With its easy-to-use, consumer-friendly design and relatively affordable price, the Nikon D5200 may technically be geared for beginners, but it also carries a considerable amount of photographic power within its compact, ergonomic body. The DSLR's sophisticated 24.1-megapixel sensor and imaging processor help it capture exceptional photos that rival those taken by more higher-end cameras, even in low light. Add in Full HD movie recording, a relatively fast burst shooting mode and a ton of advanced features, and the D5200 stands as one of the best DSLR investments a beginning photographer can make.
PROS
Captures sharp, detailed photos with its new 24.1-megapixel CMOS sensor, even at higher ISOs; Features a familiar (D5100) but refined body design; Records Full HD video with full-time autofocus tracking; Packs a ton of advanced features into a consumer-friendly body at a great price.
CONS
Autofocuses a little slowly for its class and struggles at times in low light; Changing some basic settings takes more time and effort than it should; Mediocre kit lens.
PRICE AND AVAILABILITY
The Nikon D5200 started shipping in the U.S. in late January 2013, priced at nearly US$900 in a kit with the AF-S DX NIKKOR 18-55mm f/3.5-5.6 VR lens. The kit is now readily available at retailers for US$800; or $700 body-only. The body is available in black, red or bronze.
IMAGING RESOURCE RATING
4.5 out of 5.0
Nikon D5200 Optics
Kit Lens Test Results
Zoom
Fair performance with the 18-55mm VR kit lens.
Fair performance with the 18-55mm VR kit lens.
 |  |
| 18mm, f/8 | 55mm, f/8 |
The Nikon D5200 comes bundled with the same Nikkor AF-S DX 18-55mm f/3.5-5.6G VR (Vibration Reduction) kit lens the D5100 did. This 3.1x zoom lens has a 35mm equivalent focal length of about 27-83mm because of the D5200's 1.5x "crop factor." Sharpness and contrast were fairly good across much of the frame at full wide-angle and f/8, though images were a touch soft overall. There's minor coma distortion and softening in the corners, though chromatic aberration wasn't an issue because it was suppressed by the D5200's image processor (see below). Results at full telephoto were also fairly good at f/8, with decent sharpness across most of the frame. Overall, not a bad performance for an inexpensive kit lens, but you'll likely want to invest in premium glass to get the most out of the D5200's 24-megapixel sensor.
Macro
An average-sized macro area with the kit lens, with good detail. Flash throttles down well.
An average-sized macro area with the kit lens, with good detail. Flash throttles down well.
 |  |
| Macro with 18-55mm Kit Lens 55mm, f/8 | Macro with Flash 55mm, f/8 |
The Nikon D5200 captured an average-sized macro area with the standard 18-55mm kit lens, measuring 2.46 x 1.64 inches (63 x 42 millimeters). Detail is actually pretty good, just a touch soft, and there is some minor additional softening in the corners despite being stopped down to f/8. (Most lenses have some softening in the corners at macro distances.) The Nikon D5200's flash throttled down well at minimum distance, resulting in a well exposed image with fairly even coverage.
Geometric Distortion
High barrel distortion at wide angle with the 18-55mm kit lens, though hardly any distortion at telephoto.
High barrel distortion at wide angle with the 18-55mm kit lens, though hardly any distortion at telephoto.
| Barrel distortion is 1.2 percent at 18mm |
 |
| Almost no pincushion distortion at 55mm |
 |
The Nikon D5200's 18-55mm kit lens produced about 1.2 percent barrel distortion at wide angle, which is higher than average and noticeable in its images. At the telephoto end, distortion was negligible with only one or two pixels worth of pincushion. This is the tendency for the lens to bend straight lines outward (like a barrel -- usually at wide-angle) or inward (like a pincushion -- usually at telephoto).
Auto Distortion Control
Low geometric distortion when Auto Distortion Control is enabled.
Low geometric distortion when Auto Distortion Control is enabled.
| Barrel distortion at 18mm is 0.3 percent |
 |
| Barrel distortion at 55mm is 0.1 percent |
 |
The Nikon D5200 offers an Auto Distortion Control feature to reduce geometric distortion automatically with most recent Nikkor lenses. As you can see it worked quite well with the 18-55mm lens, reducing barrel distortion at wide angle significantly, though some of the image was cropped away in the process. At the telephoto end, distortion was actually a bit higher than the uncorrected image, but still quite low. Since this option is database driven, it's only available for Nikkor D and G-type lenses with certain optics such as Fisheye and Perspective Control lenses excepted. Auto Distortion Control is Off by default.
You can also apply Auto or Manual Distortion Control to JPEGs after the fact, in the Retouch menu. Manual mode works with images from any lens.
Chromatic Aberration and Corner Sharpness
Low to moderately low C.A. in JPEGs, much higher in uncorrected RAW files at wide angle. Corners are soft at wide angle and telephoto with the kit lens.
Low to moderately low C.A. in JPEGs, much higher in uncorrected RAW files at wide angle. Corners are soft at wide angle and telephoto with the kit lens.
| Maximum Aperture | |
 |  |
| Wide, f/3.5: Upper left C.A.: Moderately low Softness: Soft | Wide, f/3.5: Center C.A.: Very low Softness: Fairly sharp |
 |  |
| Tele, f/5.6: Upper right C.A.: Low Softness: Soft | Tele, f/5.6: Center C.A.: Very low Softness: Soft |
Chromatic Aberration. Chromatic aberration was moderately low at the full wide angle setting of the Nikon D5200's 18-55mm VR kit lens, suppressed by the D5200's image processor. (See below for crops from uncorrected RAW files.) At telephoto, chromatic aberration was even lower and hardly detectable. (This distortion is visible as a slight colored fringe around the objects at the edges of the field of view on the resolution target.)
Corner Sharpness. The Nikon D5200's 18-55mm VR kit lens produced soft corners at full wide angle. All four corners were moderately soft at wide angle, with some of the softness likely stemming from C.A. suppression. Softness didn't extend very far in the frames, though, and the center was fairly sharp. At full telephoto, all four corners were also soft, with the upper right being the softest, but the lens is softer overall at telephoto than at wide angle.
Corner Shading. There's some moderate corner shading ("vignetting") at both ends of the zoom when wide-open, as indicated by the darker corner crops.
| f/8 Aperture | |
 |  |
| Wide, f/8: Upper left C.A.: Moderately low Softness: Minor blurring | Wide, f/8: Center C.A.: Very low Softness: Fairly sharp |
 |  |
| Tele, f/8: Upper right C.A.: Low Softness: Soft | Tele, f/8: Center C.A.: Very low Softness: Soft |
f/8. Stopped-down to an aperture of f/8, corner performance did improve markedly at wide angle, and sharpness in the center improved just slightly. Corners were still soft at telephoto, however, as was the center. Vignetting was negligible.
Uncorrected RAWHigher levels of C.A. at wide angle and telephoto from uncorrected RAW files.
| In-camera JPEG | Uncorrected RAW |
 |  |
| Wide: Upper left C.A.: Low | Wide: Upper left C.A.: High |
 |  |
| Tele: Upper left C.A.: Low | Tele: Upper left C.A.: Fairly low |
As you can see from the crops above comparing camera JPEGs to uncorrected RAW files (taken at f/8), levels of lateral chromatic aberration are much higher in uncorrected RAW files, particularly at wide angle.
Nikon D5200 Viewfinder
Viewfinder Test Results
Coverage
Slightly better than average coverage from the optical viewfinder. Fairly good accuracy from the LCD in Live View mode.
Slightly better than average coverage from the optical viewfinder. Fairly good accuracy from the LCD in Live View mode.
 |  |
60mm, Optical
|
60mm, Live View LCD
|
The Nikon D5200's optical viewfinder showed about 96 percent coverage with our reference Nikkor 60mm f/2.8 macro lens. This is a bit better than average for a consumer DSLR and exceeds Nikon's specification of 95% for the D5200, however the viewfinder image is slightly shifted horizontally compared to the imaging sensor, which unfortunately is not that uncommon in consumer models. In Live View mode, the Nikon D5200's LCD showed just over 98% coverage which is fairly good, though we often see 100% coverage in Live View mode.
Nikon D5200 Image Quality
Color
Saturation & Hue Accuracy
Good saturation levels and average hue accuracy.
Good saturation levels and average hue accuracy.
 | ||
ISO Sensitivity
| ||
| In the diagram above, the squares show the original color, and the circles show the color that the camera captured. More saturated colors are located toward the periphery of the graph. Hue changes as you travel around the center. Thus, hue-accurate, highly saturated colors appear as lines radiating from the center. Mouse over the links to compare ISOs. | ||
Skin tones. The Nikon D5200's Caucasian skin tones looked just about right when using manual white balance in simulated daylight. A very good job here. Where oversaturation is most problematic is on Caucasian skin tones, as it's very easy for these "memory colors" to be seen as too bright, too pink, too yellow, etc.
Hue. The Nikon D5200 did shift cyan toward blue, red toward orange, and light green toward yellow, but shifts were relatively minor. (The cyan to blue shift is very common among the digital cameras we test; we think it's a deliberate choice by camera engineers to produce better-looking sky colors.) With an average "delta-C" color error at base ISO of 5.2 after correction for saturation, overall hue accuracy was about average. Hue is "what color" the color is.
Saturation AdjustmentThe Nikon D5200 has a total of seven saturation levels available, three above and three below the default saturation, plus an Auto setting. This covers a pretty wide range of saturation levels, about as wide a range as you're likely to find photographically relevant, apart from special effects that are arguably better achieved in software. The fine steps between settings mean it's easy to program the camera to just the level of saturation you prefer. Saturation also doesn't impact contrast, which is ideal but not always the case.
| Saturation Adjustment Examples | ||||
 |  |  |  |  |
| -3 | -1 | 0 | +1 | +3 |
The table above shows results with several saturation settings, see the Thumbnails index page for more (look for the files named D5200OUTBSATx.JPG). Click on any thumbnail above to see the full-sized image.
 |  |  |
| See full set of test images with explanations See thumbnails of all test and gallery images | ||
Sensor
Exposure and White Balance
Indoors, incandescent lightingGood color with the Manual white balance setting, but overly-warm results with Auto and Incandescent. About average positive exposure compensation required.
 |  |
| Auto White Balance +0.3 EV | Incandescent White Balance +0.3 EV |
 | |
| Manual White Balance +0.3 EV |
Indoors, under normal incandescent lighting, color balance was very warm and reddish with the Auto white balance setting. (We'd say unacceptably so, though unfortunately this is common.) The Incandescent setting was also too warm, this time with a yellowish cast. The Manual setting by far produced the most accurate results, if just a touch cool. The Nikon D5200 required an average amount of positive exposure compensation here, at +0.3 EV. Our test lighting for this shot is a mixture of 60 and 100 watt household incandescent bulbs, a pretty yellow light source, but a very common one in typical home settings here in the U.S.
Outdoors, daylightExcellent results under harsh lighting, with very good handling of color and contrast, but the D5200 severely underexposed our "Sunlit" Portrait shots.
 |  |
| Manual White Balance, +1.3 EV | Auto White Balance, Default |
Outdoors, the Nikon D5200 performed well in terms of color and contrast, but it underexposed our "Sunlit" Portrait a lot more than most cameras do. The D5200 required +1.3 EV of exposure compensation to keep the mannequin's face fairly bright, while most cameras need about +0.7 EV. That's significantly below average performance. On the plus side, the camera did a very good job of holding onto detail in the highlights and deep shadows. We preferred skintones from the Manual white balance setting as they were a touch pinker than Auto, but both were pretty good. The Nikon D5200 slightly underexposed our far-field scene but in doing so avoided blowing almost all highlights, though it produced some dark shadows. Color outdoors was quite pleasing.
Resolution
Very high resolution, about 2,600 to 2,700 lines of strong detail from JPEGs, about 2,700 from ACR processed RAW files.
Very high resolution, about 2,600 to 2,700 lines of strong detail from JPEGs, about 2,700 from ACR processed RAW files.
 |  |
| Strong detail to ~2,600 lines horizontal Camera JPEG | Strong detail to ~2,700 lines vertical Camera JPEG |
 |  |
| Strong detail to ~2,700 lines horizontal ACR processed RAW | Strong detail to ~2,700 lines vertical ACR processed RAW |
Our laboratory resolution chart revealed sharp, distinct line patterns down to about 2,600 lines per picture height in the horizontal direction, and to about 2,700 lines in the vertical direction. Extinction of the pattern didn't occur until around 3,400 to 3,500 lines in both directions. We were able to do a bit better with NEF files processed through Adobe Camera Raw, with the horizontal direction showing about 2,700 lines, the vertical about 2,700 lines, while complete extinction of the pattern was extended up to the 4,000 line limit of our chart. As usual, color moire was much more evident in the converted RAW files. Use these numbers to compare with other cameras of similar resolution, or use them to see just what higher resolution can mean in terms of potential detail.
Sharpness & Detail
Slightly soft images but with very good detail. Minor edge-enhancement artifacts visible on high-contrast subjects. Moderate noise suppression visible at base ISO.
Slightly soft images but with very good detail. Minor edge-enhancement artifacts visible on high-contrast subjects. Moderate noise suppression visible at base ISO.
 |  |
| Good definition of high-contrast elements, with only minor evidence of edge enhancement. | Subtle detail: Hair Noise suppression tends to blur detail in areas of subtle contrast, though detail remains strong in the darker parts of the model's hair here. |
Sharpness. The Nikon D5200 produced very good detail overall when coupled with a sharp lens such as the Nikon 35mm f/1.8G prime used in the above left crop, though images are still slightly soft overall. Some very minor edge enhancement artifacts are visible on high-contrast subjects such as the halos around the branches in the crop above left, but overall results are quite good.Edge enhancement creates the illusion of sharpness by enhancing colors and tones right at the edge of a rapid transition in color or tone.
Detail. The crop above right shows some mild to moderate noise suppression, as the darker and lower-contrast areas of the model's hair show significant smudging where individual strands of hair merge. Still, a pretty good performance here considering the resolution and target market. Noise-suppression systems in digital cameras tend to flatten-out detail in areas of subtle contrast. The effects can often be seen in shots of human hair, where the individual strands are lost and an almost "watercolor" look appears.
Raw vs In-Camera JPEGsAs noted above, the Nikon D5200 delivers very detailed JPEGs that are a little soft overall even with a sharp prime lens. Better detail can often be obtained from carefully processing RAW files, without additional sharpening artifacts. Take a look below, to see what we mean:

In the table above, mousing over a link at the bottom will load the corresponding crop in the area above. Examples include in-camera Fine JPEG, and a raw file processed through Nikon's ViewNX 2 software using default settings, and the same raw file processed with Adobe Camera Raw 6.7, then sharpened in Photoshop. We found that sharpening with 300% unsharp mask and a radius of 0.3 pixels worked well for the Nikon D5200's NEF files.
As you can see, results from a raw file converted with Nikon's ViewNX 2 software are very similar to the in-camera JPEG, and the software wasn't really able to extract more detail. Adobe Camera Raw was able to extract quite a bit more fine detail in the pine needles, but as expected, it also shows slightly higher noise levels as well as some chromatic aberration that the camera suppresses in its JPEGs. Bottom line: When coupled with a good raw converter, the Nikon D5200 rewards raw shooters with amazing detail, especially considering the price.
ISO & Noise Performance
Good detail versus noise handling up to ISO 1,600.
Good detail versus noise handling up to ISO 1,600.
| High ISO Noise Reduction = Normal (Default) | ||
 |  |  |
| ISO 100 | ISO 200 | ISO 400 |
 |  |  |
| ISO 800 | ISO 1,600 | ISO 3,200 |
 |  |  |
| ISO 6,400 | ISO 12,800 | ISO 25,600 |
Noise levels are fairly low at ISOs 100 through 800, though some detail is lost to noise reduction and an increase in a very fine noise "grain" can be seen as ISO increases. Some minor chroma noise is also visible in the darker shadows, even at base ISO, though it's not objectionable. At ISO 1,600 noise levels increase with a touch more blurring in the fine details and more visible grain, but detail is still pretty good. ISO 3,200 shows a larger step in both luma and chroma noise and shadows begin to take on a yellow tint with noticeable color blotching. As you'd expect, image quality continues to degrade as ISO increases, to the point were very little find detail is left with strong luma and chroma at ISO 25,600. Overall color balance shifts toward green as well.
Still, very good noise performance considering the 24-megapixel resolution, but it's no surprise that noise is higher at the pixel level than its 16-megapixel siblings. See our Print Quality analysis section below for recommended print sizes at each ISO.
A note about focus for this shot: We shoot this image at f/4, usually using one of three very sharp reference lenses (70mm Sigma f/2.8 macro for most cameras, 60mm f/2.8 Nikkor macro for Nikon bodies without a drive motor, and Olympus Zuiko 50mm f/2.0 for Four Thirds and Micro Four Thirds bodies). To insure that the hair detail we use for making critical judgements about camera noise processing and detail rendering is in sharp focus at the relatively wide aperture we're shooting at, the focus target at the center of the scene is on a movable stand. This lets us compensate for front- or back-focus by different camera bodies, even those that lack micro-focus adjustments. This does mean, though, that the focus target itself may appear soft or slightly out of focus for bodies that front- or back-focused with the reference lens. We know this; if you click to view the full-size image for one of these shots and notice that the focus target is fuzzy, you don't need to email and tell us. :-) The focus target position will have been adjusted to insure that the rest of the scene is focused properly.
Extremes: Sunlit, dynamic range, and low light tests
Very good detail in both highlights and shadows, very high resolution. Good low-light performance, capable of capturing bright images in near darkness.
Very good detail in both highlights and shadows, very high resolution. Good low-light performance, capable of capturing bright images in near darkness.
 | |  |
| +1.0 EV | +1.3 EV | +1.7 EV |
Sunlight:
Apart from the underexposure issue, the Nikon D5200 handled the deliberately harsh lighting in the test above very well. Though contrast is a little high, shadow and highlight detail are both very good. The +1.3 EV exposure was best here, producing a bright face without blowing out many highlights. Despite the bright appearance, there are actually very few clipped highlights in the mannequins's white shirt. Some shadows are pretty dark, but remained fairly clean except for a yellow cast in very deep tones. The camera's contrast adjustment also did a good job of decreasing overall contrast without also affecting color saturation. (See below.) Still, be sure to use fill flash in situations like the one shown above; it's better to shoot in the shade when possible.
Apart from the underexposure issue, the Nikon D5200 handled the deliberately harsh lighting in the test above very well. Though contrast is a little high, shadow and highlight detail are both very good. The +1.3 EV exposure was best here, producing a bright face without blowing out many highlights. Despite the bright appearance, there are actually very few clipped highlights in the mannequins's white shirt. Some shadows are pretty dark, but remained fairly clean except for a yellow cast in very deep tones. The camera's contrast adjustment also did a good job of decreasing overall contrast without also affecting color saturation. (See below.) Still, be sure to use fill flash in situations like the one shown above; it's better to shoot in the shade when possible.
Because digital cameras are more like slide film than negative film (in that they tend to have a more limited tonal range), we test them in the harshest situations to see how they handle scenes with bright highlights and dark shadows, as well as what kind of sensitivity they have in low light. The shot above is designed to mimic the very harsh, contrasty effect of direct noonday sunlight, a very tough challenge for most digital cameras. (You can read details of this test here.)
Dynamic Range AnalysisA key parameter in a digital camera is its Dynamic Range, the range of brightness that can be faithfully recorded. At the upper end of the tonal scale, dynamic range is dictated by the point at which the RGB data "saturates" at values of 255, 255, 255. At the lower end of the tonal scale, dynamic range is determined by the point at which there ceases to be any useful difference between adjacent tonal steps. Note the use of the qualifier "useful" in there: While it's tempting to evaluate dynamic range as the maximum number of tonal steps that can be discerned at all, that measure of dynamic range has very little relevance to real-world photography. What we care about as photographers is how much detail we can pull out of the shadows before image noise becomes too objectionable. This, of course, is a very subjective matter, and will vary with the application and even the subject matter in question. (Noise will be much more visible in subjects with large areas of flat tints and subtle shading than it would in subjects with strong, highly contrasting surface texture.)
What makes most sense then, is to specify useful dynamic range in terms of the point at which image noise reaches some agreed-upon threshold. To this end, Imatest computes a number of different dynamic range measurements, based on a variety of image noise thresholds. The noise thresholds are specified in terms of f-stops of equivalent luminance variation in the final image file, and dynamic range is computed for noise thresholds of 1.0 (low image quality), 0.5 (medium image quality), 0.25 (medium-high image quality) and 0.1 (high image quality). For most photographers and most applications, the noise thresholds of 0.5 and 0.25 f-stops are probably the most relevant to the production of acceptable-quality finished images, but many noise-sensitive shooters will insist on the 0.1 f-stop limit for their most critical work.
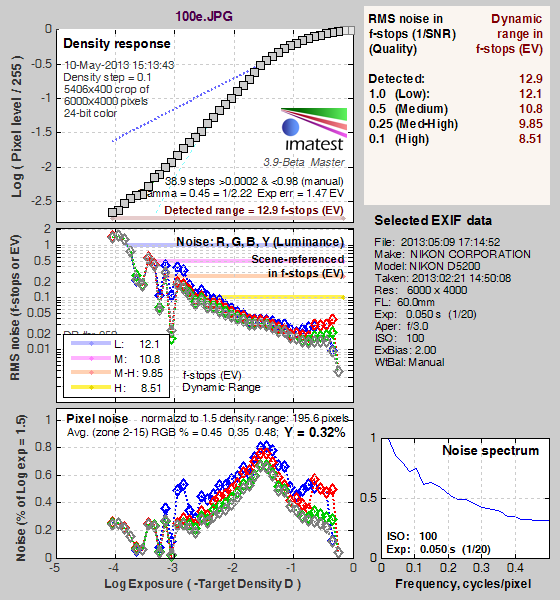
JPEG. The graph at right (click for a larger version) was generated using Imatest's dynamic range analysis for an in-camera Nikon D5200 JPEG file with a nominally-exposed density step target (Stouffer 4110). At the base ISO of 100 (the optimal ISO), with Active D-Lighting set to Off and default Contrast setting, the graph shows 12.9 f-stops of total dynamic range, with 8.51 f-stops at the "High" Quality level. These are very good results for an APS-C model, especially a high-resolution model like the 24-megapixel D5200, with its smaller photosites. For example, the 16-megapixel D5100 scored 7.74 at the highest quality level, while the D7000 scored 7.97 f-stops. Note though that this measurement has a margin of error of about 1/3 f-stop, so differences of less than 0.33 can be ignored.
 The graph at right (click for a larger version) was generated using Imatest's dynamic range analysis for an in-camera Nikon D5200 JPEG file with a nominally-exposed density step target (Stouffer 4110). At the base ISO of 100 (the optimal ISO), with Active D-Lighting set to Off and default Contrast setting, the graph shows 12.9 f-stops of total dynamic range, with 8.51 f-stops at the "High" Quality level. These are very good results for an APS-C model, especially a high-resolution model like the 24-megapixel D5200, with its smaller photosites. For example, the 16-megapixel D5100 scored 7.74 at the highest quality level, while the D7000 scored 7.97 f-stops. Note though that this measurement has a margin of error of about 1/3 f-stop, so differences of less than 0.33 can be ignored.
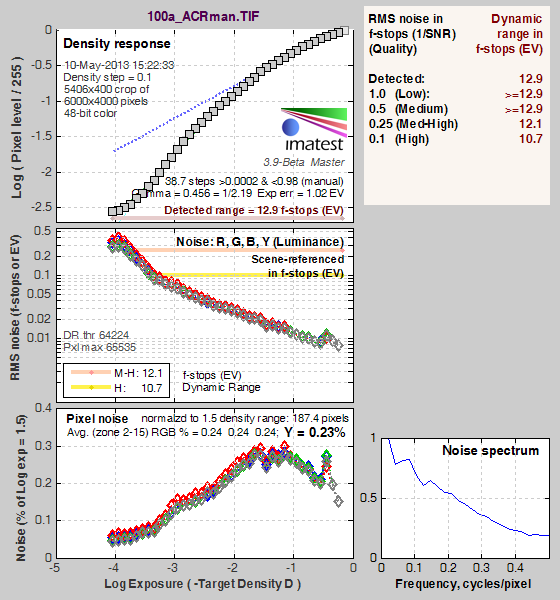
RAW. The graph at right is from the same Stouffer 4110 stepchart image captured as a raw (.NEF) file, processed with Adobe Camera Raw using the Auto setting and tweaking from there. As can be seen, the score at the highest quality level increased 2.19 f-stops from 8.51 to 10.7 f-stops, while total dynamic range remained the same at 12.9 f-stops. Again, these results are remarkable, beating the D5100's 10 f-stops at the highest quality level, as well as the D7000's 10.1 f-stops. It's worth noting here is that ACR's default noise reduction settings reduced overall noise somewhat (see the plot in the lower left-hand corner) relative to the levels in the in-camera JPEG, which would tend to boost the dynamic range numbers for the higher quality thresholds.
 The graph at right is from the same Stouffer 4110 stepchart image captured as a raw (.NEF) file, processed with Adobe Camera Raw using the Auto setting and tweaking from there. As can be seen, the score at the highest quality level increased 2.19 f-stops from 8.51 to 10.7 f-stops, while total dynamic range remained the same at 12.9 f-stops. Again, these results are remarkable, beating the D5100's 10 f-stops at the highest quality level, as well as the D7000's 10.1 f-stops. It's worth noting here is that ACR's default noise reduction settings reduced overall noise somewhat (see the plot in the lower left-hand corner) relative to the levels in the in-camera JPEG, which would tend to boost the dynamic range numbers for the higher quality thresholds.
Contrast AdjustmentWe really like it when a camera gives us the ability to adjust contrast and saturation to our liking. It's even better when those adjustments cover a useful range, in steps small enough to allow for precise tweaks. Just as with its saturation adjustment, the Nikon D5200's contrast setting offers seven levels, plus an Auto setting.
| Minimum Contrast | |
 |  |
| Contrast set to lowest, +1.3 EV | Contrast set to lowest, 0 EV |
At its lowest contrast setting, the D5200 did a very good job of preserving highlight detail and bringing out shadow detail. Highlight retention was improved, but the contrast setting had a larger impact on opening up the shadows, though the yellow push we've seen in the shadows of these shot is more apparent. The lower contrast setting opened-up shadows in our far-field shot as well, without making the image too flat looking. Overall, very good results here.
| Contrast Adjustment Examples | ||||
 |  |  |  |  |
| -3 | -1 | 0 | +1 | +3 |
The series of shots above shows results with several different contrast adjustment settings, showing the minimum step size around the default, as well as both extremes. While you can see the extremes, it's hard to really evaluate contrast on small thumbnails like these, click on any thumbnail to go to the full-size image.
Nikon's contrast adjustment is that it has very little effect on saturation. Contrast and saturation are actually fairly closely coupled, it's a good trick to be able to vary one with out the other changing as well. As usual, Nikon did a very good job here.
Active D-Lighting
Active D-Lighting attempts to preserve detail in both highlights and shadows in high-contrast situations, while maintaining moderate levels of contrast. The series of shots below show the effect of the various Active D-Lighting settings available on the Nikon D5200 on our high-contrast "Sunlit" Portrait scene. Note that Active D-Lighting is different from the touch-up menu's D-Lighting, as it is performed during image capture instead of after. (It does affect only JPEG images though, Nikon very properly doesn't apply tonal adjustments like this to RAW file data. NEF files, however, are tagged so that Nikon software can automatically apply the effect when converted.)
Active D-Lighting attempts to preserve detail in both highlights and shadows in high-contrast situations, while maintaining moderate levels of contrast. The series of shots below show the effect of the various Active D-Lighting settings available on the Nikon D5200 on our high-contrast "Sunlit" Portrait scene. Note that Active D-Lighting is different from the touch-up menu's D-Lighting, as it is performed during image capture instead of after. (It does affect only JPEG images though, Nikon very properly doesn't apply tonal adjustments like this to RAW file data. NEF files, however, are tagged so that Nikon software can automatically apply the effect when converted.)
"Sunlit" Portrait Active D-Lighting (0 EV)
| |
 | ADL Settings: Auto (Default) Off Low Normal High Extra High |
 | |
Mouse over the links to see how the various levels of Active D-Lighting affects our "Sunlit" Portrait shot at default exposure. Click on a link to get to the full-res image. (Active D-Lighting's effect can be a little subtle in shots like those above, so we decided to use a mouse-over to better show how each setting compares to Off.)
When Active D-Lighting is enabled (Auto is the default), the camera usually exposes for the highlights in an attempt to preserve them, then adjusts the tone curve to bring the midtones and shadows back up to produce an image that doesn't look underexposed. In this case, the default exposure without Active D-Lighting didn't have any blown highlights to preserve, so this is not the best example. To see how Active D-Lighting works without underexposure in this shot, see the examples from our Nikon D7000 review.
See below for how Active D-Lighting worked on our Far-field shot.
| Far-field Active D-Lighting (0 EV) | ||
 | ||
Here are the results with our Far-field shot. The D5200's Active D-Lighting worked better here, as the default exposure wasn't underexposed like it was for its "Sunlit" Portrait scene. As you can see, Active D-Lighting brought up shadow detail while holding on to more of the highlights. The Auto setting did a pretty good job here.
HDR Mode
The D5200 is only the second Nikon DSLR offering an in-camera high-dynamic-range imaging function (the D5100 was the first), something we've seen in several DSLRs from competing manufacturers. When enabled, the D5200 captures two images with one push of the shutter button, one underexposed and one overexposed and combines them in-camera to produce a high-dynamic-range JPEG. (RAW format is not supported). We don't believe the Nikon D5200 performs any micro-alignment of the two images even though the user manual warns of possible cropping. If it is, it can only correct for very small amounts of camera movement between shots, and so Nikon recommends the use of a tripod. Obviously moving subjects should also be avoided.
The D5200 is only the second Nikon DSLR offering an in-camera high-dynamic-range imaging function (the D5100 was the first), something we've seen in several DSLRs from competing manufacturers. When enabled, the D5200 captures two images with one push of the shutter button, one underexposed and one overexposed and combines them in-camera to produce a high-dynamic-range JPEG. (RAW format is not supported). We don't believe the Nikon D5200 performs any micro-alignment of the two images even though the user manual warns of possible cropping. If it is, it can only correct for very small amounts of camera movement between shots, and so Nikon recommends the use of a tripod. Obviously moving subjects should also be avoided.
"Sunlit" Portrait HDR (0 EV)
| |
 | HDR Settings: Off (Default) Low Normal High Extra High Auto |
 | |
Unlike the Nikon D5100 which allowed you to set the exposure differential between the two images from 1, 2 or 3 EV, and also adjust the amount of "smoothing" that is applied to the boundaries between the two images with selections of Low, Medium and High, the D5200 takes a simpler approach offering just four strengths in addition to Auto. Mouse over the links above to see how various levels of HDR affects our "Sunlit" Portrait shot and click on a link to get to the full-res image. Again, because of the underexposure issue, these aren't very good examples, but you can still see higher levels make quite a difference to the overall exposure by opening up shadow detail but they can lead to artificial looking shadows around bright objects or halos and glowing around dark ones. Colors can also be adversely affected in HDR mode, such as a drop in saturation. Still, it's a useful feature for capturing static scenes with dynamic range that exceeds the sensor for those not willing to use manual HDR techniques (bracketing exposure and then combining images while post-processing).
| Far-field HDR (0 EV) | ||
 | ||
Here are the same HDR settings with our Far-field shot. Again, some settings do a good job of taming hot highlights while bringing up some of the shadows and deeper midtones. You can also see ghosting in the tree branches and leaves from movement between the exposures caused by wind, as well the uneven and artificial-looking exposure when using higher settings.
| Face Detection | ||
 |  |  |
| Off Aperture-priority 0 EV | Portrait Auto mode 0 EV | Live View with Face-priority AF 0 EV |
Here, we can see the effect of the Nikon D5200's full Auto mode which selected Portrait Scene mode, as well as face detection enabled in Live View mode. As you can see from the shots above, the Portrait Scene mode made an improvement to exposure versus Aperture-priority at f/8, reducing overall contrast and lightening shadows, though noise is a bit higher as it boosted ISO sensitivity to 360. Portrait mode also selected a wider aperture of f/5.6 for better subject isolation, and a faster shutter speed of 1/500s to avoid subject motion blur. In Live View using Aperture-priority, Face-priority AF mode made a huge difference, actually overexposing the subject slightly by using a slower shutter speed of only 1/30s. (It would have likely done better if it had more control over exposure in Program mode.)
| 1 fc 11 lux | 1/2 fc 5.5 lux | 1/4 fc 2.7 lux | 1/8 fc 1.3 lux | 1/16 fc 0.67 lux | 1/16fc No NR | |
|---|---|---|---|---|---|---|
| ISO 100 | 2 s f2.8 | 4 s f2.8 | 8 s f2.8 | 15 s f2.8 | 30 s f2.8 | 30 s f2.8 |
| ISO 200 | 1 s f2.8 | 2 s f2.8 | 4 s f2.8 | 8 s f2.8 | 15 s f2.8 | 15 s f2.8 |
| ISO 400 | 0.5 s f2.8 | 1 s f2.8 | 2 s f2.8 | 4 s f2.8 | 8 s f2.8 | 8 s f2.8 |
| ISO 800 | 1/4 s f2.8 | 0.5 s f2.8 | 1 s f2.8 | 2 s f2.8 | 4 s f2.8 | 4 s f2.8 |
| ISO 1600 | 1/8 s f2.8 | 1/4 s f2.8 | 0.5 s f2.8 | 1 s f2.8 | 2 s f2.8 | 2 s f2.8 |
| ISO 3200 | 1/15 s f2.8 | 1/8 s f2.8 | 1/4 s f2.8 | 0.5 s f2.8 | 1 s f2.8 | 1 s f2.8 |
| ISO 6400 | 1/30 s f2.8 | 1/15 s f2.8 | 1/8 s f2.8 | 1/4 s f2.8 | 0.5 s f2.8 | 0.5 s f2.8 |
| ISO 12800 | 1/60 s f2.8 | 1/30 s f2.8 | 1/15 s f2.8 | 1/8 s f2.8 | 1/4 s f2.8 | 1/4 s f2.8 |
| ISO 25600 | 1/125 s f2.8 | 1/60 s f2.8 | 1/30 s f2.8 | 1/15 s f2.8 | 1/8 s f2.8 | 1/8 s f2.8 |
Low Light. The Nikon D5200 performed fairly well on the low-light test, capturing usable images at the lowest light level (1/16 foot-candle) with the lowest sensitivity setting (ISO 100). As you'd expect, noise increases as ISO goes up and light levels go down, but remains well controlled and fine-grained to ISOs as high as 3,200. We did not detect any significant issues with hot pixels other than a few of them when long exposure NR is turned off, but that's to be expected. Some minor banding could be seen at ISOs 12,800 and 25,600, as well as some heat blooming emanating from the bottom edge for longer exposures, but that's not unusual at such high ISOs.
Color balance was good with the Auto white balance setting, just slightly cool, though there's a strong shift towards magenta at lower light levels, particularly at lower ISOs.
The camera's phase-detection autofocus system was able to focus on the subject down to just above the 1/8 foot-candle light level unassisted with an f/2.8 lens. That's not quite as good as most DSLRs. The Nikon D5200 was however able to autofocus in complete darkness with the AF assist enabled. Surprisingly, in Live View mode the camera's contrast-detect autofocus did a bit better, as it was able to focus down to just below 1/8 foot-candle.
Keep in mind that the longer shutter speeds here demand the use of a tripod to prevent any blurring from camera movement. (A useful trick is to just prop the camera on a convenient surface, and use its self-timer to release the shutter. This avoids any jiggling from your finger pressing the shutter button, and can work quite well when you don't have a tripod handy.)
How bright is this? The one foot-candle light level that this test begins at roughly corresponds to the brightness of typical city street-lighting at night. Cameras performing well at that level should be able to snap good-looking photos of street-lit scenes.
NOTE: This low light test is conducted with a stationary subject, and the camera mounted on a sturdy tripod. Most digital cameras will fail miserably when faced with a moving subject in dim lighting. (For example, a child's ballet recital or a holiday pageant in a gymnasium.) Digital SLRs like the Nikon D5200 do much better than point & shoots, but you still shouldn't expect a quick autofocus lock with moving subjects.
Output Quality
Print Quality
Very nice 30 x 40 inch prints at ISO 100; makes a good 16 x 20 inch print at ISO 800 and a usable 4 x 6 at ISO 12,800.
Very nice 30 x 40 inch prints at ISO 100; makes a good 16 x 20 inch print at ISO 800 and a usable 4 x 6 at ISO 12,800.
 ISO 100 images are very detailed with bright, accurate colors up to 30 x 40 inches. 36 x 48 inch prints are quite suitable for wall display.
ISO 200 prints are very similar to ISO 100, but just a bit lower in fine detail and showing a minor amount of noise, thus making great prints at 24 x 36 inches. 30 x 40 inch prints here are great for wall display.
ISO 400 images start to show some noise in the shadows. Prints look great up to 20 x 30 inches, while 24 x 36 inch prints are suitable for wall display.
ISO 800 images look good at 16 x 20 inches. There is some noise, but you only really see it in the shadow areas, and even then, the grain is reminiscent of film grain and not present over the entire image.
ISO 1600 makes a pretty good 11 x 14 inch print. At 13 x 19, the image is a little too soft in finely detailed areas. Noise levels in the the highlights and midrange areas are excellent, but it's quite noticeable in the shadows (although still appearing more like film grain). If the image was of a brightly-lit scene, noise would be virtually unnoticeable.
ISO 3200 prints start to show a fair amount of noise, but it still produces a nice 8 x 10 inch print. As before, shadow noise is apparent, but otherwise the image looks great.
ISO 6400 makes a decent 5 x 7, but noise and a reduction in fine detail is taking its toll on the image quality, preventing us from calling anything larger acceptable.
ISO 12,800 images are fairly heavy on noise at larger sizes, but can still produce a decent 4 x 6 inch print. Colors still look good, but fine detail, such as in the red fabric and mosaic area, is almost nonexistent.
ISO 25,600 does not produce good prints at 4 x 6, and is best avoided if possible.
The Nikon D5200's 24.1-megapixel APS-C sensor produces excellent results for very large prints at the low ISO levels. Additionally, this camera is capable of images that retain fantastic colors and fine details even as the ISO rises. In fact, this was a somewhat difficult camera to grade because its results in some areas exceeded expectation. At the higher ISO levels between 1600 and 12,800, we were on the fence many times for which way to go in calling an acceptable size. The D5200 retained a great amount of fine detail at high ISOs, but we saw noticeable noise in the shadow areas at higher ISOs. Even still, the noise on these high ISO prints reminded us of film grain and users might like the way noise looks on higher ISO prints for certain instances. Overall, this DSLR packs a ton of pixels in a consumer-grade camera and produces stellar low-ISO prints at very large sizes, while still doing a fantastic job with prints at higher ISO levels.
Testing hundreds of digital cameras, we've found that you can only tell just so much about a camera's image quality by viewing its images on-screen. Ultimately, there's no substitute forprinting a lot of images and examining them closely. For this reason, we now routinely print sample images from the cameras we test on our Canon Pro9000 Mark II studio printer, and on the Canon Pixma MP610 here in the office. (See the Canon Pixma Pro9000 Mark II review for details on that model.)
Nikon D5200 High ISO Noise Reduction
The Nikon D5200's four noise-reduction settings ("High, "Normal", "Low" and "Off") provide good flexibility in choosing how you want to make the trade-off between subject detail and noise levels. The Nikon D5200 user manual doesn't say when High ISO NR kicks in, so we've included crops from the base ISO in the tables below. The manual does however say that the "Off" setting still applies NR at ISO 1,600 and higher, though at a lower strength than the "Low" setting.
See for yourself how the Nikon D5200's "Normal", "Low" and "Off" High ISO NR settings compare to RAW without noise reduction under daylight-balanced lighting. (Note that these RAW images have no sharpening applied, so they look softer than camera JPEGs at low ISOs.) Click on any of the crops below to see the corresponding full-sized image.
| High ISO Noise Reduction Comparison Daylight-balanced illumination | ||||
"Normal"
|
"Low"
|
"Off"
|
RAW (no NR)
| |
I
S O 1 0 0 |  |  |  |  |
 |  |  |  | |
 |  |  |  | |
"Normal"
|
"Low"
|
"Off"
|
RAW (no NR)
| |
I
S O 2 0 0 |  |  |  |  |
 |  |  |  | |
 |  |  |  | |
"Normal"
|
"Low"
|
"Off"
|
RAW (no NR)
| |
I
S O 4 0 0 |  |  |  |  |
 |  |  |  | |
 |  |  |  | |
"Normal"
|
"Low"
|
"Off"
|
RAW (no NR)
| |
I
S O 8 0 0 |  |  |  |  |
 |  |  |  | |
 |  |  |  | |
"Normal"
|
"Low"
|
"Off"
|
RAW (no NR)
| |
I
S O 1 6 0 0 |  |  |  |  |
 |  |  |  | |
 |  |  |  | |
"Normal"
|
"Low"
|
"Off"
|
RAW (no NR)
| |
I
S O 3 2 0 0 |  |  |  |  |
 |  |  |  | |
 |  |  |  | |
"Normal"
|
"Low"
|
"Off"
|
RAW (no NR)
| |
I
S O 6 4 0 0 |  |  |  |  |
 |  |  |  | |
 |  |  |  | |
"Normal"
|
"Low"
|
"Off"
|
RAW (no NR)
| |
I
S O 1 2 8 0 0 |  |  |  |  |
 |  |  |  | |
 |  |  |  | |
"Normal"
|
"Low"
|
"Off"
|
RAW (no NR)
| |
I
S O 2 5 6 0 0 |  |  |  |  |
 |  |  |  | |
 |  |  |  | |
The Nikon D5200's "Normal" High ISO NR setting provides a good tradeoff between noise and detail at lower ISOs to our eye, but we'd probably shoot with lower settings at higher ISOs and reduce noise ourselves in post-processing (or just shoot RAW). It's interesting that the camera does such a good job with the subtle contrast in the red-leaf swatch at low ISOs that it looks much better than the ACR converted RAW file, though the pleasing rendering of that fabric has been trademark of Nikons for years. It's also interesting that the camera sometimes produces a yellow cast with certain noise reduction settings at some higher ISOs (all shots here were taken with manual white balance), while the converted RAW files are more consistent in terms of color balance.
Nikon D5200 Flash
Flash Test Results
Coverage and Range
Decent flash range but narrow coverage at wide angle. Our standard shots required an average amount of exposure compensation.
Decent flash range but narrow coverage at wide angle. Our standard shots required an average amount of exposure compensation.
 |  |
| 18mm | 55mm |
 |  |
| Normal Flash +0.7 EV | Slow-Sync Flash Default |
Coverage and Exposure. Flash coverage was rather uneven at wide angle (18mm), with very dark corners. Coverage at telephoto (55mm) was much better, but still somewhat uneven. (Some of the corner shading is due to the lens itself, though.) For our Indoor Portrait scene test, the Nikon D5200's flash required +0.7 EV exposure compensation adjustment to get bright results in normal Auto flash mode with a 1/60 second shutter speed, which is about average for the DSLRs we've tested. The camera's Slow-Sync flash mode at 1/13 second produced bright results without any compensation, though with a stronger pinkish-orange cast from the room lighting.
| Flash Range: Wide Angle | |||||
|---|---|---|---|---|---|
| 6 ft | 7 ft | 8 ft | 9 ft | 10 ft | 11 ft |
1/60 sec f3.5 ISO 100 | 1/60 sec f3.5 ISO 100 | 1/60 sec f3.5 ISO 100 | 1/60 sec f3.5 ISO 100 | 1/60 sec f3.5 ISO 100 | 1/60 sec f3.5 ISO 100 |
| 12 ft | 13 ft | 14 ft | 15 ft | 16 ft | |
1/60 sec f3.5 ISO 100 | 1/60 sec f3.5 ISO 100 | 1/60 sec f3.5 ISO 100 | 1/60 sec f3.5 ISO 100 | 1/60 sec f3.5 ISO 100 | |
| Flash Range: Telephoto | |||||
|---|---|---|---|---|---|
| 6 ft | 7 ft | 8 ft | 9 ft | 10 ft | 11 ft |
1/60 sec f5.6 ISO 100 | 1/60 sec f5.6 ISO 100 | 1/60 sec f5.6 ISO 100 | 1/60 sec f5.6 ISO 100 | 1/60 sec f5.6 ISO 100 | 1/60 sec f5.6 ISO 100 |
| 12 ft | 13 ft | 14 ft | 15 ft | 16 ft | |
1/60 sec f5.6 ISO 100 | 1/60 sec f5.6 ISO 100 | 1/60 sec f5.6 ISO 100 | 1/60 sec f5.6 ISO 100 | 1/60 sec f5.6 ISO 100 | |
ISO 200 Range. With the kit lens at wide angle, the Nikon D5200's flash exposures started out bright at 6 feet, and brightness remained good out to 13 feet before dropping off rapidly. At the telephoto end, flash intensity started out a bit dim at 6 feet but got stronger at 8 feet, then dropped off from there. We'll call the range 8 feet at full telephoto.
| Manufacturer-Specified Flash Range | |
|---|---|
| Wide Angle | Telephoto |
 11.2 feet ISO 100 |  6.9 feet ISO 100 |
Manufacturer Specified Flash Test. The Nikon D5200's flash guide number is 12 meters in Auto mode at ISO 100. That translates to about 11.2 feet at f/3.5 and about 7 feet at f/5.6, the maximum apertures of the kit lens at full wide angle and telephoto respectively. In the shots above, the D5200 appears to underperform by a small amount relative to Nikon's specification, producing slightly dim exposures at the rated distances. The flash target was underexposed compared to the ideal exposure by less than 1/4 f-stop at wide angle, and about 1/3 f-stop at telephoto. Our standard test method for flash range uses a fixed setting of ISO 200, to provide a fair basis of comparison between cameras. We've now also begun shooting two shots using the manufacturer-specified camera settings, at the range the company claims for the camera, to assess the validity of the specific claims.
Nikon D5200 Performance
Timing and Performance
Good to slightly slower than average speed for its class.
Startup/Shutdown
| ||
Power on
to first shot |
~0.5 second
|
Time it takes for camera to turn on and take a shot.
|
Shutdown
|
~0.1 second
|
How long it takes to turn off.
|
Buffer clearing time
|
2 seconds *
after 40 L/F JPEGs |
Worst case buffer clearing time. -- This is the delay after a set of shots before you can remove the card. Some cameras won't shut down until the buffer is cleared.
|
2 seconds *
after 7 RAW frames | ||
3 seconds *
after 5 RAW + L/F JPEG frames | ||
*Note: Buffer clearing times measured with a SanDisk Extreme Pro 95MB/s UHS-I SDHC memory card. Slower cards will produce correspondingly slower clearing times.
| ||
The Nikon D5200's startup time was good for a consumer DSLR, and shutdown was nearly instantaneous. Buffer clearing times were good with a fast card, especially considering the 24-megapixel files, though buffer depths with RAW files were shallow.
| Mode Switching | ||
|---|---|---|
Play to Record,
first shot |
~0.3 second
|
Time until first shot is captured.
|
Record to Play
|
~1.0 second
|
Time to display a large/fine file immediately after capture.
|
Display
recorded image |
~0.1 second
|
Time to display a large/fine file already on the memory card.
|
Mode switching was pretty fast for a consumer DSLR: Play to Record and displaying a captured L/F JPEG image were so fast they were difficult to measure, though switching from Record to Play immediately after capturing an image was about average.
| Shutter Response (Lag Time), Optical Viewfinder | ||
|---|---|---|
Full Autofocus
Single Area AF (Center AF point) |
0.302 second
|
Time from fully pressing shutter button to image capture. (All AF timing measured with Nikkor AF-S 60mm f/2.8G Macro lens).
|
Full Autofocus
Single Area AF, Flash enabled |
0.368 second
|
Time from fully pressing shutter button to image capture, Auto Flash enabled.
|
Full Autofocus
Auto Area AF |
0.386 second
|
Time from fully pressing shutter button to image capture.
|
Continuous AF
|
0.292 second
|
This mode usually shows no speed increase with our static subject; we have no way to measure performance with moving subjects.
|
Manual focus
|
0.298 second
|
For most cameras, shutter lag is less in manual focus than autofocus, but usually not as fast as when the camera is "pre-focused."
|
Pre-focused
|
0.088 second
|
Time to capture, after half-pressing and holding shutter button.
|
Shutter Response (Lag Time), Live View mode
| ||
Full Autofocus
Live View Single-servo AF |
1.40 seconds
|
Time from fully pressing shutter button to image capture.
|
Pre-focused
Live View |
0.352 second
|
Time to capture, after half-pressing and holding shutter button.
|
The Nikon D5200's full autofocus shutter lag when shooting the same target multiple times was a little slower than average for a consumer DSLR. The D5200 required about 0.3 second for full AF using the center focus point. Enabling the flash raised shutter lag to 0.37 second, with very little delay added for the metering preflash. Shutter lag increased to about 0.39 second in Auto-area AF mode. Continuous autofocus shutter lag was 0.29 second and Manual focus shutter lag wasn't much faster than full autofocus at almost 0.3 second, which is much slower than average. When prefocused, shutter lag dropped to 0.088 second which is about average for a consumer DSLR.
Full autofocus was much slower in Live View mode, as expected. The Nikon D5200 only offers contrast-detect AF in Live View, which took about 1.4 seconds to focus in our tests. (How fast the lens can adjust focus makes a big difference here.) Prefocused shutter lag was also slower in Live View mode, at about 0.35 second.
To minimize the effect of different lens' focusing speed, we test AF-active shutter lag with the lens already set to the correct focal distance. We also use the same Sigma 70mm f/2.8 macro with most interchangeable lens cameras (on all platforms except NX, Four Thirds/Micro Four Thirds and Nikon models lacking an in-body focus motor), to further reduce variation, and because our tests showed that focus-determination time with this lens was close to the fastest, across multiple camera bodies from different manufacturers. Being an older design with a non-ultrasonic motor, it wouldn't be the fastest at slewing from one focus setting to another, but that's exactly the reason we measure focus determination speed, which is primarily a function of the camera body, vs focus adjustment speed, which is primarily a function of the lens.
| Cycle Time (shot-to-shot) | ||
|---|---|---|
Single Shot mode
Large Fine JPEG |
0.47 second
|
Time per shot, averaged over 10 shots, 1 second to clear.
|
Single Shot mode
RAW |
0.52 second
|
Time per shot, averaged over 9 shots, 2 seconds to clear.
|
Single Shot mode
RAW + L/F JPEG |
0.54 second
|
Time per shot, averaged over 9 shots, 2 seconds to clear.
|
Early shutter
penalty? |
No
(Yes with Flash) |
Some cameras refuse to snap another shot if you release and press the shutter too quickly in Single Shot mode, making "No" the preferred answer.
|
Continuous modeLarge Fine JPEG
|
0.20 second (4.90 frames per second);
40+ frames total; 2 seconds to clear |
Time per shot, averaged over 40 shots with no signs of slowing down.
|
Continuous mode
RAW |
0.20 second (4.96 frames per second);
7 frames total; 2 seconds to clear |
Time per shot, averaged over 7 frame buffer. Slows to an average of 0.43 seconds (2.30 fps) when buffer is full.
|
Continuous mode
RAW + L/F JPEG |
0.20 second (4.94 frames per second);
5 frames total; 3 seconds to clear |
Time per shot, averaged over 5 frame buffer. Slows to an average of 0.68 seconds (1.47 fps) when buffer is full.
|
Flash recycling
|
4.0 seconds
|
Flash at maximum output.
|
*Note: Buffer clearing times measured with a SanDisk SanDisk Extreme Pro 95MB/s UHS-I SDHC memory card. Slower cards will produce correspondingly slower clearing times. Slow cards may also limit length of bursts in continuous mode. ISO sensitivity and other settings such as Advanced D-Lighting or NR can also affect cycle times and burst mode performance.
| ||
Shot-to-shot cycle times were about average, at 0.47 second for Large/Fine JPEGs, 0.52 second for RAW files, and 0.54 second for RAW + L/F JPEG frames.
Continuous mode speeds were slightly above average considering the class and resolution, ranging from 4.9 to almost 5 frames per second depending on the file type.
Buffer depth in continuous mode was excellent with JPEGs at over 40 L/F JPEG frames, though with RAW files buffer depths were a bit shallow at 7 RAW frames and 5 RAW+L/F JPEG frames.
The built-in flash took 4 seconds to recharge after a full-power shot, which is a touch slow for an SLR.
| Download speed | ||
|---|---|---|
Windows Computer, USB 2.0
|
11,617 KBytes/sec
|
Typical Values:Less than 600=USB 1.1;
600-769=USB 2.0 Low; Above 770=USB 2.0 High |
Connected to a computer or printer with USB 2.0, download speeds were quite fast.
Bottom line, the Nikon D5200's performance was generally good to a little below average in our tests. Startup and shutdown were good, as were single shot cycle-times and continuous mode performance. Autofocus speed however was slightly slower than average, and buffer depths with RAW files on the shallow side.
Battery
Battery Life
Below average battery life for a lithium-ion powered consumer SLR.
Below average battery life for a lithium-ion powered consumer SLR.
| Operating Mode | Number of Shots |
|---|---|
Optical Viewfinder,
(CIPA standard) |
500
|
The Nikon D5200 uses a custom rechargeable lithium-ion battery for power, and ships with a charger. Battery life when using the optical viewfinder is below average even for a consumer DSLR. Nikon does not specify battery life for Live View mode, but it will certainly be a lot lower. We recommend you pick up a spare battery and keep it freshly charged and on-hand for extended outings, or when using Live View a lot.
The table above shows the number of shots the camera is capable of (on either a fresh set of disposable batteries or a fully-charged rechargeable battery as appropriate), based on CIPA battery-life and/or manufacturer standard test conditions.
(Interested readers can find an English translation of the CIPA DC-002 standards document here. (180K PDF document))
Nikon D5200 Video Recording
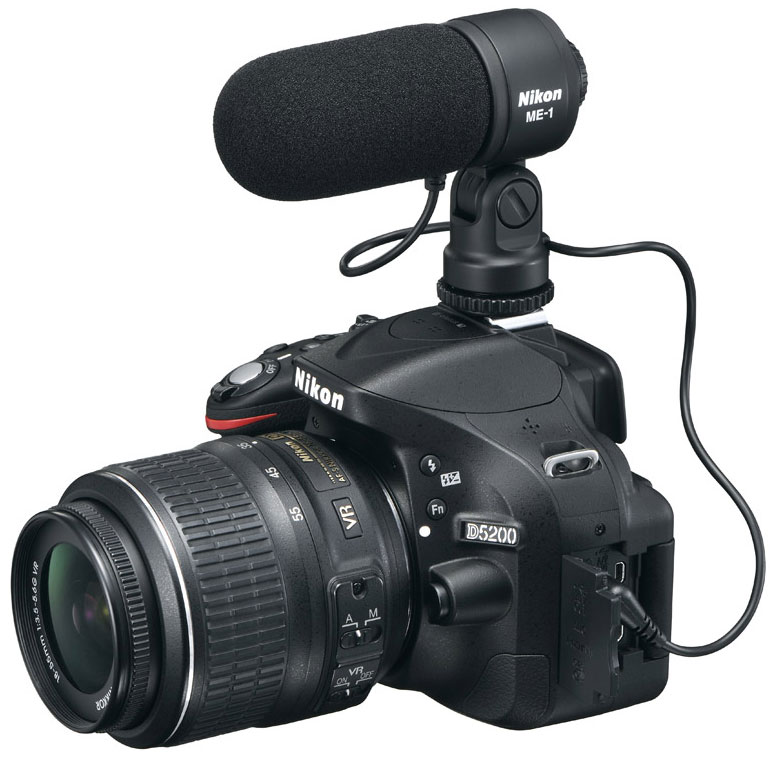
Most DSLRs nowadays offer some form of HD video recording, and the Nikon D5200 is no exception. The Nikon D5200's video system is surprisingly capable for an entry-level camera; featuring full-time autofocus, manual exposure controls, built-in stereo microphone, manual audio recording levels as well as an external microphone jack.
Here's a quick rundown of its video capabilities, along with our usual selection of sample videos.
Nikon D5200 Basic Video Specs
- 1,920 x 1,080 (Full HD / 1080p) at 60i, 50i, 30p (29.97 fps), 25p, 24p (23.976 fps)
- 1,280 x 720 (720p) at 60p (59.94 fps), 50p
- 640 x 424 at 30p, 25p
- Choice of two compression levels; High or Normal quality
- TTL (through the lens) matrix metering using the main image sensor
- MOV file format, with H.264/MPEG-4 AVC encoding
- Linear PCM stereo audio recording with adjustable recording levels and external 3.5mm microphone jack
- Autofocus can be triggered during movie recording by pressing the shutter button, or continuous AF (AF-F) can be enabled
- Manual focus also available in movie mode
- Aperture can be controlled in Aperture-priority or Manual exposure modes, but only before recording begins*
- Shutter speed and ISO can be controlled in Manual exposure mode
- EV adjustment (exposure compensation) can be selected prior to or during recording
- Built-in stereo microphone, sensitivity adjustable
- Still image can be captured while in video recording mode, but doing so stops the recording
- Flicker-reduction mode for both 60Hz and 50Hz light sources
- Movies can be "trimmed" in-camera, selecting just the portion you want and either overwriting the current file or saving it as a new file
- Single frames can be selected from movie files and saved as separate JPEG files
- Can simultaneously display video feed on LCD monitor and output video feed via HDMI (unofficial, multiple reports suggest that the D5200 outputs uncompressed, "clean" HDMI video like the D7100)
- Video duration limited to 20 minutes maximum in High quality HD modes; 29 minutes 59 seconds at normal quality HD modes or either high or normal quality at SD resolution
- File size restricted to 4 GB maximum
- Class 6 or faster SD memory cards recommended
*Note: Due to the design of the aperture mechanism in the D5200 and other non-pro Nikon DSLR bodies, when "Manual Movie Settings" are enabled in the D5200, the aperture can only be changed while Live View is disabled.
Nikon D5200 Video: Image size, frame rate, and file format
The Nikon D5200 offers three different video resolutions, five frame rates, and two quality settings in combinations as shown below:
Nikon D5200 Video Options
| |||
|---|---|---|---|
MOV files, H.264/MPEG-4 encoding
| |||
Resolution
|
Aspect Ratio
|
Frame Rate
|
Quality
|
1,920 x 1,080
|
16:9
|
60i / 50i
(60i = 59.94 fields per second, interlaced) |
High/Normal
24/12 Mbps |
1,920 x 1,080
|
16:9
|
30p
(29.97 frames per second, progressive) | |
1,920 x 1,080
|
16:9
|
24p / 25p
(24p = 23.976 frames per second, progressive) | |
1,280 x 720
|
16:9
|
60p / 50p
(60p = 59.94 frames per second, progressive) | |
640 x 424
|
3:2
|
30p / 25p
(30p = 29.97 frames per second, progressive) |
High/Normal
8/5 Mbps |
Most of the D5200's video modes are progressive scan, meaning that every video line is scanned, one after the other, for every frame. Compared to interlaced scanning, progressive scan video is much better for viewing videos on a computer screen. (Interlaced works fine for HD TVs, but some computer video players that de-interlace poorly will produce bad tearing of moving objects.) The D5200 does feature a 1,920 x 1,080 resolution with a 60i (or 50i for PAL) interlaced scan video format.
The D5200 expands on the video resolutions and frame rates of its predecessor, the D5100, now offering up to 60i at 1,920 x 1,080 and 60p in 1,280 x 720 mode. These formats are great for capturing smooth-looking action, but won't be as good in low-light situations, because the camera can't use a shutter speed longer than 1/60 second. The faster frame rate will help with those looking to fast action and then edit these videos for a slow-motion motion look.
Many advanced shooters welcome the inclusion of the 24p mode, which has pretty much become a standard feature for video-capable interchangeable lens cameras. This frame rate comes from the days of motion picture film cameras, as the de facto standard frame rate for cinema and as such, this is the frame rate movies have been shot in for many decades. Nowadays with video, the 24p frame rate gives videos the "film look and feel" that many filmmakers and video shooters want. It can be tricky to shoot in 24p however, as the lower frame rate can look choppy, particularly when shooting with fast shutter speeds or when panning quickly.
Note that the Nikon D5200 records video at 25p and 50i instead of 30p and 60i respectively when PAL video mode is selected.
The Nikon D5200 saves its video files in the MOV format, using MPEG-4 encoding, with two choices of bit rates. The HD formats can be recorded in a High quality level of 24 Mbps or a Normal quality level of 12 Mbps. The SD resolution video also has two bit rate options of 8 and 5 Mbps. Pretty much any computer or editing program made within the last 5 years should be able to play its files with little problem, although the full 1,920 x 1,080 resolution files may strain older systems.
Nikon D5200 Video: Image Quality
The Nikon D5200 produces high-quality HD video, with good detail, modest motion artifacts, and pleasing color. In our daytime videos, under bright sunlight, colors were accurate and the image was not overly contrasty. The shadow areas were not crushed and still maintained detail. Also moiré artifacts were very well-controlled in the 1080p resolutions videos, even in the usual problems areas of our test videos like roofing shingles, asphalt and window blinds. At 720p resolution, moiré was more noticeable in areas like roofing shingles (see our rolling shutter video below for an example).
In our night video, the D5200 also did really well, producing a nice image with a good dynamic range. Shadow detail was present and overall fine details were still visible even at ISO 6400. High ISO noise was not too pronounced, although still visible.
Nikon D5200 Video: Focusing

AF Settings. The D5200 offers both full-time servo autofocus, but also subject tracking autofocus in video recording.
Unlike some earlier DSLRs with video recording features, the D5200 has the ability to autofocus during recording, which a lot of casual or beginner video shooters will like and expect. However, you can still manually focus, as well. Depending on the lens used, focus motor noise may get picked up by the internal stereo microphone. With the kit lens, it is very audible in the sound track, so it's probably best not to select continuous AF when using it. Other Nikon lenses with silent focus motors would likely be better.
- Single-shot or full-time servo AF (AF-F) for continuous AF during recording.
- By default, the D5200 doesn't AF during recording, but you can always trigger an AF cycle by half-pressing the shutter button.
- AF area mode options:
- Face-priority AF
- Wide-area AF
- Normal-area AF
- Subject-tracking AF (Half-press shutter button to AF before recording or use servo AF with AF-F mode, then hit OK button with subject centered in little green square. Square will follow subject around the frame, maintaining focus on it.)
- Manual focus is also available during movie recording.
Nikon D5200 Video: Exposure Control

Movie Settings Menu. Be sure to enable Manual Movie Settings for manual exposure controls for video recording.
The D5200 offers users a full range of manual exposure settings depending on the shooting mode used, as well as allowing for simple auto-exposure settings for quick point-and-shoot video recording.
- Defaults to fully automatic exposure, but exposure compensation adjustment is available.
- Auto-ISO limit in still capture mode doesn't appear to affect video recording.
- Aperture can be set in Aperture-priority or Manual exposure mode.
- Aperture setting is very confusing: You have to exit live view mode entirely to set video recording aperture, even though the rear LCD display shows the aperture changing. (The displayed aperture applies only to still captures from Live View mode.)
- Manual exposure can be enabled via Movie Settings menu, called "Manual Movie Settings."
- In manual mode, shutter speed and ISO can be set in addition to aperture.
- You can change shutter speed either before or during recording, but changing it during will produce very loud clicks in the audio track, as you rotate the control dial.
- Available shutter speeds range from 1/4,000s down to 1/60s for 60p, and down to 1/30s for 30p and 24p.
- Sensitivity can be set from ISO 100 to 25,600, however ISO can only be changed before recording starts.
- Full range of Picture Control settings apply to movie recording. (Standard, Neutral, Vivid, Monochrome, Portrait, and Landscape, and adjustments for contrast, brightness, saturation, and hue for each of the main settings.)
- Creative Effects are also available during video recording, but some severely reduce the frame rate of the video being recorded, though Miniature Effect works well.
- AE (auto-exposure) lock is supported in video mode.
- Matrix metering is always used for video recording, regardless of metering mode selected.
Nikon D5200 Video: Audio Recording

The D5200 provides much more advanced audio recording capabilities than are typically included on a camera of this price point. Users are given the ability to use a standard external stereo microphone using the built-in 3.5mm mic jack, as well as have manual audio level controls and an audio meter displayed on screen both before and during recording. The use of an external mic is highly recommended, particularly for critical audio or when using autofocus as we noticed quite a significant amount of autofocus noise being picked up in videos when using the built-in stereo mic.
- Internal stereo microphone
- Defaults to automatic level control
- Manual level control available via Movie Settings menu, with 20 levels available
- VU (audio level) meter display also available via Movie Settings
- External stereo mic input
- Audio can be turned off entirely
Nikon D5200 Video: Rolling Shutter Artifacts ("Jello effect")
Pretty much every DSLR on the market distorts moving objects, or the entire scene, if the camera is being panned. The technical term for this is "rolling shutter artifacts," but many users simply call it the "Jello effect," because the image can jiggle and sway like Jello as the camera is moved. This occurs because the image is captured and read out line by line, so the bottom of an object may no longer be underneath the top of it by the time the camera gets around to capturing that part of the frame.
Rolling shutter artifacts can be very annoying if they're severe, but as noted, all digital SLRs show them to one extent or another. In the case of the D5200, they're clearly present, but nowhere near as bad as we've seen with some cameras. Nevertheless, the D5200 isn't going to win any awards for its ability to control rolling shutter artifacts. Like we've seen on other cameras, when shooting in 720p resolution at 60 frames per second, rolling shutter artifacts are greatly reduced.
There are plug-ins out there to fix rolling shutter when editing your footage on the computer, but it's not a surefire solution. It's simply something you need to keep in mind when moving the camera while recording video. If you just pan slowly while filming, you're not likely to notice them much at all.


No comments:
Post a Comment