| 16.20 Megapixels | Nikon F | APS-C size sensor |
|---|---|---|
 | ||
| Basic Specifications | |
|---|---|
| Full model name: | Nikon D7000 |
| Resolution: | 16.20 Megapixels |
| Sensor size: | APS-C (23.6mm x 15.6mm) |
| Kit Lens: | 5.80x zoom 18-105mm (27-158mm eq.) |
| Viewfinder: | Optical / LCD |
| Native ISO: | 100 - 6400 |
| Extended ISO: | 100 - 25,600 |
| Shutter: | 1/8000 - 30 seconds |
| Max Aperture: | 3.5 (kit lens) |
| Dimensions: | 5.2 x 4.1 x 3.0 in. (132 x 105 x 77 mm) |
| Weight: | 43.5 oz (1,234 g) includes batteries, kit lens |
| MSRP: | $1,500 |
| Availability: | 10/2010 |
| Manufacturer: | Nikon |
D7000 SUMMARY
Nikon's top enthusiast digital SLR camera is as easy to recommend as a cold glass of lemonade on a hot Summer day, and at least as satisfying. The Nikon D7000 is a refinement of the already superb D90, a redesign that maintains a small, nimble body while improving nearly every major internal aspect. Its 16.2-megapixel sensor and Expeed 2 processor conspire to output quality images at all ISO settings, from 100 to 25,600, cranking those images out at up to 6 fps. Full 1080p HD video capture, dual memory card slots, 39 autofocus points, a new color-sensitive meter, a near-100% viewfinder, and in-camera editing round out just a few of the extra features found in the Nikon D7000.
PROS
Very good image quality; Better than average noise vs. detail handling at high ISOs; Very good dynamic range in JPEGs, excellent in RAW files; Lots of high-end features in a relatively compact body; 6 fps burst mode.
CONS
Viewfinder not as accurate as specified; Viewfinder doesn't show ISO unless adjusting; No live histogram in Live View mode; No phase-detect Live View AF mode.
PRICE AND AVAILABILITY
The Nikon D7000 digital camera began shipping from October 2010, with pricing set at about US$1,200 body-only. A Nikon D7000 kit is also available, including the AF-S DX Zoom-NIKKOR 18-105mm f/3.5-5.6G ED VR lens for around US$1,500.
IMAGING RESOURCE RATING
5.0 out of 5.0
| Nikon D7000 vs other "prosumer" Nikon SLRs | ||||
| Manufacturer | Nikon | Nikon | Nikon | |
| Model | D90 | D7000 | D300s | |
| Imaging System |
Sensor Manufacturer
| Sony | Sony | Sony |
Sensor Type
| CMOS | CMOS | CMOS | |
Color Filter Array
| RGB | RGB | RGB | |
Total Megapixels
| 12.9 | 16.9 | 13.1 | |
Effective Megapixels
| 12.3 | 16.2 | 12.3 | |
Effective Sensor Size (mm)
| 23.6 x 15.8 | 23.6 x 15.6 | 23.6 x 15.8 | |
Focal Length Multiplier (approx.)
| ~1.5x (Nikon DX) | ~1.5x (Nikon DX) | ~1.5x (Nikon DX) | |
Ultrasonic Dust Reduction
| Yes | Yes | Yes | |
Image Processor
| EXPEED | EXPEED 2 | EXPEED | |
| Viewfinder |
Type
| Eye-level pentaprism | Eye-level pentaprism | Eye-level pentaprism |
Coverage
| 96% | 100% | 100% | |
Magnification (-1 diopter with 50mm lens at infinity)
| 0.94x | 0.94x | 0.94x | |
Eyepoint (mm)
| 19.5 | 19.5 | 19.5 | |
Dioptric Adjustment Range (diopters)
| -2.0 to +1.0 | -3.0 to +1.0 | -2.0 to +1.0 | |
Focusing Screen
| Type-B BriteView clear matte screen Mark II, with on-demand grid lines | Type-B BriteView clear matte screen Mark II, with on-demand grid lines | Type-B BriteView clear matte screen Mark II, with on-demand grid lines | |
Depth of Field Preview
| Yes | Yes | Yes | |
Live View (on LCD)
| Yes, Contrast Detection AF only: Face priority, Wide-Area, Normal-Area modes | Yes Contrast Detection AF only: Face priority, Wide-Area, Normal-Area, Subject Tracking modes; AF-F full-time continuous AF | Yes 2 Modes: Hand-held mode uses conventional AF sensor; Tripod mode uses contrast detect AF from image sensor | |
| Recording System |
Recording Media / Quantity / Slot Type
| Secure Digital card (SDHC compatible) | Dual Secure Digital cards (SDHC/SDXC compatible) | Dual slots: Type I CF card (UDMA supported) Secure Digital card (SDHC compatible) |
Compatible File System
| FAT 16 / FAT 32 | FAT 16 / FAT 32 | FAT 16 / FAT 32 | |
Recording Formats
| RAW 12-bit (compressed NEF), JPEG | RAW 12-bit or 14-bit (lossless compressed or compressed NEF), JPEG | RAW 12-bit or 14-bit (uncompressed, lossless compressed or compressed NEF), TIFF (32-bit), JPEG | |
Maximum Resolution
| 4288 x 2848 | 4928 x 3264 | 4288 x 2848 | |
Reduced Resolutions (JPEG only)
| 3216 x 2136; 2144 x 1424 | 3696 x 2448; 2464 x 1632 | 3216 x 2136; 2144 x 1424 | |
RAW + JPEG Recording
| Yes, selectable JPEG resolution / compression | Yes, selectable JPEG resolution / compression | Yes, selectable JPEG resolution / compression | |
| Color Space, Image Parameters & White Balance |
User-Selectable Color Space
| Yes sRGB + Adobe RGB | Yes sRGB + Adobe RGB | Yes sRGB + Adobe RGB |
Processing Parameters (Contrast, Sharpness, Saturation, Hue) / # of Increments
| 11 options for sharpening, 8 options for contrast, 3 options for brightness, 8 options for saturation, 7-step hue adjustment. | 11 options for sharpening, 8 options for contrast, 3 options for brightness, 8 options for saturation, 7-step hue adjustment. | 11 options for sharpening, 8 options for contrast, 3 options for brightness, 8 options for saturation, 7-step hue adjustment. | |
Picture Control System
| Yes | Yes | Yes | |
Adjustable High ISO NR
| Yes, 4 levels | Yes, 4 levels | Yes, 4 levels | |
Preset WB Settings
| Six presets with fine tuning, color temperature, one manual preset | Six presets with fine tuning, color temperature, five manual presets | Six presets with fine tuning, color temperature, five manual presets | |
Manual Color Temperature Setting Range
| 2,500 ~ 10,000K in increments of roughly 10 mired | 2,500 ~ 10,000K in increments of roughly 10 mired | 2,500 ~ 10,000K in increments of roughly 10 mired | |
WB Adjustment Range
| ±6 steps in 1-step increments 5 mireds per step | ±6 steps in 1-step increments 5 mireds per step | ±6 steps in 1-step increments 5 mireds per step | |
| Autofocus System |
Type
| TTL phase detection by Nikon Multi-CAM1000 autofocus module | TTL phase detection by Nikon Multi-CAM4800DX autofocus module | TTL phase detection by Nikon Multi-CAM3500DX autofocus module |
# of Focusing Points (Focusing Point Type)
| 11 points, 1 wide or normal center point (1 cross-type, 10 line type) | 39 points (9 cross-type, 30 line type) | 51 points (15 cross-type, 36 line type) | |
Superimposed Focus Point Display
| Yes | Yes | Yes | |
AF Working Range
| EV -1 ~ 19 (ISO 100) | EV -1 ~ 19 (ISO 100) | EV -1 ~ 19 (ISO 100) | |
AF Servo Modes
| AF-S (single one-shot), AF-C (continuous tracking), AF-A (for auto selection of AF-S or AF-C modes) | AF-S (single one-shot), AF-C (continuous tracking), AF-A (for auto selection of AF-S or AF-C modes) | AF-S (single one-shot), AF-C (continuous tracking). | |
AF Area Modes
| Single area, Dynamic area, Auto area, 3D tracking (11-points) | Single point (39 or 11), Dynamic Area [9 points, 21 points, 39 points, 39 points (3D-tracking)], Auto area | Single point (51 or 11), Dynamic Area [9 points, 21 points, 51 points, 51 points (3D-tracking)], Auto area | |
AF-assist Beam
| Yes Bright incandescent lamp | Yes Bright incandescent lamp | Yes Bright incandescent lamp | |
AF Fine-tuning Front/Back Focus Adjustment
| No | Yes (settings for up to 12 lenses) | Yes (settings for up to 12 lenses) | |
| Exposure Control |
Shooting Modes
| 11 - Program, Shutter-priority AE, Aperture-priority AE, Manual, Auto, Auto with flash off, Portrait, Landscape, Close up, Sports, Night Portrait. | 27 - Program, Shutter-priority AE, Aperture-priority AE, Manual, Auto, Auto with flash off, Scene (Portrait, Landscape, Child, Sports, Close up, Night portrait, Night landscape, Party/indoor, Beach/snow, Sunset, Dusk/dawn, Pet portrait, Candlelight, Blossom, Autumn colors, Food, Silhouette, High key, Low key), U1, U2 (user settings). | 4 - Program, Shutter-priority AE, Aperture-priority AE, Manual mode. |
Metering Zones
| 420 | 2,016 | 1,005 | |
Metering Modes
| 1) 3D Color Matrix Metering II (type G and D lenses); Color Matrix Metering II (other CPU lenses); metering performed by 420-segment RGB sensor. 2) Center-weighted: Weight of 75% given to 6, 8 or 10 mm dia. circle in center of frame. 3) Spot: Meters 3.5 mm dia. circle (about 2.5% of frame) centered on active focus area. | 1) 3D Color Matrix Metering II (type G and D lenses); Color Matrix Metering II (other CPU lenses); color matrix metering available with non-CPU lenses if user provides lens data; metering performed by 2,016-segment RGB sensor. 2) Center-weighted: Weight of 75% given to 6, 8, 10 or 13mm dia. circle in center of frame. 3) Spot: Meters 3.5mm dia. circle (about 2.5% of frame) centered on active focus area (on center focus area when non-CPU lens is used). | 1) 3D Color Matrix Metering II (type G and D lenses); Color Matrix Metering II (other CPU lenses); color matrix metering available with non-CPU lenses if user provides lens data; metering performed by 1,005-segment RGB sensor. 2) Center-weighted: Weight of 75% given to 6, 8, 10 or 13mm dia. circle in center of frame. 3) Spot: Meters 3mm dia. circle (about 2.0% of frame) centered on active focus area (on center focus area when non-CPU lens is used). | |
Metering System Working Range
| 1) EV 0 ~ 20 (Matrix or center-weighted metering) 2) EV 2 ~ 20 (spot metering) (ISO 100 equivalent, f/1.4 lens, 20°C/68°F) | 1) EV 0 ~ 20 (Matrix or center-weighted metering) 2) EV 2 ~ 20 (spot metering) (ISO 100 equivalent, f/1.4 lens, 20°C/68°F) | 1) EV 0 ~ 20 (Matrix or center-weighted metering) 2) EV 2 ~ 20 (spot metering) (ISO 100 equivalent, f/1.4 lens, 20°C/68°F) | |
Nikon Scene Recognition System
| Yes | Yes | Yes | |
ISO Range / Extended
| 100 / 200 ~ 3200 / 6400 | 100 ~ 6400 / 25600 | 100 / 200 ~ 3200 / 6400 | |
Exposure Compensation
| +/- 5EV in 1, 1/2 or 1/3EV increments | +/- 5EV in 1, 1/2 or 1/3EV increments | +/- 5EV in 1, 1/2 or 1/3EV increments | |
Automatic Exposure Bracketing
| 2 or 3 shots, 1/3, 1/2, 2/3, 1 or 2 EV steps | 2 or 3 shots, 1/3, 1/2, 2/3 or 1 EV steps | 2 to 9 exposures in increments of 1/3, 1/2, 2/3 or 1 EV | |
Active D-Lighting
| Yes 4 levels + Auto | Yes 5 levels + Auto | Yes 5 levels + Auto | |
| Shutter Speeds, Frame Rate |
Shutter Type
| Electronically controlled mechanical | Electronically controlled mechanical | Electronically controlled mechanical |
Shutter Speed Range
| 1/4000 ~ 30 sec. in steps of 1/3 or 1/2 EV, bulb | 1/8000 ~ 30 sec. in steps of 1/3 or 1/2 EV, bulb | 1/8000 ~ 30 sec. in steps of 1/3 or 1/2 EV, bulb | |
Maximum Frames Per Second / Buffer depth
| 4.5 fps / >20 JPEG large/fine 4.13 fps / 10 RAW (12-bit) | 5.92 fps / 19 JPEG large/fine 5.88 fps / 10 RAW (14-bit) | 7.1 fps / 26 JPEG large/fine or 17 (12-bit) RAW 2.67 fps / 22 (14-bit) RAW (up to 8 fps with optional MB-D10 battery pack) | |
| Flash |
Built-in Flash / Guide Number (m) at ISO 100
| Yes (12, manual 13) | Yes (12, manual 13) | Yes (12, manual 13) |
Max flash x-sync speed. (sec.)
| 1/200 | 1/250 (up to 1/320 at reduced GN) | 1/250 (up to 1/320 at reduced GN) | |
Flash Exposure Compensation
| -3 to +1 EV, 1/3 or 1/2 EV steps | -3 to +1 EV, 1/3 or 1/2 EV steps | -3 to +1 EV, 1/3 or 1/2 EV steps | |
Slow-sync Flash
| 1st or 2nd curtain | 1st or 2nd curtain | 1st or 2nd curtain | |
PC Sync Terminal
| Hot shoe only | Hot shoe only | Yes | |
Nikon Advanced Wireless Lighting Support
| Yes, camera can act as wireless controller with multiple groups, modes and channels | Yes, camera can act as wireless controller with multiple groups, modes and channels | Yes, camera can act as wireless controller with multiple groups, modes and channels | |
| Playback System |
LCD Size / Pixel Count
| 3.0 in LCD / 920,000 pixels | 3.0 in LCD / 920,000 pixels | 3.0 in LCD / 920,000 pixels |
Enlarged Playback / Scroll
| 1.1 - 27x for large images, 20x for medium images, or 13x for small ones / Yes | 1.1 - 31x for large images, 23x for medium images, or 15x for small ones / Yes | 1.1 - 27x for large images, 20x for medium images, or 13x for small ones / Yes | |
Calendar View
| Yes | Yes | No | |
LCD Monitor Brightness Adjustment Range
| 7 steps | 7 steps | 7 steps | |
Automatic Rotation for Vertical Shots
| Yes | Yes | Yes | |
Video Out
| Analog NTSC/PAL, HDMI | Analog NTSC/PAL, HDMI (CEC) | Analog NTSC/PAL, HDMI | |
| Other Features |
Computer Connection
| Yes, USB 2.0 High-Speed | Yes, USB 2.0 High-Speed | Yes, USB 2.0 High-Speed |
Direct Printing (PictBridge-compliant printers)
| Yes | Yes | Yes | |
Menu Languages
| 16 (Japanese, German, English, Spanish, Finnish, French, Italian, Dutch, Polish, Portuguese, Russian, Swedish, Norwegian, Traditional Chinese, Simplified Chinese, Korean) | 22 (Japanese, German, English, Spanish, Finnish, French, Italian, Dutch, Polish, Portuguese, Russian, Swedish, Traditional Chinese, Simplified Chinese, Korean, Danish, Norwegian, Arabic, Czech, Indonesian, Thai, Turkish) | 17 (Japanese, German, English, Spanish, Finnish, French, Italian, Dutch, Polish, Portuguese, Russian, Swedish, Traditional Chinese, Simplified Chinese, Korean, Danish, Norwegian) | |
Camera Default Reset
| Yes | Yes | Yes | |
Custom Functions (Quantity)
| Yes (41) | Yes (48) | Yes (48) | |
Multiple Exposures
| Yes (2~3 shots) | Yes (2~3 shots) | Yes (2~10 shots) | |
In-camera Image Retouching
| Yes | Yes | Yes | |
Remote Control
| Yes, accessory terminal for optional MC-DC2 wired remote, or ML-L3 wireless remote | Yes, accessory terminal for optional MC-DC2 wired remote, or ML-L3 wireless remote | Yes, 10-pin remote terminal for optional MC-20/30/36 remote cords or WT-4 wireless remote | |
Info LCD Panel / Illumination
| Yes / Yes (power switch) | Yes / Yes (power switch) | Yes / Yes (power switch) | |
Number of Command Dials
| 2 | 2 | 2 | |
Optional GPS Support
| Yes, via optional GP-1 | Yes, via optional GP-1 | Yes, via optional GPS Adapter Cord MC-35 | |
Programmable function button
| Yes | Yes | Yes | |
In-camera Lateral C.A. Correction
| Yes | Yes | Yes | |
Geometric Distortion Correction
| No | Yes | No | |
D-Movie Modes
| 1280x720p@24fps (16:9) 640x424p@24fps (3:2) 320x216p@24fps (3:2) with monaural audio (internal microphone only) | 1920x1080p@24fps (16:9), 1280x720p@30/25/24fps (16:9) 640x424p@30/25fps (3:2) 320x216p@30/25fps (3:2) with monaural audio (internal microphone) or stereo audio (external microphone) w/ 3.5mm jack | 1280x720p@24fps (16:9) 640x424p@24fps (3:2) 320x216p@24fps (3:2) with monaural audio (internal microphone) or stereo audio (external microphone) w/ 3.5mm jack | |
Movie Format
| AVI Motion JPEG | MOV H.264/MPEG4 | AVI Motion JPEG | |
Dedicated Movie Button
| No | Yes | No | |
Virtual Horizon
| No | Yes | Yes | |
Intervalometer
| No | Yes | Yes | |
Articulating LCD
| No | No | No | |
| Body Structure |
Body Cover/Chassis
| Largely Polycarbonate | Largely Magnesium Alloy | Largely Magnesium Alloy |
Environmental Seals
| No | Yes | Yes | |
| Power System |
Battery Compatibility
| EN-EL3e, optional MB-D80 battery pack | EN-EL15, optional MB-D11 battery pack | EN-EL3e, optional MB-D10 battery pack |
CIPA Rated Shooting Capacity (shots)
| 850 | 1050 | 950 | |
| Dimensions & Weight |
Dimensions (WxHxD, mm)
| 132 x 103 x 77 | 132 x 105 x 77 | 147 x 114 x 74 |
Weight (body only)
| 620 g | 690 g | 840 g | |
| Operational Environment |
Operating Temperature Range
| 0 ~ 40°C | 0 ~ 40°C | 0 ~ 40°C |
Operating Humidity Range
| < 85% | < 85% | < 85% | |
| Kit Lens |
Focal Length / Aperture
| 18-105mm f/3.5-5.6G VR | 18-105mm f/3.5-5.6G VR | - |
| Lens Compatibility |
Meter Coupling
| CPU | Combined CPU and AI | Combined CPU and AI |
In-body AF Motor
| Yes | Yes | Yes | |
Lens Mount / Compatibility
|
|
|
| |
Nikon D7000 Design

(Illustration courtesy Nikon USA)
1
|
Built-in flash
|
10
|
AF-mode button
|
2
|
Flash mode button
|
11
|
Focus mode selector
|
Flash compensation button
|
12
|
Meter coupling lever
| |
3
|
Bracketing (BKT) button
|
13
|
Mirror
|
4
|
Infrared receiver (front)
|
14
|
USB connector
|
5
|
Mounting mark
|
15
|
A/V connector
|
6
|
Built-in microphone
|
16
|
HDMI mini-pin connector
|
7
|
Lens release button
|
17
|
Accessory terminal
|
8
|
Connector cover
|
18
|
Connector for external microphone
|
9
|
Cover for accessory terminal and external microphone connectors
|
The Nikon D7000 has a new body design that sits somewhere in between those of the previous D90 and D300s models, in terms of both control layout and features. The D7000's body is nearly identical to that of the D90 in terms of size, and around half an inch less wide and tall than the D300s. Body-only, it weighs some 2.3 ounces (70g) more than the D90, but is still a significant 5.9 ounces (150g) lighter than the D300s. The D7000's design combines both magnesium alloy and polycarbonate panels over a polycarbonate chassis, and includes an array of environmental seals for dust and water resistance. The top and rear body panels of the camera itself are magnesium alloy, while the front, side, and base panels are all polycarbonate. Nikon doesn't specifically state how many seals the D7000 contains, but its marketing materials state that all joints and "various points" on the camera body have been sealed, and that the sealing has been "severely tested against moisture and dust". The optionally available MB-D11 portrait / battery grip has magnesium alloy panels front and rear, and also includes a variety of environmental seals. Of particular note in this view, the Focus Mode selector now includes an AF-mode button at its center, a design which differs from both those of the D90 and D300s.

(Illustration courtesy Nikon USA)
1
|
AF-assist illuminator
|
6
|
Battery-chamber cover latch
|
Self-timer lamp
|
7
|
Contact cover for optional MB-D11 battery pack
| |
Red-eye reduction lamp
|
8
|
Power connector cover
| |
2
|
Sub-command dial
|
9
|
CPU contacts
|
3
|
Function (Fn) button
|
10
|
Lens mount
|
4
|
Depth-of-field preview button
|
11
|
Tripod socket
|
5
|
Battery-chamber cover
|
As can be seen in the previous two views, front panel control placement on the D7000 is near-identical to that of the D90. A couple of notable differences between the two cameras can be found on the D7000's base, however. The D90's optional portrait / battery grip interfaced with the camera courtesy of a large dummy battery projection, where the D7000 does so via a proprietary connector that's hidden under a soft rubber flap adjacent to the battery compartment door. This change also means that where the D90's battery compartment door was removable, and could be stored in the grip when not in use, the D7000 has a fixed compartment door. The different approach means that if you want to swap both batteries in the D7000 you'll first need to remove the grip, but it also makes the grip itself rather less bulky, and perhaps makes it a little quicker to attach and remove.

(Illustration courtesy Nikon USA)
1
|
Viewfinder eyepiece
|
10
|
Diopter adjustment control
|
2
|
Rubber eyecup
|
11
|
AE-L / AF-L button
|
3
|
Delete button
|
12
|
Speaker
|
Format button
|
13
|
Main command dial
| |
4
|
Playback button
|
14
|
Live view switch
|
5
|
Monitor
|
15
|
Movie-record button
|
6
|
Menu button
|
16
|
Multi selector
|
7
|
Help / Protect button
|
17
|
Memory card slot cover
|
White balance button
|
18
|
OK button
| |
8
|
Thumbnail / Playback zoom out button
|
19
|
Infrared receiver (rear)
|
ISO sensitivity button
|
20
|
Focus selector lock
| |
9
|
Playback zoom in button
|
21
|
Memory card access lamp
|
Image quality / size (QUAL) button
|
22
|
Info button
| |
Two-button reset button
|
Several significant differences between the D7000 and its siblings can be seen from the camera's rear. The D7000 features a traditional Mode dial as in the D90, but places this above a lockable release mode dial similar to that in the D300s. Also like the D300s, the D7000 places its Playback and Delete buttons side by side, just to the left of the viewfinder eyepiece. The column of buttons adjacent to the left of the LCD display are all dual-purpose, as in the D90, but with the playback button now relocated, there are only four buttons in the column. Unlike both the D90 and D300s, the D7000 features Nikon's latest user interface design for live view and movie recording, which relies on a dedicated, spring-loaded switch to enable and disable live view, while a small button at the center of this switch conveniently starts and stops movie recording with a press of the thumb. It's an intuitive design that provides quick access to live view and movie capture no matter what the camera's current operating mode, and makes it relatively easy to avoid shaking the camera at the start and end of movie clips. It does, however, bring the potential for some confusion, given that the Mode dial position doesn't necessarily correlate to the exposure variables one can adjust before or during movie capture.

(Illustration courtesy Nikon USA)
1
|
Release mode dial
|
9
|
Exposure compensation button
|
2
|
Mode dial
|
Two-button reset button
| |
3
|
Eyelet for camera strap
|
10
|
Metering button
|
4
|
Release mode dial lock release
|
Format button
| |
5
|
Accessory shoe (for optional flash unit)
|
11
|
Eyelet for camera strap
|
6
|
Accessory shoe cover
|
12
|
Focal plane mark
|
7
|
Power switch
|
13
|
Control panel
|
8
|
Shutter-release button
|
From the top, the D7000's top panel layout is closest to that of the D300s, although as previously noted, it relies on a traditional Mode dial as in the D90. Hence, it replaces the Exposure Mode button from the D300s with a Metering Mode button as in the D90. Unlike the D90's Mode dial, that in the D7000 combines all the camera's Scene modes into a single Scene position, freeing up space for two User mode positions, and reducing Mode dial clutter significantly.
Nikon D7000 Operation
With its many buttons, knobs, and dials, the Nikon D7000 could look intimidating to the unseasoned SLR user. But to the experienced shooter, the Nikon D7000's controls will quickly make this camera a photographer's best friend. All key buttons for essential controls are on the Nikon D7000's surface skin, and several of the buttons can be reprogrammed to meet your needs or personal shooting style. Several of the front-panel controls are positioned to fall right under your fingertips without moving your hands while shooting, making the camera extremely intuitive to use, once you've memorized the button locations. These include the Function, Depth-of-field Preview, and AF Mode buttons, and the Focus Mode lever. The functions of numerous controls can also be changed through the Custom Setting menu, allowing D7000 owners to tune the camera to their preferences.
Many functions can be changed using a button and the Main Command dial while looking at the Status LCD on the top deck, while several can be changed while looking at the viewfinder's info LCD. Other items are changed by pressing the Menu key and using the navigation disk on the back of the D7000.
Nikon D7000 Top Panel Status LCD
 As with most higher-end Nikon DSLRs, the top-panel data readout LCD communicates a lot of information about current camera settings, and is used in conjunction with the various buttons and Command dials to set many camera functions. You can also use the main LCD to adjust many of the same settings, but using the top LCD saves power and can be more convenient when the camera is below eye level. The info display in the optical viewfinder can also be used for some command, but lacks the level of detail provided by the top panel display. It's also always active whenever the camera is on and not in sleep mode, so you don't have to go into the menu system to make changes to the settings it supports. The panel is illuminated by a green backlight which is activated by a third, spring-loaded lamp position on the power switch. The illustrations below show the meaning of the various icons and readouts in this display.

1
|
Color temperature indicator
|
15
|
ISO sensitivity indicator
|
2
|
Shutter speed
|
Auto ISO sensitivity indicator
| |
Exposure compensation value
|
16
|
"K" (appears when memory remains for over 1000 exposures)
| |
Flash compensation value
|
17
|
"Beep" indicator
| |
White balance fine-tuning
|
18
|
Exposure compensation indicator
| |
Color temperature
|
19
|
Flash sync indicator
| |
White balance preset number
|
20
|
Flash compensation indicator
| |
Number of shots in bracketing sequence
|
21
|
Auto-area AF indicator
| |
Number of intervals for interval timer
|
AF-area mode indicator
| ||
Focal length (non-CPU lenses)
|
3D-tracking indicator
| ||
3
|
MB-D11 battery indicator
|
22
|
Autofocus mode
|
4
|
Battery indicator
|
23
|
Clock not set indicator
|
5
|
Flash mode
|
24
|
Interval timer indicator
|
6
|
Image size
|
25
|
Multiple exposure indicator
|
7
|
Image quality
|
26
|
Exposure and flash bracketing indicator
|
8
|
White balance fine-tuning indicator
|
WB bracketing indicator
| |
9
|
White balance
|
ADL bracketing indicator
| |
10
|
Aperture stop indicator
|
27
|
Bracketing progress indicator
|
11
|
Aperture (f-number)
|
28
|
GPS connection indicator
|
Aperture (number of stops)
|
29
|
Metering
| |
Bracketing increment
|
30
|
Number of exposures remaining
| |
Number of shots per interval
|
Number of shots remaining before buffer fills
| ||
Maximum aperture (non-CPU lens)
|
Capture mode indicator
| ||
PC mode indicator
|
ISO sensitivity
| ||
12
|
Flexible program indicator
|
Preset white balance recording indicator
| |
13
|
Memory card indicator (Slot 1)
|
Active D-Lighting Amount
| |
14
|
Memory card indicator (Slot 2)
|
Manual lens number
| |
HDMI-CEC connection indicator
|
Nikon D7000 Shooting Info Display
Like other recent Nikon DSLRs, the D7000 has the ability to display shooting info and settings on the main LCD. The main LCD is larger and in color, so some prefer to use it over the top LCD, at the expense of reduced battery life. It's nice that Nikon gives you the choice of display type with the D7000. The rear LCD's greater display area allows more information to be displayed, although it's important to note that not all data elements from the top-panel readout are replicated here. Because it's a full pixel-based display, it can also show greater detail, such as the differentiation between the available and starting AF points in Dynamic-Area AF mode.
The illustrations below show the meaning of the various icons and readouts available on the Shooting Display screen:


1
|
Shooting mode
|
18
|
White balance
|
2
|
Flexible program indicator
|
White balance fine-tuning indicator
| |
3
|
Flash sync indicator
|
19
|
Image quality
|
4
|
Shutter speed
|
Role played by card in slot 2
| |
Exposure compensation value
|
20
|
Image size
| |
Flash compensation value
|
21
| Flash mode | |
Number of shots in bracketing sequence
|
22
|
Beep indicator
| |
Focal length (non-CPU lenses)
|
23
|
Multiple exposure indicator
| |
Color temperature
|
24
|
Exposure and flash bracketing indicator
| |
5
|
Color temperature indicator
|
WB bracketing indicator
| |
6
|
Aperture stop indicator
|
ADL bracketing indicator
| |
7
|
Aperture (f-number)
|
25
|
ADL bracketing amount
|
Aperture (number of stops)
|
26
|
Interval timer indicator
| |
Bracketing increment
|
27
|
Camera battery indicator
| |
Maximum aperture (non-CPU lenses)
|
28
|
MB-D11 battery type display
| |
8
|
Exposure indicator
|
MB-D11 battery indicator
| |
Exposure compensation indicator
|
29
|
GPS connection indicator
| |
Exposure, Flash, and WB bracketing progress indicator
|
30
|
Metering
| |
9
|
Auto-area AF indicator
|
31
|
Depth-of-field preview button assignment
|
Focus points indicator
|
32
|
Color space
| |
AF-area mode indicator
|
33
|
Active D-Lighting indicator
| |
3D-tracking indicator
|
34
|
High ISO noise reduction indicator
| |
10
|
ISO sensitivity indicator
|
35
|
Movie quality
|
Auto ISO sensitivity indicator
|
36
|
Autofocus mode
| |
11
|
"K" (memory remains for over 1000 exposures)
|
37
|
Copyright information
|
12
|
Number of exposures remaining
|
38
|
"Clock not set" indicator
|
Manual lens number
|
39
|
Image comment indicator
| |
13
|
Fn button assignment
|
40
|
Release mode
|
14
|
AE-L / AF- button assignment
|
Continuous shooting speed
| |
15
|
Picture control indicator
|
41
|
Eye-Fi connection indicator
|
16
|
Long exposure noise reduction indicator
|
42
|
FV lock indicator
|
17
|
Auto distortion control
|
43
|
Flash compensation indicator
|
44
|
Exposure compensation indicator
|
Nikon D7000 Virtual Horizon
 A really neat feature of the D7000 first seen on the D3 is the virtual horizon gauge, activated from the Setup menu. The display remains active as long as certain buttons aren't pressed (such as the shutter release). Sensors in the body are used to detect the orientation of the camera and a virtual horizon is displayed in realtime, similar to an aircraft instrument, though it only shows left/right tilt (or "roll"). This is useful for critical alignment of subjects such as buildings, the horizon, etc. The virtual horizon display works in both landscape and portrait orientations. Courtesy of Custom Settings f3 or f4, the electronic analog scale in the viewfinder can also be made to display the amount of tilt. The virtual horizon is also available during Live View mode as one of the overlay options via the "Info" button. In Live View mode, the display is smaller and mostly translucent, so as not to obscure the preview.
Nikon D7000 Playback mode
 Playback mode is entered by pressing the playback button. The D7000's playback mode provides a great deal of information about your pictures after you've shot them. A variety of up to nine different playback displays can be cycled through using the up/down arrows on the multi-selector, including image with file information and and focus point display, with highlight warning, with RGB / luminance histograms and white balance information, three screens with overlaid shooting and image parameter information (an additional GPS info screen is available when a GPS device was used when the image was captured), and an overview display with basic shooting data and luminance histogram. The screenshot animation at right shows the sequence when the down arrow is used.
 As you'd expect, the Nikon D7000 offers a comprehensive RGB histogram display mode. Histogram displays are common on professional digital cameras (and many amateur models now), regarded as almost mandatory by many pros for evaluating exposure levels. A histogram is simply a graph of how many pixels there are in the image at each brightness level. The brightness is the horizontal axis, running from black at the left to white at the right. The height of the graph shows the relative number of pixels having each brightness level. This sort of display is very handy for determining under- or overexposure. Ideally, the histogram would stretch across the entire width of the display, using the full range of brightness values available. An underexposed image will have a histogram with all the data lumped on the left-hand side, with nothing reaching all the way to the right. Likewise, an overexposed image will have all the data lumped on the right hand side. Clipped highlights are shown by blinking any highlights that are saturated in any of the color channels. It does this by taking the nearly-white areas on the LCD and toggling them between white and black.
  As with the Highlights display mode, the blinking highlights in the histogram display mode can also be displayed separately for each color channel by selecting R, G, or B in the RGB Histogram display mode. The screenshots at right show an example of where this might be useful: The bright, strongly colored lamp shade (deliberately shot with an incorrect white balance, to produce the strong hue) showed only minor lost detail in the screenshot above, looking at the RGB or luminance highlights, but the shot at right shows that the red channel is badly blown. This is quite common: It's easy to lose detail in a strongly-colored object well before other, more neutral-colored highlights are lost.
 Finally, the shot at right shows a nice feature that is we're surprised isn't more common: You can zoom into the image and pan around the magnified display, and the RGB histogram will change to show only the portion of the image that you're looking at. In this mode, you lose the blinking highlights, but this strikes us as very useful for checking critical parts of the image, to see if you've held highlight or shadow detail in areas you really care about.
 Of course the D7000 also lets you zoom out to quickly find and select images, or magnify them for closer inspection on its gorgeous 3-inch, 922K pixel LCD. You have the normal 4-, 9- or 72-image thumbnail displays or a calendar view available by pressing the thumbnail/zoom out button, and you can magnify them up to approximately 31x for large, 23x for medium or 15x for small images, using the zoom in button. Once magnified, you can scroll around the image using the multi-selector to examine critical detail and framing. When you zoom in or out on an image, a little navigation window pops up in the lower right corner of the display, showing a thumbnail of the image, with a yellow box indicating the currently-viewed area. Portrait-mode images can also be automatically rotated to match the camera's current orientation, using the Rotate Tall option in the Playback menu. Of course, there are the usual options to protect or delete images or movies in Playback mode, as well. Since the D7000 offers dual memory card slots, the playback mode also allows the user to select only one card for review; it's also possible to limit review to only data from a specific folder, or only data captured using the D7000 (but not other cameras).
 Movies can be played by pressing the multi-selector's center button, and during movie playback both the down arrow and OK button serve as a pause / resume control. The left and right arrows allow cuing during playback, with subsequent presses adjusting the speed to 2, 4, 8 or 16x. While paused, these same buttons allow cuing through the video one frame at a time. Also while paused, the Help / Protect button can be used to call up the Retouch menu, where you can opt to save the current frame as a still image, or to trim off everything before or after the current point, with the result saved as a new file. Movies shorter than two seconds in length cannot be edited in-camera.
To return the D7000 to shooting mode, simply press the playback button again, or half-press the shutter button.
Nikon D7000 Viewfinder
 The Nikon D7000's viewfinder is rated at 100% coverage, and is a bright, pentaprism design with 0.94x magnification at 50mm and -1 diopter, and a 19.5mm eyepoint. A diopter adjustment dial to the top-right on the viewfinder eyepiece offers a diopter adjustment range of -3 to +1.
The focusing screen is a fixed (non-interchangeable) type B BriteView Clear Matte Mark II screen. A framing grid (shown below) can be displayed on demand via a Custom menu setting. The active focus area can be highlighted in red or black (normally, the active area is highlighted in black only). There are three AF Point Illumination Custom settings available: Auto, which highlights when needed to establish contrast with the background; On, which always highlights, and Off, which disables the red highlighting.
The data readout below the focusing screen is similar to the D90, though the focus indicator has an enhanced range-finder function (the arrows indicate the direction to manually focus), the numerical field at the extreme right shows additional settings such as Active D-Lighting amount and AF-area mode when those features are adjusted, as well as some other minor changes. Compared to the D300S, the D7000's viewfinder doesn't show current metering mode, exposure mode or a full-time ISO display, though it does show some information the D300S does not, such as the no-card warning, B/W mode, range-finder arrows, tilt display, AF-area mode and Active D-Lighting amount.
The graphic (courtesy of Nikon USA) and table below shows what information is displayed in D7000's viewfinder.

1
|
On-demand framing grid
|
15
|
Flash-ready indicator
|
2
|
Focus areas
|
16
|
FV lock indicator
|
Spot metering targets
|
17
|
Flash sync indicator
| |
3
|
AF area brackets
|
18
|
Aperture stop indicator
|
4
|
Battery indicator
|
19
|
Electronic analog exposure display
|
5
|
Black and White indicator
|
Exposure compensation display
| |
6
|
No memory card warning
|
Tilt indicator
| |
7
|
Focus indicator
|
20
|
Flash compensation indicator
|
8
|
Autoexposure (AE) lock
|
21
|
Exposure compensation indicator
|
9
|
Shutter speed
|
22
|
Auto ISO sensitivity indicator
|
AF mode
|
23
|
Number of exposures remaining
| |
10
|
Aperture
|
Number of shots remaining before memory buffer fills
| |
11
|
Low battery warning
|
ISO sensitivity
| |
12
|
Exposure and flash bracketing indicator
|
Preset WB recording indicator
| |
WB bracketing indicator
|
Exposure compensation value
| ||
ADL bracketing indicator
|
Flash compensation value
| ||
13
|
ISO sensitivity indicator
|
Active D-Lighting amount
| |
14
|
"K" (appears when memory remains for over 1,000 frames)
|
AF-area mode
|
Viewfinder Test Results
Coverage
Very good accuracy with the optical viewfinder, excellent on the LCD monitor in Live View mode.
Very good accuracy with the optical viewfinder, excellent on the LCD monitor in Live View mode.
 |  |
| 70mm, Optical | 70mm, Live View LCD |
The Nikon D7000's optical viewfinder proved fairly accurate, with almost 98% coverage when measured with our Sigma 70mm f/2.8 test lens. This is very good for a non-pro model, but short of the 100% coverage Nikon claims. That said, though, it's tough to frame to within a percent or two when squinting through a viewfinder eyepiece, so the actual accuracy could be a shade higher than we measured here. The resulting image is shifted vertically and slanted slightly to the left, which is unfortunately isn't uncommon with optical viewfinders these days. The camera's Live View LCD mode was extremely accurate, with essentially 100% coverage in our measurements.
Nikon D7000 Live View
The Nikon D7000 includes live view capability with one-touch activation, via a dedicated Live View switch on its rear panel, in very convenient reach of your thumb. Flick it at any time, and the mirror flips up, with the camera immediately entering Live View mode. A button at the center of the Live View switch is used to start and stop movie recording..
Live View Mode Displays

1
|
Shooting mode
|
6
|
Autofocus area mode
|
2
|
"No movie" icon
|
7
|
Focus point
|
3
|
Audio recording indicator
|
8
|
Time remaining (movie mode)
|
4
|
Time remaining
|
9
|
Movie quality
|
5
|
Focus mode
|
10
|
Monitor brightness
|
 A nice feature of the Nikon D7000's Live View mode is the optionally available, full information display. The Live View mode shooting info display shows you a lot of what you'd normally see looking through the viewfinder, yet manages to keep most of the information out of the way of the live image area. Information displayed includes current exposure mode, flash mode, AF mode, AF-area mode, Active D-Lighting mode, image size, image quality, white balance mode, metering mode, shutter speed, aperture, exposure compensation, ISO setting, shots remaining, face detection status, and battery status. In a separate overlay mode, it also shows microphone status and minutes/seconds of movie recording available at the current resolution and quality settings, and indicates the area of the frame that will be outside the movie crop by darkening it. There's also a third info overlay that only shows basic exposure variables, as well as a grid overlay display, and a single axis (roll) electronic level display, all of which include small crop marks to indicate the movie capture area.
A very nice detail is that you can adjust the LCD monitor's brightness (with no effect on the exposure / brightness of captured images) without needing to enter the camera's menu system. This is achieved by holding in the Help / Protect button,and pressing the Up or Down arrow keys on the four-way controller. It's a clever design, because when shooting in live view mode, you can find yourself often wanting to change the display brightness as you roam around taking photos in varying ambient lighting conditions. One thing we miss in the Nikon D7000, though, is the live histogram display that's an option on the Nikon D3 and on some competing SLRs from Nikon's rivals -- even in some entry-level cameras.
Like the D90 and the company other subsequent DSLRs, the Nikon D7000 has only one type of autofocus method in Live View, and it's not the traditional phase-detect AF. The D7000's only option for autofocus in Live View mode is contrast detection. This is a fairly radical difference, compared to other camera makers.
Contrast-detect vs. Phase-detect Autofocus
By way of explanation, the phase-detect/contrast-detect distinction is one of the fundamental differences that separates digicams from digital SLRs, and is the core reason that SLRs focus more quickly. Contrast-detection autofocus involves looking at the image from a camera's main image sensor and evaluating it to see how abruptly brightness values change from one pixel to the next. If an image is soft and fuzzy, brightness changes between adjacent pixels will be relatively slight, but if it's sharply focused, they'll be much greater. The point of ideal focus is found by moving the lens elements back and forth, and determining whether the contrast signal gets stronger or weaker. Achieving focus this way necessarily involves some back-and-forth hunting, which can take a while to accomplish. By contrast (no pun intended), phase-detect AF uses a system of prisms, lenses, and a secondary sensor to determine not only whether the image is in focus or not, but by how much it's out of focus and in which direction. The camera can then adjust the focus setting to exactly the position needed, either in a single step, or perhaps with a quick secondary check once the initial focus adjustment has been made. As a result, phase-detect AF systems are generally much faster than contrast-detect ones.
The catch with phase-detect AF, though, is that it requires some of the light passing through the lens to be diverted to the focus sensor. This is fine in an SLR, when the mirror is down between exposures, as typically part of the mirror can be made to be partially transmissive, with the light passing through it deflected by a secondary mirror down to the AF sensor, usually located in the bottom of the mirror box. When the mirror is raised in Live View mode, though, light from the lens can't get to the separate AF sensor. This accounts for the rather lengthy (and noisy) phase detection AF cycles in most Live View-capable SLRs: To focus the camera the mirror has to be dropped, focus determined, and the mirror raised again, adding several tenths of a second to the normal non-Live View shutter lag.
For example, when shooting with our Sigma 70mm f/2.8 prime lens, the Nikon D7000 has a shutter lag of only 0.238 second when using the optical viewfinder and a single AF point. This increases to an average of 1.95 seconds in Live View mode via contrast-detect, all other settings being the same. While it takes some time for the mirror to drop and re-open for phase-detect AF in Live View mode, the overall result can still be faster than when relying on contrast-detect autofocus. The Nikon D300 for instance can focus and capture a shot in 0.473 second in Live View mode using phase-detect AF, with the same Sigma lens.
With the above as background, you can see why we were surprised to find contrast-detect AF the only autofocus option available on the D90, and continue to be surprised that they've carried that limitation forward on the Nikon D7000. It's a little bit faster than its equivalent in the D5000, but the Nikon D7000's contrast-detect AF in Live View mode clearly still isn't something you're going to be using for sports shooting.
| Nikon D7000 Live View Autofocus | |
 |  |
| As shown here, one advantage of contrast-detect AF is that you can put the AF box wherever you like it. (In this case, we've put it top center.) When focus is locked, the focus box changes from red to green. | |
One advantage of contrast-detect autofocus, though, is that you're not restricted to focusing only on those areas where you happen to have an AF point. The Nikon D7000 lets you put the focus box anywhere in the frame when in Live View mode.
| Nikon D7000 Live View Autofocus | |
 |  |
| Contrast-detect AF also opens the possibility of advanced modes like face-detection. The Nikon D7000 will change both the location and size of the face-detect box to accommodate changes in subject size and position, and can detect up to 35 faces in a scene simultaneously. | |
Besides the ability to position the AF area wherever you like it, the Nikon D7000's contrast-detect AF in Live View mode also offers face detection. Up to 35 faces can be detected in an image in Face Priority mode, and the AF areas adjust to match the size of each face detected. The primary face-detect box shows yellow when not in focus, and green when in focus (after half-pressing the shutter button). The video clip at right shows the earlier D90 model tracking a live face while zooming in and out and panning around. While the Nikon D7000 can detect many more faces simultaneously, its face detection autofocus mode is otherwise very similar.

Face detection. Here's a look at the D90's face detection working with a live subject, which operates similarly on the Nikon D7000. Click to view/download 1.7MB MPEG-4 file.
Playing with face-detect autofocus in Live View mode, we were pleased to see that the camera not only tracked the faces, but was also intelligent enough to set focus based on the eyes of subjects, rather than on their noses or mouths. (In portrait work, the eyes are the most critical part of the face to render in sharp focus. Other parts of the face can be soft but viewers will regard the shot as properly focused if the eyes are crisp.)
Other Nikon D7000 Live View autofocus modes are: Wide Area, designed for hand-held shots of landscapes and other non-portrait subjects; Normal Area, designed for pin-point focusing using a tripod; and Subject Tracking. This mode is designed to track just about any selected subject as it moves around the frame -- it need not have a face.
Manual Focusing in Live View Mode
During manual focusing, the Live View display on the Nikon D7000 can be magnified quite considerably, but it seems it's not all that you might expect from the specifications. In Live View mode, pressing the magnifying glass button on the camera's back lets you zoom in up to a maximum of 6.7x. The viewfinder image at this magnification isn't sharp, though; it seems the camera is actually grabbing fewer pixels than that section of the sensor actually contains and then interpolating them to form the image. (You can check this by snapping a shot and then magnifying the resulting image to the same degree in playback mode. Doing this, you'll find the image is quite a bit sharper than what you saw on the LCD in Live View mode.) While the magnified Live View display is still usable for focusing, it isn't as sharp as it could be, nor as sharp as the Live View display on some of Canon's SLR models sporting this feature.
Nikon D7000 Modes and Menus
Nikon D7000 Exposure Modes
 The mode dial on the left side of the D7000's top panel provides access to its various exposure modes, with the usual Program, Aperture-priority, Shutter-priority, and Manual operating modes found on all Nikon DSLRs, plus an Auto mode, a total of seven Scene modes, and a Guide mode that helps beginners get to grips with their first DSLR. Here's a list of what's available:
Program: Puts the camera in charge of aperture and shutter speed, though all remaining camera settings are available. You can vary the combination of aperture and shutter speed the camera has selected, while retaining the same exposure level, by rotating the Main Command dial. Called Flexible Program in Nikon parlance, this function is otherwise known as Program Shift, and is a great way to quickly bias your exposure without needing to switch to a Priority mode.
Shutter Priority: The user controls shutter speed, from 1/8,000 to 30 seconds, while the camera sets the aperture value.
Aperture Priority: The opposite of Shutter Priority mode, this mode lets the user control the aperture, while the camera sets the shutter speed.
Manual: Gives the user complete control over the exposure (both shutter and aperture settings). Also provides access to the camera's Bulb shutter setting (for exposures longer than 30 seconds), and x250 setting (which fixes the D7000 at its 1/250 second flash sync speed.)
Auto: The camera sets almost everything. Used for snapshots, or users who just don't want to be bothered with the details of how the camera will do its work. The AF-assist light will come on if needed, and the camera selects the AF point covering the closest subject.
Auto (Flash Off): Nearly identical to the Auto mode, but the flash is disabled, and the camera will use higher sensitivities to capture images using available light. By default, the autofocus assist light will come on if needed, although this can be manually disabled. This mode is great for museums and other places where flash isn't permitted, more natural-looking indoor shots, etc. (Do note though, that you may need to use a tripod, as the shutter speeds may still be on the slow side, depending on available light levels.)
Scene: This single Mode dial position provides access to all 19 of the D7000's scene modes. The Main Command dial is used to select the active scene mode when the Mode dial is in the Scene position, and the precise selection of restrictions and available functions varies depending on the Scene type selected. Available scene modes are Portrait, Landscape, Child, Sports, Close Up, Night Portrait, Night Landscape, Party / Indoor, Beach / Snow, Sunset, Dusk / Dawn, Pet Portrait, Candlelight, Blossom, Autumn Colors, Food, Silhouette, High Key, and Low Key.
User 1: The Nikon D7000 allows most camera settings -- including Custom settings, Exposure mode, and even aperture / shutter speed when in A/S/M modes -- to be saved for later recall. Settings are saved through the Setup menu by first configuring the camera as desired, and then selecting the U1 or U2 memory positions from the Save User Settings option. Switching the Mode dial to the U1 position recalls User Settings group 1.
User 2: Identical to the User 1 position, but recalls User Settings group 2.

Nikon D7000 Menus
Pressing the Menu button provides access to the camera's full menu system. The D7000's menus are arranged in a vertical tab structure, with icons for each tab along the left side. The multi-selector is used to navigate the menus.

| Playback Menu Options | |||
Top-Level
Selection |
Second-Level
|
Third-Level
|
Notes
|
Delete
|
- Selected
- All |
- Select Image(s)
|
Deletes pictures from the camera memory card. Hidden and protected images will not be deleted.
|
- Select Date
|
- Select Date(s)
| ||
- All
|
- Slot 1
- Slot 2 | ||
Playback Folder
|
- D7000
- All - Current |
Select a folder for playback. The camera will show images in all folders created by a Nikon D7000, but not those in folders created by other cameras.
| |
Hide Image
|
- Select / set
- All |
- Select Image(s)
|
Reveal or hide selected images.
|
- Select Date
|
- Select Date(s)
| ||
- All
|
Reveal all hidden images?
- Yes - No | ||
Display Mode
|
- Done
|
Allows you to select what shooting information is displayed with the picture during playback. Each listed parameter may be enabled or disabled.
| |
- Basic photo info
|
- Focus point
| ||
- Detailed photo info
|
- Highlights
- RGB histogram - Data | ||
Copy Image(s)
|
- Select source
|
- Slot 1
- Slot 2 |
Allows specific images or folders of images to be copied between cards, to either a new or an existing one. Only available when multiple cards are inserted in the camera.
|
- Select image(s)
|
- Select source folder
- Deselect all - Select all images - Select protected images -- Select additional images | ||
- Select destination folder
|
- Folder number entry screen
- Existing folder list | ||
- Copy images?
|
- Yes
- No | ||
Image Review
|
- On
- Off |
Lets you choose to see each image right after shooting it or not.
| |
After Delete
|
- Show next
- Show previous - Continue as before |
Lets you choose which remaining picture will be displayed after an image is deleted.
| |
Rotate Tall
|
- On
- Off |
Rotates pictures that were shot in portrait orientation to be right side up on the LCD monitor.
| |
Slide Show
|
- Start
|
- OK
|
Allows you to create a slide show of existing pictures with your choice of interval between pictures. Hidden pictures will not be displayed.
|
- Frame interval
|
- 2 s
- 3 s - 5 s - 10 s | ||
Print Set (DPOF)
|
- Select/set
|
- Select image screen
-- Done -- Data imprint -- Imprint date |
Allows you to select which pictures will print on a DPOF compatible printer.
|
- Deselect all?
|
Remove print marking from all images?
- Yes - No | ||

| Shooting Menu Options | |||
Top-Level
Selection |
Second-Level
|
Third-Level
|
Notes
|
Reset Shooting menu
|
- Yes
- No |
Restores all shooting menu options to their default values.
| |
Storage Folder
|
- Select folder by number
|
- 100-999
|
Choose the active folder name where your images will be stored.
|
- Select folder from list
|
- 100D7000
- 101D7000 ...etc. | ||
File Naming
|
- File naming
|
- On-screen keyboard
|
This is used to change the file name prefix. To distinguish files shot in the sRGB or Adobe RGB color spaces, sRGB have an underscore added after the prefix, and Adobe RGB have an underscore added before the prefix.
|
Role Played By Card In Slot 2
|
- Overflow
- Backup - Raw Slot 1 - JPEG Slot 2 |
Selects whether the secondary slot should serve as an overflow once the primary card is filled, a backup (duplicate) of data written to the primary card, or whether the primary card should receive Raw files while JPEGs are written to the secondary card. If either of the latter two options is selected, the "shots remaining" display will refer to the card with less capacity remaining, and the camera won't take any more pictures once either of the cards fills up.
| |
Image Quality
|
- NEF (RAW) + JPEG fine
- NEF (RAW) + JPEG normal - NEF (RAW) + JPEG basic - NEF (RAW) - JPEG fine - JPEG normal - JPEG basic |
Choose the type(s) of file you want to capture.
| |
Image Size
|
- Large (4,928 x 3,264; 16.1 M)
- Medium (3,696 x 2,448; 9.0 M) - Small (2,464 x 1,632; 4.0 M) |
Choose the images size you want to capture. Only applies to JPEG images, and only available when JPEG or Raw+JPEG modes are selected in the previous option.
| |
JPEG Compression
|
- Size priority
- Optimal quality |
Compress images based on a fixed file size or on the best quality. Only applies to JPEGs, but unlike the previous option, the setting can be changed even if you're only shooting Raw images.
| |
NEF (RAW) recording
|
- Type
|
- Lossless compressed
- Compressed |
Choose the type and bit depth of the Raw images you want to capture.
|
- NEF (RAW) bit depth
|
- 12-bit
- 14-bit | ||
White Balance
|
- Auto
- Incandescent - Fluorescent (Sodium-vapor, Warm-white, White, Cool-white, Day white, Daylight, High temp. mercury-vapor) - Direct Sunlight - Flash - Cloudy - Shade - Choose color temp. - Preset manual |
- Adjustment screen (all modes except "Choose color temp" which allows you to choose color temp from 2500K to10,000K)
|
Adjusts the white balance to match the conditions you are shooting in.
|
Set Picture Control
|
- Standard
- Neutral - Vivid - Monochrome - Portrait - Landscape - C-1 - C-2 - C-3 - C-4 - C-5 - C-6 - C-7 - C-8 - C-9 |
- Quick adjust
- Sharpening - Contrast - Brightness - Saturation - Hue - Filter effects - Toning |
Picture controls allow the look of images to be tweaked, adjusting the intensity of sharpening, contrast, brightness, saturation and hue. For Monochrome presets, the filter effects and toning options replace saturation and hue. All presets can be further adjusted by the user, and the quick adjust function varies the cumulative strength of the other sliders.. The C1 through C9 options only appear when created by the user through the Manage Picture Control menu item, and can be renamed.
|
Manage Picture Control
|
- Save/edit
- Rename - Delete |
- Picture control selection screen
|
Allows up to nine new picture controls to be created in-camera at any one time. Picture controls can be renamed, copied, and saved to or read from a flash card, allowing them to be shared between cameras.
|
- Load/save
|
- Copy to camera
- Delete from card - Copy to card | ||
Auto Distortion Control
|
- On
- Off |
Corrects for barrel or pincushion distortion, when shooting with type-G or type-D lenses, excluding PC, fisheye, and certain other models. Reduces burst shooting rate when enabled.
| |
Color Space
|
- sRGB
- Adobe |
Determines which color space should be used for JPEG files.
| |
Active D-Lighting
|
- Auto
- Extra high - High - Normal - Low - Off |
Selects whether Nikon's Active D-Lighting technology should be applied automatically, disabled altogether, or applied with a preset strength. Active D-Lighting attempts to optimize visual dynamic range by adjusting the exposure, and then selectively tone-mapping to preserve highlight and shadow detail.
| |
Long Exp. NR
|
- On
- Off |
Enables or disables dark current noise reduction when using exposures longer than eight seconds. If enabled, the total time to capture each image is doubled.
| |
High ISO NR
|
- High
- Normal - Low - Off |
Disables or selects the strength of noise reduction. Even when set to off, images shot at ISO 1,600 or greater will have high ISO noise reduction applied.
| |
ISO Sensitivity Settings
|
- ISO sensitivity
|
- Auto
- 100 - 125 - 140 - 160 - 200 - 250 - 280 - 320 - 400 - 500 - 560 - 640 - 800 - 1000 - 1100 - 1250 - 1600 - 2000 - 2200 - 2500 - 3200 - 4000 - 4500 - 5000 - 6400 - Hi 0.3 - Hi 0.5 - Hi 0.7 - Hi 1 - Hi 2 |
Allows manual selection of ISO sensitivity, as well as control over the range of sensitivities available under automatic control. The precise selection of sensitivities offered varies depending on the ISO sensitivity step value set in Custom Setting b1. If Auto ISO sensitivity control is enabled, then the camera will override the user's selection automatically if optimal exposure can't otherwise be achieved. The maximum sensitivity setting applies only when automatic control is enabled, and will override a higher manual setting by the user. The minimum shutter speed marks the point at which the camera will automatically raise sensitivity up to the selected sensitivity limit, when in program or aperture-priority modes.
|
- Auto ISO Sensitivity auto control
|
- On
- Off | ||
- Maximum sensitivity
|
- 200
- 400 - 800 - 1600 - 3200 - 6400 - Hi 1 - Hi 2 | ||
- Minimum shutter speed
|
- 1/4,000 s
- 1/3,200 s - 1/2500 s - 1/2000 s - 1/1600 s - 1/1250 s - 1/1000 s - 1/800 s - 1/640 s - 1/500 s - 1/400 s - 1/320 s - 1/250 s - 1/200 s - 1/160 s - 1/125 s - 1/100 s - 1/80 s - 1/60 s - 1/50 s - 1/40 s - 1/30 s - 1/15 s - 1/8 s - 1/4 s - 1/2 s - 1 s | ||
Multiple Exposure
|
- Done
|
- OK
|
Allows you to shoot either 2 or 3 exposures, and combine them into a single multiple-exposure image. Up to 30 seconds is allowed between exposures (plus the time set in Custom Setting c4, "Monitor Off Delay"), and the exposures can either be averaged by setting gain to "On", or the brightness values from each image simply added together.
|
- Number of shots
|
- 2
- 3 | ||
- Auto gain
|
- On
- Off | ||
Movie Settings
|
- Quality
|
- 1080 * 24 (1,920 x 1,080, 24 fps, high quality)
- 1080 24 (1,920 x 1,080, 24 fps, normal quality) - 720 * 30 (1,280 x 720, 30 fps, high quality) - 720 30 (1,280 x 720, 30 fps, normal quality) - 720 * 24 (1,280 x 720, 24 fps, high quality) - 720 24 (1,280 x 720, 24 fps, normal quality) - 424 * 30 (640 x 424, 30 fps, high quality) - 424 30 (640 x 424, 30 fps, normal quality) |
Allows setup of the camera's movie recording. Maximum clip length is 20 minutes or 4GB, whichever is reached first. Microphone sensitivity can be set to one of three levels, Auto, or off. Movies can be recorded to either card slot, but not both simultaneously. The selection screen lists an estimation of the recording time currently available on each card. Manual movie settings can be enabled or disabled, and if enabled, the Mode dial must also be set in the appropriate position (M or A) prior to enabling live view.
|
- Microphone
|
- Auto Sensitivity (A)
- High Sensitivity (3) - Medium Sensitivity (2) - Low Sensitivity (1) - Microphone Off | ||
- Destination
|
- Slot 1
- Slot 2 | ||
- Manual movie settings
|
- On
- Off | ||
Interval Timer Shooting
|
- Choose start time
|
- Now
- Start time |
Allows automatic capture of images at a pre-determined interval. (Intervalometer function.) You can delay the start time or have shooting start "now" (in actual fact, roughly three seconds after settings are completed). The interval between shots, the number of shots per interval, and the total number of intervals before capture stops can also be set. Exposure, flash, Active D-Lighting and white balance bracketing are all possible, and all but the latter will override the shots per interval setting. Interval capture can be paused and resumed through the menu. A viewfinder cover should be used during interval shooting to prevent stray light through the eyepiece from affecting the exposure.
|
- Start time
-- (00:00 to 23:59) - Interval -- (1s to 24h00m00s) - Select intvls X no. of shots -- (Intervals 1-999) -- (Shots 1-99) - On - Off | |||
Remote Control Mode
|
- Delayed remote
- Quick-response remote - Remote mirror-up |
Determines how the camera should respond when the shutter is triggered remotely -- either fire with a two-second delay, fire immediately, or raise the mirror on the first press, then trip the shutter on the second press.
| |

| Custom Menu a Options | |||
Top-Level
Selection |
Second-Level
|
Third-Level
|
Notes
|
Reset Custom Settings
|
- Yes
- No |
Restores custom settings to their default values.
| |
a - Autofocus
|
- a1 AF-C priority selection
|
- Release
- Focus |
For continuous servo AF, determines whether photos can always be taken regardless of focus lock, or only when focus lock is achieved.
|
- a2 AF-S priority selection
|
- Release
- Focus |
For single servo AF, determines whether photos can always be taken regardless of focus lock, or only when focus lock is achieved.
| |
- a3 Focus tracking w/lock-on
|
- 5 (Long)
- 4 - 3 (Normal) - 2 - 1 (Short) - Off |
Determines whether the camera should refocus immediately when the subject distance changes, or with varying levels of delay, to avoid losing focus when an object passes in front of the subject.
| |
- a4 AF point Illumination
|
- Auto
- On - Off |
Determines whether the active AF point should always be highlighted in the viewfinder, never be highlighted, or only highlighted when the camera determines that there is sufficient contrast to see the illuminated point.
| |
- a5 Focus point wrap-around
|
- Wrap
- No wrap |
Determines whether focus point selection should wrap around from top to bottom or left to right of the camera, and vice versa.
| |
- a6 Number of focus points
|
- AF39 39 points
- AF11 11 points |
Determines whether all 39 AF points should be available for selection, or only a subset of eleven points evenly distributed across the frame.
| |
- a7 Built-in AF-assist illuminator
|
- On
- Off |
Enables or disables the camera's built-in AF assist illuminator.
| |
- a8 Live view / movie AF
|
- Autofocus mode (AF-S / AF-F)
- AF-area mode (Face-priority AF, Wide-area AF, Normal-area AF, Subject-tracking AF) |
Determines how autofocus operates in live view / movie shooting. AF-S is single-servo (focuses with a half press of the shutter button until a lock is achieved or the camera gives up). AF-F is full-time AF, which focuses all the time until the shutter button is half-pressed, then acts similarly to AF-S until it is released. Face priority detects up to 35 faces in a scene, then focuses on the closest one. Wide-area and Normal-area AF provide two different fixed point sizes. Subject-tracking will follow a subject around the frame after you press the OK button with the subject under the AF point.
| |

| Custom Menu b Options | |||
Top-Level
Selection |
Second-Level
|
Third-Level
|
Notes
|
b - Metering / Exposure
|
- b1 ISO sensitivity step value
|
- 1/3 step
- 1/2 step |
Selects the step size for ISO sensitivity adjustment.
|
- b2 EV steps for exposure cntrl.
|
- 1/3 step
- 1/2 step |
Selects the step size for shutter speed, aperture and bracketing. (Note, though, that if setting b3 below is set to a smaller step, exposure comp will be made in steps of that size, but the exposure readouts will only indicate changes in steps the size set here in b2.)
| |
- b3 Easy exposure compensation
|
- On (Auto reset)
- On - Off |
Selects whether the exposure compensation button is needed to adjust the compensation level. Auto reset and On both allow adjustment without first pressing the exposure compensation button. Auto reset retains the compensation value only until the camera or exposure meters are turned off. On retains the value until the user cancels it.
| |
- b4 Center-weighted area
|
- 6 mm
- 8 mm - 10 mm - 13 mm - Average |
Determines what area at the center of the frame should be given greater weight in the center-weighted metering mode.
| |
- b5 Fine tune optimal exposure
|
- Matrix metering
- Center-weighted metering - Spot metering |
Allows separate fine-tuning of the camera's matrix, center-weighted and spot metering modes by +/-1EV in 1/6EV increments. As the camera warns, this shift is not shown in the exposure compensation readout, but applies to all exposures in each mode.
| |

| Custom Menu c Options | |||
Top-Level
Selection |
Second-Level
|
Third-Level
|
Notes
|
c - Timers / AE Lock
|
- c1 Shutter-release button AE-L
|
- On
- Off |
Determines whether the metered exposure should be locked only the AE-L:/AF-L button is pressed, or also when the shutter button is half-pressed.
|
- c2 Auto meter-off delay
|
- 4s
- 6s - 8s - 16s - 30s - 1 min. - 5 min. - 10 min. - 30 min. - No Limit |
Determines the period of inactivity that must elapse before the camera powers off its exposure meters to save battery life. The meter doesn't turn off when the camera is running on AC power.
| |
- c3 Self-timer
|
- Self-timer delay (2 s, 5 s, 10 s, 20 s)
- Number of shots (1 - 9) - Interval between shots (0.5s, 1s, 2s, 3s) |
Determines how many seconds delay should elapse before the shutter is fired in self-timer mode, how many shots should be captured after the timer has elapsed, and what the time between shots should be.
| |
- c4 Monitor off delay
|
- Playback
- Menus - Information display - Image review - Live view |
The time-out for the LCD monitor can be set separately for four different scenarios - playback, menus, info display or image review. Options for all but live view are four, 10 or 20 seconds, one, five or 10 minutes. Live view options are five, 10, 15, 20, or 30 minutes. When running on AC power, this setting is ignored and the monitor always remains on for ten minutes of inactivity.
| |
- c5 Remote on duration
|
- 1 min
- 5 min - 10 min - 15 min |
Determines how long the camera should remain at stand-by power in remote release mode. After this timer has elapsed, the shutter button must be half-pressed before the remote will control the camera.
| |

| Custom Menu d Options | |||
Top-Level
Selection |
Second-Level
|
Third-Level
|
Notes
|
d - Shooting / Display
|
- d1 Beep
|
- Volume (3, 2, 1, Off)
- Pitch (High, Low) |
Determines whether the single-servo AF focus lock beep and self timer beep should have a high or low pitch, and what the volume should be, or whether they should be disabled altogether. The camera will never beep in quiet shutter release mode, when operating in release priority, or during movie recording.
|
- d2 Viewfinder grid display
|
- On
- Off |
Enables or disables the on-demand grid display in the viewfinder, helpful for precise alignment of subjects in the frame.
| |
- d3 ISO display and adjustment
|
- Show ISO sensitivity
- Show ISO / Easy ISO - Show frame count |
Determines whether ISO sensitivity or frame count should be shown in the viewfinder and top panel LCD displays. If Easy ISO is selected, also allows quick adjustment of ISO sensitivity in P and S modes with the sub-command dial, and in A mode with the main command dial.
| |
- d4 Viewfinder warning display
|
- On
- Off |
Enables or disables a warning of low battery levels in the viewfinder.
| |
- d5 Screen tips
|
- On
- Off |
Enables or disables "tool tips" help info for items in the information display.
| |
- d6 CL mode shooting speed
|
- 5 fps
- 4 fps - 3 fps - 2 fps - 1 fps |
Determines the camera's burst rate in frames per second when set to the Continuous Low shooting mode.
| |
- d7 Max. continuous release
|
- Select 1 - 100
|
Determines the maximum number of frames possible in a burst of continuous mode shooting. If the buffer fills before this limit is reached, burst shooting will continue at a reduced rate.
| |
- d8 File number sequence
|
- On
- Off - Reset |
Determines whether file numbering should continue or be reset when the card is formatted, the active folder changed, or the card changed. On always continues the numbering, Off always resets it, and Reset only resets the numbering when recording is switched to an empty folder.
| |
- d9 Information display
|
- Auto
- Manual |
Determines whether the information display should change based on light levels (as seen by the exposure system), or be manually set. Manual options are black lettering on a light background, or white lettering on a dark background. Auto selects black on light in bright conditions, and light on dark in dark surroundings.
| |
- d10 LCD illumination
|
- On
- Off |
Determines whether the control panel backlight should be active only when the power switch is rotated to the backlight position to reduce distraction and save battery life, or whether the control panel should be backlit whenever the camera's meters are active.
| |
- d11 Exposure delay mode
|
- On
- Off |
When set to on, shutter operation is delayed for one second after the shutter button is pressed and mirror raised, to reduce camera shake. (Handy if the camera is propped on something or on a rickety tripod.) When set to off, the shutter is triggered immediately.
| |
- d12 Flash warning
|
- On
- Off |
When set to on, the flash symbol will blink in the viewfinder when the camera determines that flash is needed to achieve the metered exposure.
| |
- d13 MB-D11 battery type
|
- LR6 (AA alkaline)
- HR6 (NiMH) - FR6 (AA Lithium) |
When AA batteries are inserted in the optional MB-D10 battery pack, tells the camera what their chemistry is, allowing more accurate determination of remaining battery life.
| |
- d14 Battery order
|
- Use MB-D11 batteries first
- Use camera battery first |
Selects which batteries should be used first, and which should be reserved until the other batteries have been completely drained.
| |

| Custom Menu e Options | |||
Top-Level
Selection |
Second-Level
|
Third-Level
|
Notes
|
e- Bracketing / Flash
|
- e1 Flash sync speed
|
- 1/320 s (Auto FP)
- 1/250 s (Auto FP) - 1/250 s - 1/200 s - 1/160 s - 1/125 s - 1/100 s - 1/80 s - 1/60 s |
Selects the flash sync speed. In the first two options, the Auto FP high-speed sync will match the actual shutter speed if using an SB-900, SB-800, SB-600 or SB-R200 flash unit. Other flashes will default to the selected speed in the Auto FP modes.
|
- e2 Flash shutter speed
|
- 1/60 s
- 1/30 s - 1/15 s - 1/8 s - 1/4 s - 1/2 s - 1 s - 2 s - 4 s - 8 s - 15 s - 30 |
Determines the slowest available shutter speed in Program or Aperture priority modes when using red-eye reduction or front / rear-curtain sync.
| |
- e3 Flash cntrl for built-in flash
|
- TTL
- Manual - Repeating flash - Commander mode |
Determines whether the built-in flash should determine exposure automatically, fire with a manually-set strength, fire repeatedly with reduced strength for a strobe effect, or act only as a wireless commander up to two remote strobes, using Nikon's Creative Lighting System. (Its own light can either contribute to exposure or not) Manual power can be set from full to 1/128th full power. Repeating flash allows the output strength to be set from 1/4 to 1/128th full power, the frequency to be set from 1 to 50 Hz, and the number of times the flash should fire from as few as two to as many as 35 times, depending on the strength selected.
| |
- e4 Modeling flash
|
- On
- Off |
Determines whether a modeling flash should be emitted when depth of field is previewed with the SB-900, SB-800, SB-600 or SB-R200 flash units attached.
| |
- e5 Auto bracketing set
|
- AE & flash
- AE only - Flash only - WB bracketing - ADL bracketing |
Determines which settings should be bracketed when auto bracketing is in effect - exposure and flash level together, exposure only, flash level only, white balance only, or Active D-Lighting only.
| |
- e6 Bracketing order
|
- MTR > under > over
- Under > MTR > over |
Determines the order of bracketed exposures. Options are metered / under / over, or under / metered / over.
| |

| Custom Menu f Options | |||
Top-Level
Selection |
Second-Level
|
Third-Level
|
Notes
|
f - Controls
|
- f1 Backlight switch
|
- LCD backlight
- LCD backlight and information display |
Determines whether rotating the Power switch to the backlight position should only illuminate the control panel for six seconds, or also display shooting information on the main LCD display.
|
- f2 OK button (shooting mode)
|
-- Select center focus point
-- Highlight active focus point -- Not used |
Determines the function of the multi-selector's central OK button in shooting mode.
| |
- f3 Assign Fn button
|
- Preview
- FV lock - AE/AF lock - AE lock only - AE lock (Hold) - AF lock only - Flash off - Bracketing burst - Active D-Lighting - +NEF (Raw) - Matrix metering - Center-weighted metering - Spot metering - Framing grid - Viewfinder virtual horizon - Access top item in My Menu - 1 step speed / aperture - Choose non-CPU lens number - Playback - Start movie recording |
Determines the Function button's purpose.
| |
- f4 Assign preview button
|
- Preview
- FV lock - AE/AF lock - AE lock only - AE lock (Hold) - AF lock only - Flash off - Bracketing burst - Active D-Lighting - +NEF (Raw) - Matrix metering - Center-weighted metering - Spot metering - Framing grid - Viewfinder virtual horizon - Access top item in My Menu - 1 step speed / aperture - Choose non-CPU lens number - Playback - Start movie recording |
Determines the depth-of-field preview button's purpose. Options are the same as those for the Function button.
| |
- f5 Assign AE-L/AF-L button
|
- AE/AF lock
- AE lock only - AF lock only - AE lock (Hold) - AF-ON - FV lock |
Determines the AE-L / AF-L button's purpose.
| |
- f6 Customize command dials
|
- Reverse rotation
- Change main/sub - Aperture setting - Menus and playback |
Controls operation of the main and sub-command dials. Reverse rotation selects which rotation direction should increase or decrease values, and applies to the dials on the MB-D11 battery pack as well. Change main/sub chooses which dial should control shutter speed, and which should control aperture. Aperture setting determines whether the command dial or lens aperture ring should adjust aperture, and precludes use of live view when set to use the aperture ring of an attached CPU lens. When set on, Menus and playback allows the command dials to be used in place of the multi-selector to navigate menus and playback mode.
| |
- f7 Release button to use dial
|
- Yes
- No |
Selects whether related buttons must be held in while rotating the command dials to change values, or whether the button can be pressed once and then the command dial turned to change the value.
| |
- f8 Slot empty release lock
|
- Release Locked
- Enable Release |
Selects whether the shutter can be triggered without a memory card in the camera. Pictures captured without a flash card can be displayed on the monitor, but cannot be stored. When connected to a computer using the optional Camera Control Pro 2 package, this setting is ignored and photos are transferred directly to the computer without being written to the flash card.
| |
- f9 Reverse indicators
|
- + 0 - display
- - 0 + display |
Determines whether the exposure indicators should read left to right from high to low, or low to high.
| |
- f10 Assign MB-D11 AE-L / AF-L button
|
- AE/AF lock
- AE lock only - AF lock only - AE lock (Hold) - AF-ON - FV lock - Same as Fn button |
Determines the purpose of the duplicate AE-L / AF-L button on the MB-D11 battery grip. Options are the same as those for the AE-L / AF-L button on the camera body, except for the addition of an option that allows the grip's button to mirror the Function button's operation.
| |

| Setup Menu Options | |||
Top-Level
Selection |
Second-Level
|
Third-Level
|
Notes
|
Format Memory Card
|
- Slot 1
- Slot 2 |
- Yes
- No |
Formats camera memory card. This can also be achieved by holding the delete and exposure mode buttons in simultaneously for two seconds.
|
Save User Settings
|
- U1
- U2 |
- Save Settings
- Cancel |
Saves the current camera settings in one of two slots for future recall. The settings are recalled by selecting either the U1 or U2 position on the Mode dial.
|
Reset User Settings
|
- U1
- U2 |
- Reset
- Cancel |
Clears the current camera settings in either of the two user slots, returning them to their default values.
|
LCD Brightness
|
- -3/+3 adjustment
|
Adjusts LCD brightness darker or lighter 3 arbitrary units each way.
| |
Clean Image Sensor
|
- Clean Now
|
- Cleaning activated
|
Cleans dust from the image sensor immediately, or configures when this should be done automatically.
|
- Clean at startup/shutdown
|
- Clean at startup
- Clean at shutdown - Clean at startup and shutdown - Cleaning off | ||
Lock Mirror Up for Cleaning
|
- Start
|
This locks the mirror up to allow manual cleaning of the imaging sensor. This should only be done on AC power or with a fully-charged battery, The camera will try to warn you two minutes before the battery runs out by beeping and flashing the self-timer lamp, so if this happens, remove your tools immediately before the shutter closes on them causing damage to the camera!
| |
Video Mode
|
- NTSC
- PAL |
Selects the standard definition video output mode for display on a TV
| |
HDMI
|
- Output resolution
|
- Auto
- 480p (progressive) - 576p (progressive) - 720p (progressive) - 1080i (interlaced) |
Selects the high definition video output mode for display on HDMI-compatible displays, and enables or disables Consumer Electronics Control functionality, which allows certain playback features to be controlled using the attached display's remote unit. (Note that an HDMI cable is not included.)
|
- Device control
|
- On
- Off | ||
Flicker Reduction
|
-50 Hz
- 60Hz |
Reduces live view or movie flicker from fluorescent or mercury vapor lighting by matching the frequency of the local AC power supply.
| |
Time Zone and Date
|
- Time zone
|
- Graphical time zone selector
|
Selects the time zone and date format that you want to use and sets the camera to use Daylight Savings time or not
|
- Date and time
|
- YMD and HMS
| ||
- Date format
|
- YMD,MDY,DMY
| ||
- Daylight saving time
|
- On
- Off | ||
Language
|
- Czech
- Danish - German - English - Spanish - French - Indonesian - Italian - Dutch - Norwegian - Polish - Portuguese - Russian - Finnish - Swedish - Turkish - Arabic - Traditional Chinese - Simplified Chinese - Japanese - Korean |
Selects the language that the camera will use for menus and messages.
| |
Image Comment
|
- Done
|
- OK
|
Allows comments to be added to a picture. (Comments are viewable in Nikon's ViewNX or Capture NX 2 software.)
|
- Input comment
|
- Data entry screen
| ||
- Attach comment
|
- Set
| ||
Auto Image Rotation
|
- On
- Off |
Decides if the camera will record information at capture time allowing it to orient your picture properly for viewing during playback in camera, or with software that supports this feature.
| |
Image Dust Off Ref Photo
|
- Start
- Clean sensor then start |
- Take photo of bright featureless white object 10cm from lens. Focus will be set to infinity
|
Captures the reference data used to filter out dust electronically
|
Battery Info
|
- Batt. meter %
- Pic. meter (nnn) - Battery age |
Gives very detailed information about battery condition, age and shots fired on the current battery / batteries. If using an MB-D11 battery grip with AA batteries, only the battery level will be shown.
| |
Wireless Transmitter
|
- Mode
- Transfer settings - Device info - Device settings |
Select various settings for use with a wireless network (Menu available only when WiFi transmitter is attached)
| |
Copyright Information
|
- Done
|
Allows copyright info to be embedded in the headers of images. Artist names can be 36 characters long. Copyright holder names can be 54 characters long. Attachment of copyright info can be temporarily enabled or disabled without clearing the entered names.
| |
- Artist
|
- Data entry screen
| ||
- Copyright
| |||
- Attach copyright information
| |||
Save/Load Settings
|
- Save settings
- Load settings |
Allows you to save most settings to or restore them from the memory card. This includes all custom settings. (Handy for getting the camera back to some predetermined state, after making changes.)
| |
GPS
|
- Auto Meter off
|
- Enable
- Disable |
When a GPS unit is connected to the camera it can record or display latitude, longitude, altitude, time and heading information, and correct the camera's internal clock. Since the GPS takes time to become ready after the camera's meters are powered on, pressing the shutter button fully with the meters powered off can result in a picture with no GPS info. Disabling auto meter off altogether prevents this, at the cost of reduced battery life. See manual for specific GPS units the camera has been tested with; the cable is an optional extra.
|
- Position
| |||
- Use GPS to set camera clock
|
- Yes
- No | ||
Virtual Horizon
|
- Virtual horizon display screen
|
Displays a single-axis (roll) "virtual horizon" on the LCD display, aiding in precise alignment of the camera in that axis. Works for both portrait and landscape orientations, and even when the camera is completely upside down. However, it doesn't indicate pitch, and if the camera is tilted too far forwards or backwards, the roll display is disabled.
| |
Non-CPU Lens Data
|
- Done
|
- OK
|
Allows you specify data for lenses without CPUs to allow them to use some functions of CPU equipped lenses. Up to 9 lenses can be entered. See manual for full details.
|
- Lens Number
|
- 1 thru 9
| ||
- Focal Length
|
- 6 thru 4000
| ||
- Maximum aperture
|
- f1.2 thru f22
| ||
AF Fine Tune
|
- AF fine tune
|
- On
- Off |
Allows you to enter focus correction factors to fine tune focusing with lenses that you define via this menu. See manual for full details.
|
- Saved value
|
- -20 thru + 20 units
| ||
- Default
|
- -20 thru + 20 units
| ||
- List saved values
|
- previously saved values
| ||
Firmware Version
|
- A
|
-Version
|
Displays which firmware versions the camera is using
|
- B
|
-Version
| ||

The Nikon D7000's Retouch Menu lets you modify images in-camera. NOTE that it always saves the results as a new image, so your original images are preserved.
| Retouch Menu Options | |||
Top-Level
Selection |
Second-Level
|
Third-Level
|
Notes
|
D-Lighting
|
- Picture selection
|
- Normal
- High - Low |
Uses Nikon's D-lighting to brighten shadows or compensate for under-exposed images.
|
Red-Eye Correction
|
- Picture selection
|
Automatically removes red-eye from your pictures, and allows preview of the results with pan and zoom.
| |
Trim
|
- Picture selection
|
- Trim screen
|
Allows you to crop a picture, with control of crop size, aspect ratio (3:2, 4:3, 5:4, 1:1, or 16:9), and crop position. The cropped area can be previewed, then the new picture can be saved as a copy, while retaining the old one.
|
Monochrome
|
- Black-and-white
- Sepia - Cyanotype |
- Selection screen
|
Allows you to make copies of pictures as black and white, sepia or cyanotype
|
Filter Effects
|
- Skylight
- Warm filter - Red intensifier - Green intensifier - Blue intensifier - Cross screen - Soft |
- Selection screen
|
Allows you to make copies of pictures as if taken with a various filters attached.
|
Color Balance
|
- Selection window
|
- Adjustment screen
|
Allows you to change the color balance with green / magenta and blue / amber bias via the adjustment window. An RGB/luminance histogram is shown alongside the image, corresponding to the currently-viewed area, which you can zoom in and out and pan around.
|
Image Overlay
|
- Selection window
|
- Image overlay screen
|
Allows you to take 2 Raw images and combine them into a third picture. Gain for each image can be adjusted from 0.1 to 2.0, and a live preview is shown.
|
NEF (RAW) Processing
|
- Selection window
|
- Image quality
- Image size - White balance - Exposure compensation - Set Picture Control - High ISO noise reduction - Color space - D-Lighting - EXE |
Creates JPEG copies of NEF Raw files, changing a wide range of exposure parameters in the process.
|
Resize
|
- Select image
|
- Selection window
|
Creates a low-resolution version suitable for email or web use. Sizes are 1,920 x 1,080, 1,280 x 856, 960 x 640, 640 x 424, or 320 x 216 pixels.
|
- Choose destination
|
- Slot 1
- Slot 2 | ||
- Choose size
|
- 2.5M
- 1.1M - 0.6M - 0.3M - 0.1M | ||
Quick Retouch
|
- Selection window
|
- Adjust amount (low, normal, high)
|
Enhances saturation and contrast, and applies Active D-Lighting as required to brighten dark or backlit subjects.
|
Straighten
|
- Rotate image in +/- 20 steps (+/- 5 degrees in 0.25 degree steps)
|
Correct tilted images (or deliberately tilt them for artistic effect) in-camera. Image is cropped to a rectangle fitted inside the rotated image.
| |
Distortion Control
|
- Auto
- Manual |
+/- 5 step adjustment
|
Corrects pincushion or barrel distortion. Auto corrects for you and then allows fine-grained adjustment, manual provides a coarser adjustment with no initial auto-adjust.
|
Fisheye
|
- +10 step adjustment
|
Mimics the effect of a fisheye lens
| |
Color Outline
|
- Selection window
|
Creates a copy with only the outlines of an image showing.
| |
Color Sketch
|
- Selection window
|
Creates a copy that appears similar to a pencil drawing
| |
Perspective Control
|
- +/- 20 step adjustment on horizontal and vertical axes
|
Corrects for diverging horizontals / verticals such as a shot of a tall building from ground level.
| |
Miniature Effect
|
- Choose area in focus
- Preview copy - Cancel - Create copy |
Creates a graduated blur effect on either side of a user-specified area, which yields an artificially strengthened effect similar to narrow depth of field, reminiscent of a photograph of a miniature.
| |
Edit Movie
|
- Choose start point
- Choose end point - Save selected frame |
- Movie playback dialog with play, fast forward, rewind, frame forward, frame rewind, pause, and crop controls
|
Allows basic editing of movies, and saving of frames as still images.
|

This option lets you create a custom menu screen, with your most-used camera options on it. (This animation shows some menu items already added.)
| My Menu Options | |||
Top-Level
Selection |
Second-Level
|
Third-Level
|
Notes
|
Add Items
|
- Playback menu
|
- Delete
- Playback Folder - Hide Image - Display Mode - Copy Image(s) - Image Review - After Delete - Rotate Tall - Slide Show - Print Set (DPOF) |
This lets you add options to create a customized list of options.
|
- Shooting menu
|
- Reset Shooting Menu
- Storage Folder - File Naming - Role played by card in slot 2 - Image Quality - Image Size - JPEG Compression - NEF (raw recording) - White Balance - Set Picture Control - Manage Picture Control - Auto distortion control - Color Space - Active D-Lighting - Long Exposure NR - High ISO NR - ISO Sensitivity Settings - Multiple Exposure - Movie Settings - Interval Timer Shooting - Remote control mode | ||
- Custom setting menu
|
(Select any item from any Custom Settings Menu)
- Reset Custom Settings - a Autofocus - b Metering / Exposure - c Timers / AE Lock - d Shooting / Display - e Bracketing / Flash - f Controls | ||
- Setup menu
|
- Format Memory Card
- Save user settings - Reset user settings - LCD Brightness - Clean Image Sensor - Lock Mirror Up for Cleaning - Video Mode - HDMI - Flicker reduction - Time Zone and Date - Language - Image Comment - Auto Image Rotation - Image Dust Off Ref Photo - Battery Info - Wireless Transmitter - Image Authentication - Copyright Information - Save/Load Settings - GPS - Virtual Horizon - Non-CPU lens data - AF Fine Tune - Firmware Version | ||
- Retouch menu
|
- D-Lighting
- Red-Eye Correction - Trim - Monochrome - Filter Effects - Color Balance - Image Overlay - NEF (RAW) Processing - Resize - Quick retouch - Straighten - Distortion control - Fisheye - Color outline - Color sketch - Perspective control - Miniature effect - Edit Movie | ||
Remove Items
|
- Done
- Select item |
Select the item(s) you wish to delete, then select Done to delete.
|
This lets you remove options to create a customized list of options.
|
Rank Items
|
- Select item
- Move - OK |
Select item and move it using Up or Down on the multi-selector.
|
This lets you move My Menu items up or down in the list.
|
Choose Tab
|
- My Menu
- Recent settings |
Disables the My Menu, and replaces it with a tab listing the twenty most recently used settings.
| |
Nikon D7000 Optics
Kit Lens
 The Nikon D7000 is sold body-only, or bundled with the Nikkor AF-S DX 18-105mm f/3.5-5.6 G ED VR 5.8x zoom lens. Optical construction consists of 15 elements in 11 groups with one element using ED glass and one hybrid aspheric surface. (A hybrid aspheric lens consists of a normal spherical-section glass lens with a thin plastic layer bonded to it that provides a molded aspheric surface. They provide the benefits of aspheric surfaces (reduced distortion and aberration) at lower cost than all-glass aspherics.) Maximum aperture ranges from f/3.5-5.6 from wide angle to tele, while minimum aperture ranges from f/22-36.
The long list of alphabetic jargon in the lens's name deserves some translation for the non-Nikonians who might be reading this, so here it is:
- AF-S - "Silent Wave" (SWM) motor for fast, quiet focusing. This design also lets you adjust focus manually after the autofocus system has achieved focus, handy for manually tweaking focus to your liking in tricky situations.
- DX - designed to mate with Nikon's DSLRs, smaller and lighter because its image circle doesn't have to cover the full 35mmm film plane.
- 18-105mm - A fairly wide zoom range, 5.8x from wide to tele, equivalent to a 27-157.5mm lens on a 35mm camera.
- f/3.5-5.6 - A fairly average maximum aperture range, typical of most of Nikon's kit lenses.
- G - It has a CPU so it will work with Nikon's 3D Color Matrix Metering II system. The G also means no aperture ring, you set the aperture only through the camera's controls. Speaking of aperture, the diaphragm in this lens is a 7-blade rounded-opening design, for nice round catchlights and more appealing bokeh. (A more natural blur for out-of-focus objects.)
- ED - Uses Extraordinary Dispersion glass for better control of distortion, astigmatism, and chromatic aberration. As noted, there's also one aspheric surface, down from no fewer than 7 in the previous 18-135mm kit optic.
The lens focuses quite closely, to a maximum repro ratio of 0.2x (1:5 macro), and accepts 67mm filters. This is a slightly reduced macro capability over the previous 18-135mm, which could get to 0.24x. It's nice that the lens takes a 67mm filter, that seems to be a fairly common size on Nikon's lenses, so you'll have a better chance of using the same filters on multiple lenses. As its VR designation indicates, this lens also incorporates Nikon's excellent Vibration Reduction (Image Stabilization) technology. The overall dimensions of the lens are 76mm diameter by 89mm long, and it weighs in at 420 grams. This lens adds about $300 to the price of the body when purchased as a kit, but costs about $400 when purchased alone (though you should be able to find it on sale for less these days).
The new kit lens felt very nice in the hand. It zoomed smoothly, focused quickly, and construction was solid and tight. Optical performance was quite good, and VR is a welcome addition. Along with the test results presented below, see our full review of the Nikkor 18-105mm VR lens on our sister site, SLRgear.com.
Lens Compatibility

Nikon F-mount. The Nikon D7000's lens mount is compatible with a larger number of Nikon lenses, including AF-S, older screw-drive AF, and manual focus lenses.
Like other Nikon SLRs, the D7000 accommodates a wide range of Nikkor lenses, via the standard Nikon "F" lens mount. Unlike the Nikon D3100 and D5000 consumer models, however (as well as the D40, D40X, D60 and D3000 before them), the D7000's lens mount includes both a mechanical AF coupling for older "screw-drive" autofocus lenses, as well as AF electrical contacts for the latest AF-IF or AF-S Nikkor lenses with internal focus motors.
The Nikon D7000 has an APS-C sized sensor which is smaller than 35mm film, so it's designed to work with "DX" lenses as well as full-frame "FX" lenses. As mentioned previously, DX lenses tend to be smaller and lighter than full-frame models with the same focal length and maximum aperture. The sub-frame sensor on the Nikon D7000 means that it has a smaller angle of view (by a factor of 1/1.5x) than a full-frame camera with any given lens. While most properly called a "crop factor," the 1.5x ratio is most commonly referred to as the "focal length multiplier," since that's how it works in practice: Any lens used on the Nikon D7000 will have the same field of view as one with a 1.5x greater focal length will when attached to a 35mm camera. For example, a 100mm lens on the D7000 will show about the same field of view as a 150mm lens on a camera with a 35mm frame size.
The Nikon D7000's lens mount includes an AI aperture ring connector, a little metal vane located just outside the lens mount flange (at about 1 o'clock), that interfaces with old AI Nikkor manual focus lenses. This engages with the aperture ring on AI-style Nikkor lenses, and lets the D7000 support aperture-priority metering mode and provides manual-exposure metering with them. Lower models including the D90 do not have this feature, so the D7000 is compatible with a wider range of older Nikkor lenses than its lesser siblings.
With few exceptions, you can use the Nikon D7000 with any F-mount Nikkor lens made since 1977. See the table and notes below for detailed lens compatibility information extracted from the D7000 User's Manual (courtesy of Nikon USA):

Nikon D7000 Autofocus System
 Phase-detect AF. Autofocus is an area that's received significant attention from the Nikon D7000's designers. The company has developed a new Multi-CAM 4800DX autofocus sensor, which includes 39 AF points, including nine cross-type sensors at the center of the image frame, operable with every autofocus Nikkor lens. That's 12 fewer AF points than the D300S, but a major improvement over the D90's 11 point system. The 39 focus points cover much of the image frame (see the Viewfinder tab for the AF array), and the Nikon D7000 includes 3D tracking capability that follows moving subjects from point to point as they traverse the frame with the help of the 2,016-pixel RGB sensor (more about that below). For manual point selection, when a 39-point system might prove overly complex, it's possible to restrict the number of manually selectable points to a subset of 11 points throughout the frame. Nikon has also improved AF control in the D7000, with a new button positioned centrally in the Focus Mode switch used to select the AF point in concert with the camera's control dials to select autofocus mode, active points, etc. Detection range for the D7000's AF system is -1 to +19 EV (ISO 100, 68°F / 20°C).
 Focus modes. The Nikon D7000 lets you choose either auto or manual focus via the small Focus Mode switch on the front of the camera, next to the lens. Setting the switch to "M" puts the camera into manual focus mode, "AF" places it in autofocus mode. Single AF (AF-S), Continuous AF (AF-C), and Auto-switching AF (AF-A) options are selected by pressing the button in the center of the switch and rotating the rear command dial, to cycle through the choices. The control panel and viewfinder display the current mode as it's being adjusted. Single AF simply means that the camera sets focus only once, when the Shutter button is first pressed halfway, and is best for stationary objects. Continuous AF means that the camera continuously adjusts the focus with predictive focus tracking, as long as the Shutter button is halfway pressed, and is best for moving objects. In AF Auto mode, the camera begins focus operations in Single AF mode, but switches to Continuous AF if it detects motion within the active AF area.
Like the D300S, Release or Focus Priority can be selected for both AF-S and AF-C modes via a Custom menu a1 and a2 settings. In Focus Priority mode (the default for AF-S mode), the shutter won't release unless the lens is focused, or the lens itself is set to manual focus. However, in Release Priority mode (the default for AF-C mode), the camera will fire regardless of the state of focus. If you want to be sure that the camera is focused when you snap the picture, use Focus Priority mode. Use Release Priority for moving subjects, and/or times when the instant of shutter release is more important to you than sharp focus. A "Focus Tracking with Lock-On" option in Custom menu a3 allows you to adjust how long the camera waits before adjusting focus if the distance to subject changes abruptly, for example by something passing between the camera and the subject. Options range from 1 second (Short) to 5 seconds (Long) in 1 second steps, along with an Off option.
AF-area modes. Pressing the Focus Mode button and rotating the front dial allows you select the AF Area mode. Available options are: Single-point AF, 9-point Dynamic-area AF, 21-point Dynamic-area AF, 39-point Dynamic-area AF, 3D-tracking and Auto-area AF modes. Single Area AF simply means that the camera judges focus based on one part of the subject, and the user can manually select the AF point by pressing the arrow keys. The other modes are rather more complex, offering the ability to automatically track moving subjects, determine scene types and even recognize the location of human subjects in a scene.
Dynamic-area AF is relevant only when in Continuous-servo AF mode, with its behavior mirroring that of Single-point AF when in Single-servo mode. Dynamic-area AF employs all or a subset of the autofocus points, though you can still manually select the starting point for AF operation. When Dynamic-area focusing is enabled, the camera first focuses on the subject in the primary focus area. When the subject moves to a different AF area, the camera shifts the focus to "follow" the subject. This is great for irregularly moving subjects. (Sports and kids come to mind.) As well as allowing tracking across all 39 AF points, at the user's option the camera can limit subject tracking to only a small area of 9 or 21 points including the user-selected starting point. As noted, you can manually select different starting points, and the cluster of Dynamic-area points will follow your selection. As an aid to users transitioning from the D90's system, there's also an option that lets you choose a single active point from a selection of 11, roughly matching the AF point layout of the D90 and some older models.
The final point selection option in Dynamic-area AF is the 3D Tracking mode, which allows the camera to use the 2,016-element RGB exposure/white balance sensor to aid in subject tracking. This sensor has been enhanced over the D300S's 1,005 pixel version and is used by Nikon's excellent 3D Matrix Metering system. In matrix metering, patterns of tone and color are used as an index into a large database of "reference scenes" stored in the camera's memory. The camera doesn't directly understand it's snapping a portrait shot, but when it sees a human-shaped blob against a different color background, its scene indexing tells it that it should try to get the exposure of the blob correct, even if it means the overall scene brightness would come out low.
Starting with the D3 and the D300, the Nikon engineers have used the data from the RGB exposure sensor to help guide the camera's autofocus decisions. While the RGB sensor provides no distance information, it has muchmore resolution than even the large array of AF points on the Multi-CAM4800 AF sensor. The 2,016 element RGB sensor also captures both tone and color information, making it easier to discern where objects are in the field of view and how they're moving.
With this RGB-assisted AF approach, when an AF point initially acquires a lock on a particular subject, the camera immediately notes the pattern of light and color found at the corresponding point on the RGB array. Then, as the subject or camera moves, the camera can track the light/color pattern corresponding to the subject across the face of the RGB array. This provides much finer-grained position information than could ever be obtained from the sparse AF array. The RGB sensor doesn't provide any distance information, but by more precisely tracking subject information, it permits a much surer hand-off of the subject between AF points.
In Auto-area AF mode, the camera chooses which AF points to use automatically, with the selected points shown briefly in the viewfinder for reference when in Single-servo AF mode. The camera automatically determines the subject type, and bases AF point selection on its decision of the main subject in the scene. When using either G- or D-type lenses, this becomes rather more intelligent, with the camera able to use its 2,016-pixel RGB sensor to distinguish human subjects from the background. This allows the D7000 to automatically select the focus points located over your human subject(s).
Changing AF points & locking focus. In any of the AF modes, you can change the primary focus area by unlocking the focus area selector (the Four-Way Arrow pad on the back panel) and then shifting the focus area using the up, down, right, or left arrow directions on the control rocker. You can lock the focus area selection by turning the switch below the control rocker back to the lock position. By default, the Nikon D7000 does not "wrap" the focus area selector as you scroll between focus areas. Custom Setting a5 lets you opt for a "wrap" function. What this means is that if you press the right arrow key again, after the right focus area is already selected, the selection will immediately jump to the left focus area. The same thing happens when moving the focus area selection vertically as well.
 There are several methods by which you can lock focus on the D7000. The first is to half-press the Shutter button to lock the focus, placing your subject in the selected focus area, halfway pressing the Shutter button, then realigning the composition and firing the shutter. Alternatively, when using Single Servo AF, you can press the AF-L/AE-L button (or through Custom Function f3, the Function button, or f4, the Preview button) to lock focus, even if the Shutter button is released. This lets you recompose the photograph without keeping your finger on the Shutter button, but on the AE-L/AF-L button instead. (Reducing the chance that you'll accidentally trip the shutter when you don't intend to.) The D7000 has no dedicated AF-ON button like the D300S, but the AE-L/AF-L can be programmed to act as one. In this case, the shutter button will not perform autofocus.
Nikon D7000 AF "Fine Tuning"
 The Nikon D7000 also supports AF fine-tuning to address back- or front-focusing lens issues, a feature previously only found on higher-end models such as the D300 and up. You can register up to 12 different lens "types" with the camera (more on "types" in a moment), and make micro-adjustments to the AF system for each, across a range of +/-20 (arbitrary) increments.
What does lens "type" mean here? Basically, a lens "type" is a lens model. For instance, if you have a 70-200mm f/2.8 and a 100mm f/2.8 Micro, the camera would recognize each lens when it was attached to the camera, and automatically load the appropriate fine-tuning setting. If you had two 70-200mm f/2.8s, though, the camera would have no way to distinguish between them, and would load the same fine-tuning settings for either one.
While there may be some photographers (particularly pros) who have more than 12 lenses in their kits, the 12-lens "fine-tuning library" will cover the needs of the vast majority of D7000 users. We've found that this system also recognizes lens types for third-party lenses as well, so its utility extends to essentially any CPU-containing AF lens the Nikon D7000 can work with.
The lens-based AF tuning function can also be disabled altogether, if you want to revert to the standard focus tuning for all lenses. It should be noted that AF fine tuning only affects phase detection autofocusing, having no effect over contrast detection AF in Live View mode. (It's also an option best left disabled unless you know you have a front- or back-focusing issue with one or more of your lenses, because the system can also be used to manually introduce a focusing error, perhaps making it impossible to focus to infinity, or the ordinary macro focusing distance of a lens.)
AF fine-tuning has by now become a fairly standard feature on higher-end SLRs. That doesn't diminish the fact that it's a huge step forward in focus accuracy, though, giving photographers the tools they need to maintain and calibrate their own equipment.
Nikon D7000 AF Assist
The Nikon D7000 has a bright, dedicated autofocus-assist lamp, which also doubles as a self-timer lamp. We prefer this setup over using the flash strobe for AF assist, as this totally decouples autofocusing from flash operation. (The flash does not need to be raised or active.) The AF assist lamp illuminates automatically in poor lighting conditions, and can be disabled via a Custom menu setting a7. The effective range is specified by Nikon as 0.5-3m or 1.7 -9.9 ft.
Nikon D7000 Live View Focusing Options
 In Live View mode, the Nikon D7000 offers only contrast-detection autofocus (The D300/D300S gives you a choice between phase-detection and contrast-detection in Live View, but doesn't offer the more advanced contrast-detection modes or Full-time servo mode mentioned below.) There are three focus modes in Live View: Single-servo AF (AF-S), Full-time servo AF (AF-F) and manual focus (MF). Of note is AF-F mode which is similar to AF-C mode when using the optical viewfinder (though you don't have to half-press the shutter button), as the D7000 is only the second time a Nikon SLR offers continuous full-time autofocus in Live View and Movie modes. (The D3100 was the first.) There are four AF-area modes in Live View mode: Face-priority AF, Wide-area AF, Normal-area AF and Subject-tracking AF. Face-priority is useful for portraits. Up to 35 faces can be detected and when more than one face is present, the D7000 will select the closest one. You can also manually select which face to focus on using the multi-selector. Wide-area is recommended for landscapes and other non-portrait shots. Normal-area offers a smaller focusing area, and is useful for focusing on a small area of the frame. With either Wide- or Normal-area, you can move the active focus area with the multi-selector. Using a tripod is recommended. Subject-tracking attempts to track a selected subject as it moves through the frame. You position the focus point over your intended subject and press the OK button to begin tracking. To end tracking, press the OK button again. Note that Subject-tracking AF may be unable to track a subject if it's too small, moves too quickly, is similar in color to the background, changes sizes, or if the subject and background are very bright or dark, etc.
Nikon D7000 Anti-Dust Technology
To help combat dust particles that can enter the camera when changing lenses, the Nikon D7000 includes an ultrasonic dust cleaning system to automatically vibrate the low-pass filter over the sensor each time the camera is turned on or off (programmable). There is also an immediate mode where cleaning takes place on demand, and of course, there's a manual cleaning mode, where the camera lifts the mirror and opens the shutter, allowing access to the low pass filter with a blower or other cleaning device. You can also capture an "Image Dust Off Reference Photo," and use the optional Capture NX2 software to remove dust shadows from your images via post-processing.
While ultrasonic dust removal systems can increase the interval between manual cleanings, it bears noting that no such system can completely eliminate the need to occasionally clean the sensor manually. Copper Hill Images is an advertiser of ours, but we'd recommend their wet/dry cleaning system even if they weren't (it's what we use in our own lab): See the Copper Hill website for details.
Kit Lens Test Results
Zoom
Very good performance with the 18-105mm VR kit lens.
Very good performance with the 18-105mm VR kit lens.
 |  |
| 18mm, f/8 | 105mm, f/8 |
The Nikon D7000 is available with a Nikkor AF-S DX 18-105mm f/3.5-5.6G ED VR (Vibration Reduction) lens, which has a better-than-average zoom ratio of about 5.8x for a kit lens. Details are pretty good across the frame at full wide-angle, with minimal corner blurring. There are low levels of coma distortion in the leaves at the corners, and chromatic aberration isn't an issue because most of it is removed by the D7000's image processor (see below). Results at full telephoto are also quite good, showing strong detail across most of the frame with some minor softness in extreme corners. (These shots were both taken at f/8. See below for how the lens performs at maximum aperture.) Overall, a very good performance for a kit lens, and the built-in Vibration Reduction (Nikon's term for optical image stabilization) will come in handy for hand-held shots in low light.
Macro
A larger-than-average macro area with the kit lens, with soft detail overall. Flash throttles down pretty well.
A larger-than-average macro area with the kit lens, with soft detail overall. Flash throttles down pretty well.
 |  |
| Macro with 18-105mm Kit Lens 105mm, f/5.6 | Macro with Flash 105mm, f/5.6 |
The Nikon D7000 captured a larger-than-average macro area with the standard 18-105mm kit lens, measuring 4.18 x 2.77 inches (106 x 70 millimeters). Detail was somewhat soft, and there was some additional softening in the corners. (Most lenses have some softening in the corners at macro distances.) Some vignetting is also noticeable in the extreme corners. The Nikon D7000's flash throttled down for the macro area pretty well, though.
Geometric Distortion
High levels of geometric distortion at wide-angle and telephoto ends with the 18-105mm kit lens.
High levels of geometric distortion at wide-angle and telephoto ends with the 18-105mm kit lens.
| Barrel distortion is 1.1 percent at 18mm |
 |
| Pincushion distortion is 0.6% at 105mm |
 |
The Nikon D7000's 18-105mm kit lens produced about 1.1 percent barrel distortion at wide-angle, which is higher than average and noticeable in its images. At the telephoto end, there was about 0.6% of pincushion distortion which is also higher than average and noticeable. This is the tendency for the lens to bend straight lines outward (like a barrel -- usually at wide-angle) or inward (like a pincushion -- usually at telephoto).
Auto Distortion Control
Low geometric distortion when Auto Distortion Control is enabled.
Low geometric distortion when Auto Distortion Control is enabled.
| Barrel distortion at 18mm is 0.5 percent |
 |
| Pincushion distortion at 105mm is 0.1 percent |
 |
The Nikon D7000 offers an Auto Distortion Control feature to reduce geometric distortion automatically. As you can see it worked quite well with the 18-105mm lens, reducing barrel distortion at wide-angle to 0.5%, and pincushion at telephoto to 0.1 percent. Since this option is database driven, it's only available for Nikkor D and G-type lenses with certain optics such as Fisheye and Perspective Control lenses excepted. Auto Distortion Control is Off by default. You can also apply Auto or Manual Distortion Control to JPEGs after the fact, in the Retouch menu. Manual mode works with images from any lens.
Chromatic Aberration and Corner Sharpness
Very low C.A. in JPEGs, higher in uncorrected RAW files. Some blurring in the corners of the frame at wide-angle and telephoto with the kit lens wide-open.
Very low C.A. in JPEGs, higher in uncorrected RAW files. Some blurring in the corners of the frame at wide-angle and telephoto with the kit lens wide-open.
 |  |
| Wide, f/3.5: Lower right C.A.: Very low Softness: Slightly soft | Wide, f/3.5: Center C.A.: Very low Softness: Sharp |
 |  |
| Tele, f/5.6: Lower left C.A.: Very low Softness: Moderate blurring | Tele, f/5.6: Center C.A.: Very low Softness: Slightly soft |
Chromatic Aberration. Chromatic aberration is quite low at the full wide-angle setting of the Nikon D7000's 18-105mm VR kit lens. At telephoto, chromatic aberration is even lower and hardly detectable. (This distortion is visible as a slight colored fringe around the objects at the edges of the field of view on the resolution target.) The Nikon D7000's image processor does a good job at automatically removing most C.A. from JPEGs, and it works with any lens. (See below for crops from uncorrected RAW files.)
Corner Sharpness. The Nikon D7000's 18-105mm VR kit lens produced slightly soft corners of the frame at full wide-angle. The lower right corner was a touch softer than the other corners, and the softness didn't extend very far into the frame. The center was reasonably sharp. At full telephoto, the left hand side corners were softer than the right. The lower left corner was the softest, with some softness extending fairly far into the frame, but the lens was softer overall at telephoto than at wide-angle. There's also a little bit of vignetting (corner shading) at both ends of the zoom, as indicated by the darker corner crops. Still, these are better-than-average results for a kit lens, considering the zoom ratio and that the aperture was wide-open for these shots. (Corner sharpness and vignetting typically improve as the lens is stopped-down from maximum aperture.)
Uncorrected RAWMuch higher levels of C.A. at wide-angle and telephoto in RAW files.
 |  |
| Wide: Lower right C.A.: Moderately high Softness: Moderate blurring | Wide: Center C.A.: Very low Softness: Sharp |
 |  |
| Tele: Lower left C.A.: Moderately high Softness: Moderate blurring | Tele: Center C.A.: Very low Softness: Slightly soft |
As you can see from the crops above, levels of chromatic aberration in the corners are much higher in uncorrected RAW files, though still reasonable. Nikon has been automatically reducing C.A. in its JPEGs for a while now in their DSLRs, so this is no surprise. (Note that these crops are unsharpened, so they appear softer than the camera JPEGs.)
Nikon D7000 Exposure
Exposure Modes. Although it's a prosumer camera that's clearly aimed at reasonably experienced photographers, the Nikon D7000 offers not only the traditional selection of Programmed Auto, Shutter Priority, Aperture Priority, and Manual modes, but also a Full Auto mode, a Flash Off Auto mode, a generous selection of Scene modes that help beginners capture the photos they're looking for without needing to understand the complexities behind the process, and two User modes (U1 and U2) that allow the photographer to save groups of settings for later recall. Among other settings, when you store a User mode, you save the camera's current exposure mode, and so these simply mirror one of the other available exposure modes (including scene modes). In Shutter Priority and Manual modes, shutter speeds from 1/8,000 to 30 seconds are available in 1/3 EV steps. The Manual mode also adds a Bulb setting for manually timed exposures whose length is limited only by available battery power, and an X-sync setting that locks the shutter speed at 1/250th second. A very nice touch that's common to other Nikon DSLRs is that, while in Program AE mode, you can rotate the Main Command dial to select different combinations of aperture and shutter speed settings than those normally chosen by the autoexposure system. (That is, if the automatic program would have chosen 1/125 second and f/5.6, you could instead direct the camera to use 1/60 at f/8 or 1/30 at f/11, to get greater depth of field.) Nikon calls this Flexible Program, and photographers familiar with other brands may know it as Program Shift. It's a very handy option for those times when you need some measure of increased control, but still want the camera to do most of the work for you. We personally use this capability more than Aperture- or Shutter-priority metering in our own shooting. The Nikon D7000 also allows the step size used for aperture, shutter speed, ISO sensitivity, exposure compensation and exposure bracketing to be set to the user's preference of either 1/3 or 1/2 or 1EV steps. If you generally want fine-grained control over shutter speed and aperture, but find yourself occasionally wanting to make quicker adjustments, the camera can be set using Custom Setting f3 to temporarily use a 1EV step size for these variables while the Function button is held down.
An interesting feature when using Manual exposure mode is the electronic analog exposure display visible in the optical viewfinder data readout. This shows the amount the camera thinks an image will be over- or underexposed, based on the settings you have selected, and helps you find the best exposure for the subject.
The Scene modes, meanwhile, are all accessed through a single position on the Mode dial, with the Main Command dial used to select between available scene types, which include Portrait, Child, Landscape, Sports, Close Up, Night Landscape, Night Portrait, Party / Indoor, Beach / Snow, Dusk / Dawn, Sunset, Pet Portrait, Candlelight, Autumn Colors, Blossom, Food, Silhouette, Low Key, and High Key. Although an information screen briefly pops up on the rear-panel LCD when you change scene modes, it doesn't go out of its way to help the photographer learn, with only a limited number of settings listed beneath the name of the scene mode, with most of the settings shown being identical in all scene modes. The majority of the selection screen is taken up by an animation of a dial turning as the scene types are changed, and a small thumbnail showing an example of the current scene type. The help pages for each scene mode likewise offer only the briefest of descriptions, with the Candelight mode's terse "For candlelit scenes." being one such example. With that said, you do at least see the shutter speed and aperture chosen by the camera while the shutter button is half pressed (and in Live View mode, the ISO sensitivity), while quite a few other settings can be confirmed by looking at the LCD info display, or the information display that can be enabled on the rear panel LCD, so photographers who want to learn from the scene modes can do so -- the information just isn't provided in quite as direct a manner as it could be.
 Exposure Metering. Nikon has one of the most sophisticated and flexible metering systems currently on the market, and in the case of the Nikon D7000, its metering sensor covers a wide area of the frame with a 2,016-pixel RGB array. Like most SLRs, there are three main metering modes on the Nikon D7000: Matrix, Center-weighted, and Spot metering. Where Nikon's system differs is in the capability of these modes. Nikon's matrix metering -- the default option on the D7000 -- is called 3D Color Matrix Metering II, and takes into account not only subject brightness and contrast, but also subject and overall scene color, as well as subject distance information from the lens (when using type G or D lenses). This information is then compared against an in-camera database of over 30,000 different scene types, before the optimal exposure for the scene is calculated.
By default, the Nikon D7000's Center-Weighted metering mode gives a greater weight to an 8mm diameter circle in the center of the frame, although this can be changed with Custom Setting b4 to use either a 6mm, 10mm or 13mm spot, or to average the entire frame. Finally, Spot meters a 3.5mm diameter circle (about 2.5% of the frame) centered on the active focus area, unless you're using a non-CPU lens or Auto-area AF, in which case the D7000 behaves like most DSLRs in only metering the very center of the frame in Spot metering mode.
 An even more unusual feature of the Nikon D7000 comes courtesy of Custom Setting b5, which allows fine-tuning of the camera's metering system within a range of +/-1EV in extremely fine 1/6 EV steps. Three values can be set, allowing you to fine-tune Matrix, Center-weighted and Spot metering separately. This means that if you feel the camera to be consistently under- or over-exposing scenes, you should be able to pull it back towards your preferred exposure without needing to dial in exposure compensation for most images. Another similarly useful feature for tuning the D7000 to your tastes is Custom Setting c2, which allows the user to select how long the camera's metering system should be powered on during a period of inactivity. This lets you balance battery life against convenience, within a nine-step range from a miserly four seconds to a spendthrift 30 minutes, as well as an option to leave the metering system powered on at all times. Note that when running on A/C power, the metering system remains powered on all the time, for convenience's sake.
It's important to note that 3D Color Matrix Metering II does rely on the use of a Type-G or -D lens. With other CPU lenses, the D7000 falls back to Color Matrix Metering II, which doesn't take account of distance information in exposure calculations. Non-CPU lenses can use Color Matrix Metering if the focal length and maximum aperture are manually specified, but otherwise fall back to Center-weighted metering. The 2,016-pixel RGB sensor also serves to ascertain automatic white-balance, and provides assistance for focus tracking when the subject leaves the AF sensor area. Metering range is specified at 0 to 20 EV in Matrix or Center-Weighted, and 2 to 20 EV in Spot metering mode.
 Exposure Lock. Ordinarily, the AE-L/AF-L button locks both exposure and autofocus, useful for off-center subjects in tricky lighting. Alternatively, it can be programmed to lock only exposure, or only focus, via the custom menu. You can also program the button to toggle the exposure lock on and off, rather than requiring the button to be held. In addition, you can program the camera to trigger autofocus operation while the button is held in, or to toggle a flash value lock when using the built-in flash, or one of six external flash strobes -- the SB-900, SB-800, SB-700, SB-600, SB-400, or SB-R200.
 Exposure Compensation. Exposure compensation on the Nikon D7000 is adjustable from -5 to +5 exposure equivalents (EV) in 1/3 or 1/2 EV step increments, and is controllable in Program, Aperture-priority, or Shutter-priority modes. Note that in Manual exposure mode, the EV button doesn't actually vary the exposure - it only biases the electronic analog exposure display that's shown in the optical viewfinder data readout. The Auto Bracketing feature on the Nikon D7000 can capture either two or three sequential shots of the same subject with varying exposure values. Exposure settings for bracketing can vary from -2 to +2 EV, with step sizes of 1/3, 1/2, 2/3, 1, or 2 EV units, and are additive to the current exposure compensation value. That is to say, if you have the camera set with +5 EV exposure compensation, and you then bracket three frames with a 2 EV step size, it's possible for one frame to stray as far as +7 EV from the originally metered exposure. When shooting only two bracketed frames, you can select the extra frame to be shot either above or below the metered value.
Through Custom Setting e6, you can change the order in which bracketed shots are captured. By default, the metered exposure is captured first, then the shots under and over the metered exposure. The alternative is to capture the shots in order from under, metered, then over the metered value. Custom Setting e5 allows you to designate whether the bracketing sequence adjusts the ambient and/or flash exposure, white balance, or Active D-Lighting. When bracketing white balance, which is not available for Raw or Raw+JPEG shooting, note that the shutter is tripped only once and the camera then saves the bracketed exposures from the same source data. For two frame ADL bracketing, one frame has ADL disabled, and the other uses Auto ADL. For three shots, the camera brackets with ADL Off, Normal, and High.
 ISO Sensitivity. The Nikon D7000's normal ISO ranges from 100 to 6,400 equivalents, and can be extended up to ISO 25,600 equivalent (Hi 2). By default, ISO is adjustable in 1/3 EV steps (100, 125, 160, 200, 250, 320, 400, 500, 640, 800, etc.). Through Custom Setting b1, the D7000 can be set to allow sensitivity adjustment in 1/2 EV steps (100, 140, 200, 280, 400, 560, 800, etc.). Nikon's excellent Auto ISO feature is carried over as well, which allows you to set both the upper ISO limit (from ISO 200 to 25,600 / Hi 2) as well as the minimum shutter speed (selectable from 1s to 1/4,000s) required before ISO is increased automatically.
The menu design does have one slight quirk, though, which we've commented on previously in our D3100 review. When you're shooting in Program, Priority or Manual modes, you'll notice a greyed-out Auto option at the top of the list of ISO sensitivities, which no amount of fiddling with camera settings will activate. That's because this option is available only when shooting in Auto, Flash Off Auto, or Scene modes -- in which case the Auto ISO sensitivity control option is instead greyed out. The two options are completely separate and accessible only in their correct exposure modes, but might cause a newcomer to Nikon's interface to believe that Auto mode wasn't actually enabled, when in fact it is. Even with Auto ISO set, you still manually choose an ISO sensitivity, and this simply acts as a starting point for the camera to raise if needed. Shots where the ISO sensitivity was automatically raised are indicated in playback mode, with the automatically chosen sensitivity listed in red.
 White Balance. The Nikon D7000 offers quite a range of white balance settings. There are two Auto modes: Auto 1 operates normally, while Auto 2 is similar to Pentax's CTE (Color Temperature Enhancement) mode, and adjusts white balance automatically, but with a bias towards a warm result. There are also six presets consisting of Incandescent, Fluorescent, Direct Sunlight, Flash, Cloudy, and Shade, a direct color temperature setting (2,500 to 10,000K), and a manual mode where white-balance is determined from a white or grey card or copied from an existing image. The Fluorescent preset has seven sub-settings consisting of Sodium Vapor (2,700K), Warm-white (3,000K), White (3,700K), Cool-white (4,200K), Day White (5,000K), Daylight (6,500K), and High Temperature Mercury Vapor (7,200K). The manual setting allows five custom white-balance measurements to be stored, and each preset can be fine-tuned and given a 36-character alphanumeric comment (including both upper and lower case, and a selection of punctuations marks, all entered through an on-screen keyboard).
 As with a number of other high-end SLRs these days, all the D7000's white balance presets and manual settings except for the direct color temperature settings are adjustable via a 2D fine-tuning grid display. The Nikon D7000 also supports White Balance bracketing, where either two or three frames can be bracketed with Blue and/or Amber white balance bias increments of approximately 5, 10 or 15 mireds.
Active D-Lighting. D-Lighting has proven a popular post-processing feature in Nikon's recent digital SLRs, as well as some of the company's point & shoot models. It's a quick software process that attempts to overcome underexposed images, and bring detail out of shadows. An improved version of Active D-Lighting appeared in the Nikon D3 and D300, including optimization of image contrast, helping to prevent overprocessing of shadows and flattening of overall image contrast. The Nikon D7000 inherits this same Active D-Lighting setup, which features Extra-High, High, Normal, Low, and Off settings plus the ability to automatically choose the Active D-Lighting strength on the fly.
D7000 Active D-Lighting
| |
 |  |
Active D-Lighting
Off |
Active D-Lighting
Extra-High |
The effect of Active D-Lighting is highly dependent on the particular subject and lighting being shot, but for the most part is fairly subtle. The thumbnails above shows its effect on our Outdoor Portrait test, where you can see it opening up the shadows somewhat, while simultaneously holding back the highlights a little. We like that it's generally subtle in its effect, as it's so easy to overdo automatic tonal adjustments like this. (See the Nikon D7000 Image Quality tab for more detail on how well Active D-Lighting performs.)
Lateral Chromatic Aberration Correction. While other cameras have had lens distortion processing built-in, (notably the Olympus E-1, quite some time ago, and more recently many Panasonic cameras), none until Nikon's D3 and D300 did the processing based on the distortion detected in the image. Past cameras (and most distortion-correction software) simply looked at which lens was mounted and perhaps the focal length if it was a zoom lens, and then applied a pre-set amount of correction; no image analysis actually took place. Nikon's Lateral Chromatic Aberration correction offered a more sophisticated approach, thanks to the power of the camera's EXPEED 2 processor, by actually analyzing each image after capture and fixing the chromatic aberration detected therein before saving the JPEG file. Cameras with high-resolution sensors place a greater demand on lenses, and hence Lateral Chromatic Aberration correction proves a useful feature on the Nikon D7000. There are no settings for this feature; it's always enabled for JPEGs.
Nikon In-Camera CA Correction
| |
 |  |
200% Crop from Nikon D90,
18-105mm VR lens at 18mm Converted from Raw, no CA correction applied |
200% Crop from Nikon D90,
18-105mm VR lens at 18mm Camera JPEG, Automatic CA correction applied |
The crops above are actually taken from our review of the Nikon D90, but the D7000 uses the same technology, and the D90 crops above make good examples, because its 18-105mm VR kit lens had quite a bit of CA in the corners at the wide-angle end. The crop at left was taken from an image converted from a Raw file from the D90, enlarged 200% to make the colored fringing caused by the CA more evident. As you can see, there's quite a bit of CA present. The crop at right is from a camera JPEG, shot at the same time under identical conditions. The difference in CA is pretty amazing; the camera did a remarkably good job of eliminating it. (Click on either image to see the full-resolution images as they came from the camera and Raw converter.)
 Picture Control. Nikon has standardized its Picture Control system so that camera settings for sharpening, contrast, brightness, saturation, and hue can be finely adjusted and ported to other Nikon digital SLRs that support the system. The D3 was the first camera compatible with the option, and all Nikon SLRs since, including the D7000 follow the standard. The Nikon D7000 has six presets called Standard, Neutral, Vivid, Monochrome, Portrait, and Landscape, and up to nine custom presets can be defined, named, saved, and copied. Sharpness can be adjusted in ten steps, along with an Auto setting; contrast and saturation can be adjusted in seven steps or determined automatically, while for hue there's a seven-step adjustment with no auto mode. Brightness is adjustable in three steps, and doesn't affect exposure. There is also a five-step "Quick Adjust" setting which exaggerates or mutes the combined effect without having to adjust each slider individually. When Monochrome Picture Control is selected, Hue and Saturation are replaced by Filter Effects and Toning respectively. Filter Effects offers Off, Yellow, Orange, Red, and Green settings, while Toning offers B&W, Sepia, Cyanotype, Red, Yellow, Green, Blue Green, Blue, Purple Blue and Red Purple settings, with each of the colored settings offering seven adjustment steps. Of course, the Nikon D7000 also offers sRGB and Adobe RGB settings, in a separate Color Space option located in the Shooting menu.
 Noise Reduction. The Nikon D7000 offers four levels of high ISO noise reduction: Off, Low, Normal, and High. When set to Off, minimal noise reduction is still performed at ISO sensitivities of 1,600 equivalent or above for JPEG images. High ISO noise reduction is not performed on Raw files. The Nikon D7000 also offers long-exposure noise reduction for exposures longer than 8 seconds. When set to On, the camera takes a second exposure for somewhere between half to the same duration as the actual exposure, but with the shutter closed, and subtracts the "dark frame" from the first, to further reduce hot-pixel and amp noise.
 Release Modes. The Nikon D7000's release modes are selected via the lockable release mode dial, which surrounds the base of the Mode dial, on the left of the camera's prism / popup flash housing. Release modes consist of Single Frame (S), Continuous Low-speed (CL), Continuous High-speed (CH), Quiet Shutter-release (Q), Self-timer, Remote, and Mirror Up (MUP). The Nikon D7000's Continuous High mode is rated by Nikon for up to six frames per second with the standard EN-EL15 battery pack, while Continuous Low allows one, two, three, four, or five frames per second as configured in Custom Setting d6. These figures apply only with a shutter speed of 1/250 second or faster, continuous servo AF, manual or shutter-priority auto exposure, and all other settings at their default values. The number of shots that can be captured in a Continuous-mode burst before the camera slows down varies, depending on the file type and image size, as well as the amount of fine detail in the scene for compressed filetypes. Nikon doesn't provide a specification for the number of shots that can be captured before the buffer fills, but our tests with a deliberately difficult-to-compress image showed a capacity of ten Raw files (regardless of bit depth or whether JPEGs were simultaneously recorded), and a limit of 19 large/Fine JPEGs. Of course, the number of consecutive shots could also be limited by available memory card space, if your card(s) are nearly full.
Quiet Shutter-release is similar to normal Single Frame mode; however, the camera reduces noise by disabling the beep sound when the camera focuses, something which can be achieved in other modes through Custom Setting d1 in the Custom menu. It also delays lowering of the mirror until the shutter button is released, separating the noise of this operation from that of the mirror being raised and the shutter fired. It further reduces actuation speed of the mirror mechanism, and of the shutter recocking mechanism. The result is, indeed, a much quieter shutter sound. Self-Timer mode triggers the shutter a programmable delay (2, 5, 10, or 20 seconds) after the shutter button is pressed. The delay is set using Custom Setting c3, which also allows the D7000 to be programmed to capture anywhere from one to nine shots after the timer countdown has elapsed, with an interval of 0.5, one, two, or three seconds between shots. (Note that Self-Timer mode requires placing the bundled DK-5 eyepiece cap over the viewfinder to prevent stray light from affecting the exposure, and that Bulb exposures in Self-Timer mode will have a duration of 1/4 second.) Remote Control mode allows the D7000's shutter to be triggered using the optionally available ML-L3 infrared wireless remote control unit. Three operating modes are possible, configured using the Remote Control Mode option in the Shooting menu. The D7000 can either trigger the shutter immediately that the button on the remote is pressed, after a two second delay has elapsed, or the mirror and shutter can be separated so that the first press will lift the mirror, and the second press will start the exposure. Finally, Mirror Up mode allows the mirror to be locked up with a first press of the shutter button or optional MC-DC2 corded remote release, and fires the shutter on a second press (or automatically, after a delay of 30 seconds), allowing camera shake caused by mirror slap to be reduced when shooting on a tripod. There is also an Exposure Delay option in Custom Setting d11 which delays the exposure one second after the shutter button has been pressed and the mirror raised.
 Interval Timer Mode. Another useful feature on the Nikon D7000 that first appeared on more expensive models is Interval Timer mode, which facilitates time-lapse photography by taking a series of images at preset intervals. You can set the starting time for the series, as well as the time interval between shots, the number of shots to be captured after each interval (from one to nine), and the total number of intervals after which capture should cease (from one to 999). You can set hours, minutes, and seconds between each shot, and you can set a start time using 24-hour notation (HH:MM) from 00:00 to 24:00. (Make sure the camera's timezone, date and time are correctly set!) You can also start immediately, using the "Now" option. This is a good way to capture a timeline of slower events, such as clouds passing across the sky, tidal changes, a flower opening, etc. As with the Self-timer mode, the bundled DK-5 eyepiece cap should be placed over the viewfinder to prevent stray light from affecting the exposure. Exposure, flash, Active D-Lighting and white balance bracketing are all possible during interval shooting, and all but the latter will override the shots per interval setting to capture the required number of bracketed exposures. (White balance bracketing will capture only the requested number of exposures, but then process each single exposure differently so as to create the separate WB-bracketed still image files.). Interval capture can be paused and resumed, or interrupted, through the camera's menu system, if needed.
 Multiple Exposure Mode. The Nikon D7000 allows either two or three exposures to be captured separately, and then combined in-camera into a single multiple-exposure image. This function allows effects similar to those that might have been obtained by intentionally winding back and re-exposing an image on a film camera. Up to 30 seconds is allowed between exposures, in addition to the time set in Custom Setting c4, "Monitor Off Delay" if Image Review is enabled - so a maximum of 10 minutes and 30 seconds between exposures is possible if the camera has sufficient battery life remaining. As they're captured, the exposures can either be averaged by setting gain to "On", or the brightness values from each exposure simply added up. The Multiple Exposure mode can be combined with the Interval timer function to automatically capture all the shots of the multiple exposure if desired, and it's also possible to change white balance between exposures. Most other menu options are disabled during Multiple Exposure capture. Sadly, live view can't be used to capture multiple exposures, so there's no way to preview the effect and precisely align subjects by looking at the camera's LCD display.
 Retouch Menu. The Nikon D7000 has an extensive Retouch menu, which is starting to rival what basic image editing software packages can do on a computer - so much so that some users may not feel the need to use a computer for Nikon D7000 image editing at all. Retouch options include adjusting D-Lighting, red-eye correction, image cropping (trim), converting to monochrome, applying one of seven filter effects (including Skylight and Warm filters), adjusting color balance, image overlay for combining two Raw images into one JPEG, NEF (Raw) processing, resizing to small images (for TV, Web or email), "Quick Retouch" (boosts saturation / contrast and applies D-Lighting for contrasty scenes), straighten (rotates images +/- five degrees in 0.25 degree increments), distortion (barrel / pincushion) correction, a fisheye effect, color outline, a pencil-like color sketch effect, perspective control (correcting diverging verticals / horizontals), miniature effect (graduated blur at top and bottom of the frame to emulate reduced depth of field), and basic movie editing.
Raw Processing SubMenu. Raw-format files are pretty common on SLRs these days: They capture all the data as it comes from the sensor, usually without any processing applied. Manipulated on a computer with Raw-processing software, they let you make major white balance adjustments, minor exposure tweaks, and perform noise-reduction processing beyond what the camera can manage on its own. Like many of their other high-end SLRs, the Nikon D7000 also lets you do this sort of processing right in the camera, via a sub-menu off the Retouch Menu.
Nikon in-camera Raw processing
| |
 |  |
Here's a screenshot from our D300s review
showing a Raw file captured under a very yellow light source. While the D7000's menu isn't quite identical, it's very similar. | Changing to a manual white balance setting lets us make a fresh JPEG with good color. |
As seen in the screen shots above from our D300s, Nikon's in-camera Raw processing menu gives you a lot of options, and the D7000 adds one more. As well as letting you change the JPEG quality, image size, white balance, exposure compensation (within +/-2 EV limits), Picture Control setting, High ISO noise reduction, and color space of a file, you can now adjust D-Lighting in three steps, or disable it together, before generating a new JPEG. (The original Raw file itself and any JPEG is left untouched; a new file is created.) This can be pretty handy if you need to make a quick change to white balance or minor exposure tweak in the field, before uploading an image to beat a deadline.
The images above were taken from our standardized test shots. For a collection of more pictorial photos, see ourNikon D7000 Photo Gallery .
Not sure which camera to buy? Let your eyes be the ultimate judge! Visit our Comparometer(tm) to compare images from the Nikon D7000 with those from other cameras you may be considering. The proof is in the pictures, so let your own eyes decide which you like best!
Nikon D7000 Image Quality
Color
Saturation & Hue Accuracy
Very good overall accuracy and saturation, with only minor shifts in hue and intensity.
Very good overall accuracy and saturation, with only minor shifts in hue and intensity.
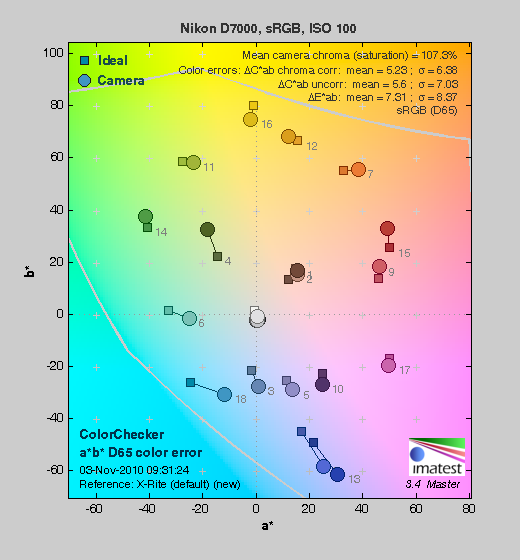 |
| In the diagram above, the squares show the original color, and the circles show the color that the camera captured. More saturated colors are located toward the periphery of the graph. Hue changes as you travel around the center. Thus, hue-accurate, highly saturated colors appear as lines radiating from the center. |
Skin tones. Here, with the color balanced properly for the light source, the Nikon D7000's skin tones looked just about right. There were some slight pink tints in places, but overall skin tone looked very natural. Where oversaturation is most problematic is on Caucasian skin tones, as it's very easy for these "memory colors" to be seen as too bright, too pink, too yellow, etc.
Hue. The Nikon D7000 showed a few small color shifts relative to the mathematically precise translation of colors in its subjects, but its overall color accuracy was very good. Reds shifted very slightly toward orange, and cyan shifted a bit toward blue, as there were slight shifts in some oranges, greens and purples, but shifts were relatively minor. (The cyan to blue shift is very common among the digital cameras we test; we think it's a deliberate choice by camera engineers to produce better-looking sky colors.) Hue is "what color" the color is.
Picture Control
The Nikon D7000 offers six preset "Picture Control" options. You can adjust Sharpening, Contrast, Brightness, Saturation and Hue for any of the settings. (For Monochrome, Saturation and Hue are replaced by Filter Effects and Toning settings.)
The Nikon D7000 offers six preset "Picture Control" options. You can adjust Sharpening, Contrast, Brightness, Saturation and Hue for any of the settings. (For Monochrome, Saturation and Hue are replaced by Filter Effects and Toning settings.)

Mouse over the links above to see the effect of the presets on our Still Life target. Click on a link to load the full resolution image.
Saturation AdjustmentThe Nikon D7000 lets you adjust the image saturation and contrast in seven steps each, brightness in three steps, hue in seven steps and sharpening in ten steps. As can be seen below, the saturation adjustment worked very well, providing a reasonably fine-grained adjustment over a useful range of control. The saturation adjustment also has almost no impact on contrast. That's how a saturation control should work, but we've often found interactions between saturation adjustments and image contrast (and vice versa) on the cameras we test.
| Saturation Adjustment Examples | ||||
 |  |  |  |  |
| -3 | -1 | 0 | +1 | +3 |
The series of shots above shows results with several different saturation adjustment settings, showing the minimum step size around the default, as well as both extremes. There is also an Auto setting available. See the Thumbnails index page for more (look for the files named D7000OUTBSATx.JPG). Click on any thumbnail above to see the full-sized image.
 |  |  |
| See full set of test images with explanations See thumbnails of all test and gallery images | ||
Sensor
Exposure and White Balance
Indoors, incandescent lighting
Very warm results with Auto and Incandescent white balance, though good color with Manual and 2,600 Kelvin white balance settings. About average exposure compensation required.*
Very warm results with Auto and Incandescent white balance, though good color with Manual and 2,600 Kelvin white balance settings. About average exposure compensation required.*
 |  |
| Auto White Balance +0.3 EV | Incandescent White Balance +0.3 EV |
 |  |
| Manual White Balance +0.3 EV | 2,600 Kelvin +0.3 EV |
The Nikon D7000's auto white balance had a difficult time with the very warm color balance of the household incandescent bulbs used in this shot, something we find disappointing in a camera in this price and performance range. But the D7000 is by no means alone in this: Many cameras we test have trouble with this light source, and it's important to note that this is far from the worst we've seen. The camera's incandescent white balance setting is obviously tuned for the cooler-hued 3,200K color of professional studio lighting, so it produces the warm cast you'd expect here. The 2,600K and Manual settings produced much more accurate results. Skin tones and white values looked best with the manual option, as the 2,600K setting had a slight magenta tint (though still nearly accurate -- and we could obviously have chosen a slightly higher Kelvin setting if we'd wanted to fiddle with it more). After accounting for the lens (see below), the Nikon D7000 required an average amount of exposure compensation for this shot (+0.3 EV). Our test lighting for this shot is a mixture of 60 and 100 watt household incandescent bulbs, a pretty yellow light source, but a very common one in typical home settings here in the U.S.
* Note: These shots were captured with a Sigma 70mm f/2.8 macro lens, one of the sharpest lenses we've ever tested on SLRgear.com. We use Sigma 70mm lenses in most of our studio test shots because they are so sharp and are available on all major platforms with the exception of Four Thirds. For some reason, though, on some (but not all) Nikon bodies, the Sigma causes the camera's exposure system to overexpose by somewhere between two thirds of a stop and a full stop. The D7000 is one such body (as was the D90 and D300S), as the exposure compensation settings actually used in the images above are lower than normal for this shot. Accordingly, the comments regarding exposure compensation required have been adjusted to match results we achieved with a Nikkor lens. Other than this exposure shift, the Sigma 70mm performs very well on Nikon bodies, so we continue to use it as our "reference" lens, due to its excellent optical qualities.
Outdoors, daylightGood exposure and color outdoors with very good highlight/shadow detail preservation. Options like D-Lighting, and Contrast adjustment are a help when faced with tough conditions like these.
 |  |
| Auto White Balance, +0.7 EV | Auto White Balance, 0 EV |
The Nikon D7000 handled tough outdoor lighting under harsh sunlight pretty well, and produced good overall color and exposure. The default contrast setting was a bit on the high side (as most users prefer), but shadow and highlight detail in the "sunlit" Portrait shot shown above was quite good. Despite the bright appearance, only a few highlights mainly in the red and blue channels were clipped in the model's shirt, pendant and some of the flowers, though the blue channel was lost in some of the deeper shadows. Shadow noise was however surprisingly low. The +0.7 EV exposure compensation required to keep the model's face bright was about average for this scene. The house shot was slightly overexposed at 0 EV, so it lost some highlights in the white trim , but shadow detail was quite good. Again, shadow noise was surprisingly low. Color looks good outdoors as well, just a touch cool.
Resolution
Very high resolution, ~1,950 to 2,000 lines of strong detail from JPEGs, slightly higher from converted RAW files.
Very high resolution, ~1,950 to 2,000 lines of strong detail from JPEGs, slightly higher from converted RAW files.
 |  |
| Strong detail to 1,950 lines horizontal Camera JPEG | Strong detail to 2,000 lines vertical Camera JPEG |
 |  |
| Strong detail to 2,100 lines horizontal ACR�processed RAW | Strong detail to 2,000 lines vertical ACR�processed RAW |
Our laboratory resolution chart revealed sharp, distinct line patterns down to about 1,950 lines per picture height in the horizontal direction, and about 2,000 lines per picture height in the vertical direction in JPEGs. (Some might argue for over 2,000 lines, but aliasing artifacts begin to appear earlier.) Complete extinction didn't occur until around 2,800 lines in both directions. We were able to eke out a bit more resolution (about 2,100 lines) in the horizontal direction with RAW files processed through Adobe Camera RAW, but not in the vertical direction. The ACR processed RAW images were crisper (thanks to strong/tight unsharp masking in Photoshop), but didn't contain much more detail. Use these numbers to compare with other cameras of similar resolution, or use them to see just what higher resolution can mean in terms of potential detail.
Sharpness & Detail
Very good detail but a hint soft straight from the camera, with relatively minor edge-enhancement on high-contrast subjects. Minimal noise suppression artifacts at base ISO.
Very good detail but a hint soft straight from the camera, with relatively minor edge-enhancement on high-contrast subjects. Minimal noise suppression artifacts at base ISO.
 |  |
| Very good definition of high-contrast elements, with only minor evidence of edge enhancement. | Subtle detail: Hair Noise suppression tends to blur detail in areas of subtle contrast, though detail remains strong in the darker parts of the model's hair here. |
Sharpness. The Nikon D7000 produced very good detail, but there's a slight softness overall, even when using the sharp Nikon 35mm f/1.8G prime lens at f/8 as was used for the house crop above left. f/8 is slightly beyond the diffraction limit on the D7000, but our testing on SLRgear showed that the sharpness loss from f/5.6 to f/8 was very slight: So the slight softness here is almost certainly the result of the camera's low pass filter and its image processing, rather than any loss optically. Some minor edge enhancement artifacts are visible on high-contrast subjects such as the crop above left, but overall results are still quite good. Edge enhancement creates the illusion of sharpness by enhancing color and tonal differences right at the edge of a rapid transition in color or tone.
Detail. The crop above right shows only minimal detail loss due to noise suppression, as the darker areas of the model's hair show a lot of detail. Individual strands are still distinguishable even in the lighter shadows, though they begin to merge as shadows deepen, and in places where the tone and color of adjacent strands is very close. All in all, a very good performance here for Nikon's highest-resolution DX sensor to date. Noise-suppression systems in digital cameras tend to flatten-out detail in areas of subtle contrast. The effects can often be seen in shots of human hair, where the individual strands are lost and an almost "watercolor" look appears.
RAW vs In-Camera JPEGsAs noted above, the Nikon D7000 does a pretty good job at capturing lots of detail, but JPEG images are slightly soft at the default settings. A little more detail can be obtained from carefully processing RAW files, though, without introducing additional artifacts. Take a look below, to see what we mean:

In the table above, mousing over a link at the bottom will load the corresponding crop in the area above, and clicking the link will load the full resolution image. Examples are all shot at ISO 100, and include in-camera Fine JPEG, the RAW file processed through Nikon's free ViewNX software, and the RAW file processed through Adobe Camera Raw (ACR) version 6.3b, then sharpened in Photoshop. We used default settings for ViewNX. For Adobe Camera Raw, we found best results with strong but tight 350% unsharp masking with a 0.3 pixel radius.
As is frequently the case, the demosaicing and sharpening in Adobe Camera and Photoshop deliver finer detail than either the camera or the manufacturer's own software. Looking very closely at the images, ACR extracts a bit more detail that wasn't present in the JPEGs from either the camera itself or Nikon's software package, but the main difference is in the fineness of the rendering. Fine details (the tree branches against the sky, for example) look a little coarser in the various Nikon renderings than in that from ACR/Photoshop. This isn't without cost, though: While they don't look as crisp, the Nikon renderings are smoother-looking. We'd personally go the Adobe (or other high-quality third-party RAW converter) route here if we were concerned about making the sharpest-looking print possible from the D7000's files.
ISO & Noise Performance
Very good handling of noise vs detail to ISO 1,600.
Very good handling of noise vs detail to ISO 1,600.
| Noise Reduction = Default | ||
 |  |  |
| ISO 100 | ISO 200 | ISO 400 |
 |  |  |
| ISO 800 | ISO 1,600 | ISO 3,200 |
 |  |  |
| ISO 6,400 | ISO 12,800 | ISO 25,600 |
The Nikon D7000's images were very clean at ISO 100 through 800, which just a touch of luminance noise becoming more visible in the shadows as ISO increased. Detail was still very good at ISO 1,600, with a tight film-like noise "grain" and very little fine detail lost to noise reduction. At ISO 3,200, subject detail takes a bigger drop than previous steps, with stronger blurring and more visible noise "grain", but detail is better than average. Images at 6,400 and ISO 12,800 are notably less detailed than those at lower sensitivity levels, and ISOs 12,800 and 25,600 in particular shows a lot of chroma noise as well, in the form of yellow and purple blotches. Of course, the impact of noise and detail loss are highly dependent on the size the photos are printed at, and pixel-peeping on-screen has surprisingly little relationship to how the images look when printed: See the Print Quality section below for recommended maximum print sizes at each ISO.
A note about focus for this shot: We shoot this image at f/4, using one of three very sharp reference lenses (70mm Sigma f/2.8 macro for most cameras, 60mm f/2.8 Nikkor macro for Nikon bodies without a drive motor, and Olympus Zuiko 50mm f/2.0 for Four Thirds and Micro Four Thirds bodies). To insure that the hair detail we use for making critical judgements about camera noise processing and detail rendering is in sharp focus at the relatively wide aperture we're shooting at, the focus target at the center of the scene is on a movable stand. This lets us compensate for front- or back-focus by different camera bodies, even those that lack micro-focus adjustments. This does mean, though, that the focus target itself may appear soft or slightly out of focus for bodies that front- or back-focused with the reference lens. If you click to view the full-size image for one of these shots and notice that the focus target is fuzzy, you don't need to email and tell us about it; we already know it. :-) The focus target position will simply have been adjusted to insure that the rest of the scene is focused properly.
 |  |
 |  |
| ISO 100 | ISO 6,400 |
Extremes: Sunlit and low light tests
Very high resolution with very good highlight and shadow detail. Very good low-light performance, capable of capturing bright images in near darkness.
Very high resolution with very good highlight and shadow detail. Very good low-light performance, capable of capturing bright images in near darkness.
 | |  |
| +0.3 EV | +0.7 EV | +1.0 EV |
Sunlight:The Nikon D7000 handled the deliberately harsh lighting very well in the above test. Though contrast is a little high, highlight and especially shadow detail are very good. The camera's contrast adjustment also did a good job of decreasing overall contrast without producing strong color variations; see the section below. The +0.7 EV exposure did the best job here, as the model's face was a bit too dim at +0.3 EV and we thought that too many highlights were lost at +1.0 EV. At +0.7 EV, only a few highlights were blown in the model's shirt and bright flowers, while very good detail was still preserved in the shadows with lower than average noise. These shots were captured with the Nikon D7000's Active D-Lighting control set to its default of "Off."
Because digital cameras are more like slide film than negative film (in that they tend to have a more limited tonal range), we test them in the harshest situations to see how they handle scenes with bright highlights and dark shadows, as well as what kind of sensitivity they have in low light. The shot above is designed to mimic the very harsh, contrasty effect of direct noonday sunlight, a very tough challenge for most digital cameras. (You can read details of this test here. In actual shooting conditions, be sure to use fill flash in situations like the one shown here; it's better to shoot in open shade whenever possible.)
Contrast AdjustmentWe really like it when a camera gives us the ability to adjust contrast and saturation to our liking. It's even better when those adjustments cover a useful range, in steps small enough to allow for precise tweaks. Just as with its saturation adjustment, the Nikon D7000's contrast setting meets both challenges, the contrast steps actually being a little finer than those for saturation, and thus even more to our liking.
| Minimum Contrast | |
 |  |
| Contrast set to lowest, +0.7 EV | Contrast set to lowest, 0 EV |
At its lowest contrast setting, the D7000 did a really excellent job of preserving a bit more highlight detail, maintaining natural-looking skin tones, and bringing nice detail out of the shadows. The D7000 captures good color outdoors, though just slightly on the cool side. Overall, very good results here, especially when the contrast setting is tweaked. (This is a really tough shot; the Nikon D7000 does a better than average job handling it.)
| Contrast Adjustment Examples | ||||
 |  |  |  |  |
| -3 | -1 | 0 | +1 | +3 |
The series of shots above shows results with several different contrast adjustment settings, showing the minimum step size around the default, as well as both extremes. There is also an Auto setting available. While you can see the extremes, it's hard to really evaluate contrast on small thumbnails like these, click on any thumbnail to go to the full-size image.
One very nice feature of Nikon's contrast adjustment is that it has very little effect on color saturation. Contrast and saturation are actually fairly closely coupled, it's a good trick to be able to vary one with out the other changing as well. Nikon did a good job here.
Nikon's Active D-Lighting
The series of shots below show the results of the available Active D-Lighting settings (once again, with an equivalent exposure compensation of +0.7 EV), used to preserve highlight and shadow detail in high contrast images. Active D-Lighting is different from the touch-up menu's D-Lighting, as it is performed during image capture instead of after. (It does affect only JPEG images though, Nikon very properly doesn't apply tonal adjustments like this to RAW file data. NEF files, however, are tagged so that Nikon software can automatically apply the effect when converted.)
The series of shots below show the results of the available Active D-Lighting settings (once again, with an equivalent exposure compensation of +0.7 EV), used to preserve highlight and shadow detail in high contrast images. Active D-Lighting is different from the touch-up menu's D-Lighting, as it is performed during image capture instead of after. (It does affect only JPEG images though, Nikon very properly doesn't apply tonal adjustments like this to RAW file data. NEF files, however, are tagged so that Nikon software can automatically apply the effect when converted.)
| Outdoor Portrait Active D-Lighting | |||
 | Off (Default) | ||
| Auto | |||
| Low | |||
| Normal | |||
| High | |||
| Extra High | |||
Mouse over the links to see how the various levels of Active D-Lighting affects our "Outdoor" Portrait shot. Click on a link to get to the full-res image. (Active D-Lighting's effect can be a little subtle in shots like those above, so we decided to use a mouse-over to better show how each setting compares to Off.)
When Active D-Lighting is enabled, the camera exposes for the highlights in an attempt to preserve more of them (in this case, faster shutter speeds were used at higher ADL settings), then adjusts the tone curve to bring the midtones and shadows back up to produce an image that doesn't look underexposed. As you can see from the thumbnail images and histograms above, higher values of Nikon's Active D-Lighting do a very good job at preserving highlights while bringing up shadows and deeper midtones, without making the image look too flat. There's a touch more noise visible in the darker areas of the test shots above with Active D-Lighting enabled, but noise levels are very low to begin with that the slight increase is of no practical concern.
| Far-field Active D-Lighting Examples | ||
 | ||
Here are the results with our Far-field House shot. Again, Active D-Lighting does a very good job of taming hot highlights while bringing up some of the shadows and deeper midtones a bit. Also note the slight blue cast in the white trim of the house as the strength of Active D-Lighting is increased.
| 1 fc 11 lux | 1/2 fc 5.5 lux | 1/4 fc 2.7 lux | 1/8 fc 1.3 lux | 1/16 fc 0.67 lux | 1/16fc No NR | |
|---|---|---|---|---|---|---|
| ISO 100 | 2 sec f2.8 | 4 sec f2.8 | 8 sec f2.8 | 15 sec f2.8 | 30 sec f2.8 | 30 sec f2.8 |
| ISO 200 | 1 sec f2.8 | 2 sec f2.8 | 4 sec f2.8 | 8 sec f2.8 | 15 sec f2.8 | 15 sec f2.8 |
| ISO 400 | 0.5 sec f2.8 | 1 sec f2.8 | 2 sec f2.8 | 4 sec f2.8 | 8 sec f2.8 | 8 sec f2.8 |
| ISO 800 | 1/4 sec f2.8 | 0.5 sec f2.8 | 1 sec f2.8 | 2 sec f2.8 | 4 sec f2.8 | 4 sec f2.8 |
| ISO 1600 | 1/8 sec f2.8 | 1/4 sec f2.8 | 0.5 sec f2.8 | 1 sec f2.8 | 2 sec f2.8 | 2 sec f2.8 |
| ISO 3200 | 1/15 sec f2.8 | 1/8 sec f2.8 | 1/4 sec f2.8 | 0.5 sec f2.8 | 1 sec f2.8 | 1 sec f2.8 |
| ISO 6400 | 1/30 sec f2.8 | 1/15 sec f2.8 | 1/8 sec f2.8 | 1/4 sec f2.8 | 0.5 sec f2.8 | 0.5 sec f2.8 |
| ISO 12800 | 1/60 sec f2.8 | 1/30 sec f2.8 | 1/15 sec f2.8 | 1/8 sec f2.8 | 1/4 sec f2.8 | 1/4 sec f2.8 |
| ISO 25600 | 1/125 sec f2.8 | 1/60 sec f2.8 | 1/30 sec f2.8 | 1/15 sec f2.8 | 1/8 sec f2.8 | 1/8 sec f2.8 |
Low light. The Nikon D7000 performed well here, able to capture usable images down to the 1/16 foot-candle light level (about 1/16 as bright as average city street lighting at night), at all ISO settings. The D7000's metering system struggled a bit with getting the exposure right at the lowest levels though, so we used manual exposure for these shots. Color balance with auto white balance was fairly neutral at higher light levels, but took on an increasingly strong blue or magenta cast as light levels dropped. Noise was quite low up to ISO 1,600, and even a higher ISOs, there's still a lot of detail to work with when high ISO NR is set to "Off" (which still applies some filtering at ISOs over 1,600). The Nikon D7000 gives you four options for high ISO noise reduction: Off, Low, Normal, and High, so you have some flexibility in deciding how much noise to trade for detail. Except for the "No NR" shots in the table above, these were all shot using the Normal NR setting, and Long Exposure NR was enabled so it was applied to exposures longer than eight seconds. There are a number of hot pixels visible starting at ISO 400 at lower light levels (in addition to the cluster visible in good lighting), and the number increases at higher ISOs. We did not detect any significant banding issues.
The Nikon D7000's phase-detection autofocus system also performed very well here, able to focus on the subject down to well below the 1/16 foot-candle light level with its AF assist light turned off, and in total darkness with it enabled. In Live View mode with contrast-detect autofocus, the D7000 was able to focus down to only the 1/4 foot-candle, which is about average. (Keep in mind that the longer shutter speeds here demand the use of a tripod to prevent any blurring from camera movement. A useful trick is to just prop the camera on a convenient surface, and use its self-timer to release the shutter. This avoids any jiggling from your finger pressing the shutter button, and can work quite well when you don't have a tripod handy.)
How bright is this? The one foot-candle light level that this test begins at roughly corresponds to the brightness of typical city street-lighting at night. Cameras performing well at that level should be able to snap good-looking photos of street-lit scenes.
NOTE: This low light test is conducted with a stationary subject, and the camera mounted on a sturdy tripod. Most digital cameras will fail miserably when faced with a moving subject in dim lighting. (For example, a child's ballet recital or a holiday pageant in a gymnasium.) Digital SLRs like the Nikon D7000 do much better than point & shoots, but you still shouldn't expect a quick autofocus lock with moving subjects.
Output Quality
Print Quality
 Printing tells the clear story of the Nikon D7000's image quality. ISO 100 images make a very crisp 24 x 36 inch print with no trouble. This remains true at ISO 200 and 400, with slight luminance noise starting to encroach in the shadows at ISO 400. Prints up to 36 x 48 are fine for wall display purposes.
ISO 800 shots finally start to show some softness in fine detail, but it's still quite good at 20 x 30 inches.
ISO 1,600 prints are nice at 13 x 19, with only minor noise in the some shadowy areas and reminiscent of film grain.
ISO 3,200 yields a nice 11 x 14, if just a bit soft in some areas for fine detail.
ISO 6,400 is good for 8 x 10s. Chroma noise is visible in the shadows, but not too badly.
ISO 12,800 suffers from more chroma noise and snowy luminance noise at 5 x 7, such that it's not really usable. However, reducing size to 4 x 6 is fine.
ISO 25,600 prints a decent 4 x 6 for less critical applications, but is not what we can officially call "good".
That's what we call an impressive performance, producing excellent images from ISO 100 to 400 at very large 24 x 36 inch print sizes, and even at ISO 12,800 you can get a good 4 x 6 inch print.
Testing hundreds of digital cameras, we've found that you can only tell just so much about a camera's image quality by viewing its images on-screen. Ultimately, there's no substitute forprinting a lot of images and examining them closely. For this reason, we now routinely print sample images from the cameras we test on our Canon Pro9000 Mark II studio printer, and on the Pixma MP610 here in the office. (See the Canon Pixma Pro9000 Mark II review for details on that model.)
Nikon D7000 Imatest Results
We routinely use Norman Koren's excellent "Imatest" analysis program for quantitative, thoroughly objective analysis of digicam test images. I highly recommend it to our technically-oriented readers, as it's far and away the best, most comprehensive analysis program I've found to date.
My comments below are just brief observations of what we see in the Imatest results. A full discussion of all the data Imatest produces is really beyond the scope of this review: Visit the Imatest web site for a full discussion of what the program measures, how it performs its computations, and how to interpret its output.
Here's some of the results produced by Imatest for the Nikon D7000:
sRGB Accuracy Comparison | |||||
The Nikon D7000 showed pretty good color accuracy, with mild to moderate oversaturation of deep blues, bright reds, and dark greens, and to a lesser extent, some oranges, greens, purples and browns. Some colors such as yellow, light green, aqua and cyan are slightly understaturated. Hue accuracy was very good, with the typical (typical meaning significant) cyan shift we see in most cameras we test, and also a little shift in other colors such as aqua, red, orange and yellow. Average saturation for the Nikon D7000 was 107.3% (oversaturated by 7.3%) which is fairly typical. Average "delta-C" color error was 5.23 after correction for saturation, a little less accurate than the D90 and D300S, and the least accurate of the group above except for the Pentax K-5. (Delta-C is the same as the more commonly referred to delta-E, but delta-C takes into account only color differences, ignoring luminance variation.) All in all, a pretty good color response for an SLR. Mouse over the links below the illustration above to compare results with the others in this group.
Adobe RGB Accuracy Comparison | |||||
Most SLRs oversaturate colors when shooting in Adobe RGB mode, and the Nikon D7000 is no exception. Average saturation was 109% which is higher than the sRGB result, but not by as much as we often see. Average saturation-corrected hue error was 4.92 "delta-C" units, slightly better accuracy than sRGB. Again, a pretty good result overall. Mouse over the links below the illustration above to compare results with the same group.
Nikon D7000 Color Analysis

This image shows how the Nikon D7000 actually rendered the colors of the MacBeth chart, compared to a numerically ideal treatment. In each color swatch, the outer perimeter shows the color as actually captured by the camera. The inner square shows what the ideal color would look like if the brightness were adjusted to match the camera's tone curve, while the small rectangle shows the numerically correct color with no adjustment. This image shows the good hue accuracy of the D7000, as well as a commonly-employed trick of overexposing some of the highest-saturation swatches, to give an impression of "brighter" color, without actually oversaturating.
The bottom row of the chart shows exaggerated white balance errors, revealing that the camera produced a slightly cool color balance when using Custom white balance, with a WhiBal card as the reference, though mid-one white balance looks quite accurate. (Note that the examples above deliberately exaggerate the white balance error.)
Nikon D7000 Noise Analysis

As always, there's more in this particular graph than we really have room to go into here. (Also note that this set of plots has also changed a few revisions back in Imatest. Some of the plots that were once shown here are now shown in other Imatest output. Since we largely focus on the Noise Spectrum plot, we only show the graphic above, which includes that plot.)
In comparing these graphs with those from competing cameras, we've found that the Noise Spectrum graph at lower right is often the most important. Cameras that manage to shift their noise spectrum to higher frequencies have much finer-grained noise structures, making their noise less visually objectionable. In the graph above, this would show up as a noise spectrum curve that remained higher on the right side, representing higher noise frequencies.
Above, we see the results at ISO 100. The luminance curve (in black) is fairly flat, with blue and red channels only slightly elevated lot lower frequencies, however the red channel exhibits much higher noise values at lower frequencies. The dominance of low frequencies in the color channels points to some low-level blotchiness, but noise levels are so low in the red channel (bottom left plot), that subtle chroma blotches are only seen withextreme pixel-peeping in midtone and shadows.

Above is the same set of noise data from the Nikon D7000 at ISO 3,200. Here, the overall Noise Spectrum graph is shifted a fair bit toward the left-hand, lower-frequency side than it was at ISO 100, coarsening the "grain" of the image noise patterns. There's much less difference between the color channels in this plot, with the green channel tracking luminance noise very closely, and only the red and blue channel noise being a bit elevated at the lowest frequencies, no doubt due to noise reduction processing. This translates to ISO 3,200 images with pretty low levels of noise, slightly lower than the D300S but slightly higher than the D90. An impressive performance considering the smaller pixel size of the D7000.

Here's the same set of noise data at ISO 6,400. Here again, the Noise Spectrum graph is shifted even more toward the left-hand side, further coarsening the "grain" of the image noise patterns further. Overall noise levels are higher than ISO 3,200 as you'd expect, but very good compared to most other APS-C SLRs.

This above chart is a little crowded, so below is a version with ISO range 100-6,400.

This chart compares the Nikon D7000's noise performance over a range of ISOs against that of a few other SLR cameras in a similar price range or resolution. While we continue to show noise plots of this sort because readers ask for them, we each time point out that the noise magnitude is only a small part of the story, the grain pattern being much more important, not to mention what the camera does to achieve a given noise level. (Some cameras obliterate subject detail along with noise, so the camera with the lowest noise levels on MacBeth chart swatches may not necessarily produce the most appealing images.)
As you can see, the Nikon D7000's luminance noise levels are competitive with and often better than most of the cameras in this group, with a nice, fairly linear progression of noise levels versus ISO sensitivity. What's not shown here, though, is how good the Nikon D7000's JPEG processing is at holding on to fine detail while keeping noise in check, especially in difficult subjects with subtle tone-on-tone detail. The Sony A580 and Pentax K-5 score better at very high ISOs (above 6,400) with cleaner looking images, but they don't show quite as much detail. All in all, a very good performance from the Nikon D7000. Keep in mind, though, that these results are at default noise reduction settings, so the shape and positions of the curves will be influenced by your settings.
Nikon D7000 Dynamic Range Analysis
A key parameter in a digital camera is its Dynamic Range, the range of brightness that can be faithfully recorded. At the upper end of the tonal scale, dynamic range is dictated by the point at which the RGB data "saturates" at values of 255, 255, 255. At the lower end of the tonal scale, dynamic range is determined by the point at which there ceases to be any useful difference between adjacent tonal steps. Note the use of the qualifier "useful" in there: While it's tempting to evaluate dynamic range as the maximum number of tonal steps that can be discerned at all, that measure of dynamic range has very little relevance to real-world photography. What we care about as photographers is how much detail we can pull out of the shadows before image noise becomes too objectionable. This, of course, is a very subjective matter, and will vary with the application and even the subject matter in question. (Noise will be much more visible in subjects with large areas of flat tints and subtle shading than it would in subjects with strong, highly contrasting surface texture.)
What makes most sense then, is to specify useful dynamic range in terms of the point at which image noise reaches some agreed-upon threshold. To this end, Imatest computes a number of different dynamic range measurements, based on a variety of image noise thresholds. The noise thresholds are specified in terms of f-stops of equivalent luminance variation in the final image file, and dynamic range is computed for noise thresholds of 1.0 (low image quality), 0.5 (medium image quality), 0.25 (medium-high image quality) and 0.1 (high image quality). For most photographers and most applications, the noise thresholds of 0.5 and 0.25 f-stops are probably the most relevant to the production of acceptable-quality finished images, but many noise-sensitive shooters will insist on the 0.1 f-stop limit for their most critical work.
The image below shows the test results from Imatest for an in-camera JPEG file from the Nikon D7000 with a nominally-exposed density step target (Stouffer 4110), with its settings such as contrast and Active D-Lighting set to the defaults.

Here, we can see that the tone curve maintains pretty good gradation in the highlights but the shadow end doesn't trail-off quite as nicely, though shadow noise is quite low. Total dynamic range is very good at 10 f-stops, almost a full stop better than the D90 and D300S, while the score at the highest quality is also very good, at 7.97 f-stops versus the D90's 7.77 and D300S' 7.49. (But keep in mind the base ISO of the D90 and D300S is ISO 200, and higher ISOs tend to reduce Imatest scores.) We didn't shoot with Active D-Lighting enabled for this test, as the increased noise levels resulting from the boost in shadows usually results in a lower Imatest score at the highest quality levels. The high quality score at default settings is excellent for an in-camera JPEG from an APS-C sensor; among the very top performers.

The illustration above shows the results from an Adobe Camera Raw 6.3 converted NEF file, using the Auto setting. Slightly better results are possible by manually tweaking, but we weren't able to improve the scores. As can be seen, the score at the highest quality level was much better than the in-camera JPEG, at 10.1 f-stops versus 7.97 f-stops, which is one of the highest scores to date of any camera we've tested, aided by the D7000's low shadow noise. Total dynamic range also improved considerably, from 10 to 12.1 f-stops. It's worth noting here that ACR's noise reduction reduced overall noise (see the plot in the lower left-hand corner) relative to the levels in the in-camera JPEG, which would tend to boost the dynamic range numbers for the High Quality threshold. Also, the extreme highlight recovery being performed by ACR here would likely produce color errors in strong highlights of natural subjects.
Dynamic Range, the bottom line:
The net result was that the Nikon D7000's JPEGs showed excellent dynamic range, performing almost as well as the best cameras we've tested, and that's with Active D-Lighting set to Off (default). RAW dynamic range performance with Adobe Camera RAW was outstanding, producing the second best score we've tested to date, besting even full-frame models.
To get some perspective, here's a summary of the Nikon D7000's dynamic range performance, and how it compares to other digital SLRs that we also have Imatest dynamic range data for. (Results are arranged in order of decreasing dynamic range at the "High" quality level.):
| Dynamic Range (in f-stops) vs Image Quality (At camera's base ISO) (Blue = RAW via ACR, Yellow=Camera JPEG, Green=Current Camera) | ||||
| Model | 1.0 (Low) | 0.5 (Medium) | 0.25 (Med-High) | 0.1 (High) |
| Pentax K-5 (Adobe Camera Raw 6.3) | 11.5 | 11.5 | 11.2 | 10.2 |
| Nikon D7000 (Adobe Camera Raw 6.3) | 12.0 | 11.9 | 11.6 | 10.1 |
10.0 Stops
| ||||
| Nikon D3X (Adobe Camera Raw 5.3b) | -- | -- | 11.1 | 9.64 |
| Nikon D3S (Adobe Camera Raw 5.6) | -- | -- | 10.7 | 9.55 |
| Nikon D700 (Adobe Camera Raw 4.5) | 12.1 | 11.6 | 10.6 | 9.51 |
| Nikon D5000 (Adobe Camera Raw 5.4b) | -- | 11.6 | 10.8 | 9.50 |
9.5 Stops
| ||||
| Sony A33 (Adobe Camera Raw 6.2) | -- | -- | 10.7 | 9.37 |
| Sony A900 (Adobe Camera Raw 4.6b) | -- | 12.1 | 10.7 | 9.36 |
| Pentax K-x (Adobe Camera Raw 5.6b) | 11.5 | 11.2 | 10.7 | 9.33 |
| Nikon D90 (Adobe Camera Raw 4.6b) | 12.1 | 11.8 | 10.7 | 9.27 |
| Sony A55 (Adobe Camera Raw 6.2) | 11.1 | 10.9 | 10.5 | 9.16 |
| Fujifilm S3 Pro (Adobe Camera Raw 2) | 12.1 | 11.7 | 10.7 | 9.00 |
9.0 Stops
| ||||
| Sony NEX-5 (Adobe Camera Raw 6.2b) | 11.9 | 11.5 | 10.4 | 8.95 |
| Sony A230 (Adobe Camera Raw 5.5) | 11.7 | 11.1 | 10.1 | 8.95 |
| Nikon D40x (Adobe Camera Raw 4.1) | 12.0 | 10.9 | 10.3 | 8.90 |
| Canon 1D Mark IV (Adobe Camera Raw 5.7) | -- | 11.0 | 10.1 | 8.90 |
| Nikon D300S (Adobe Camera Raw 5.5) | -- | 11.3 | 10.4 | 8.89 |
| Canon 5D Mark II (Adobe Camera Raw 5.2) | -- | 10.8 | 10.0 | 8.89 |
| Sony NEX-3 (Adobe Camera Raw 6.2b) | 11.8 | 11.4 | 10.1 | 8.87 |
| Sony A330 (Adobe Camera Raw 5.4) | -- | -- | 10.1 | 8.86 |
| Canon EOS-1Ds Mark III (Adobe Camera Raw 4.5) | 11.5 | 10.7 | 9.96 | 8.84 |
| Nikon D3 (Adobe Camera Raw 4.5) | 11.7 | 11.0 | 10.0 | 8.75 |
| Canon EOS-1D Mark III (Adobe Camera Raw 4.5) | 11.7 | 10.7 | 9.99 | 8.73 |
| Sony A380 (Adobe Camera Raw 5.5) | 11.8 | 10.9 | 10.1 | 8.62 |
| Nikon D3000 (Adobe Camera Raw 5.5) | -- | 10.8 | 10.1 | 8.61 |
| Pentax K20D (Adobe Camera Raw 4.5) | 11.4 | 10.6 | 9.82 | 8.56 |
| 8.5 Stops | ||||
| Nikon D300 (Adobe Camera Raw 4.3.1) | 11.4 | 10.9 | 9.87 | 8.45 |
| Sony A200 (Adobe Camera Raw 4.3.1) | 11.6 | 10.4 | 9.82 | 8.43 |
| Nikon D60 (Adobe Camera Raw 4.4.1) | 11.6 | 10.5 | 9.74 | 8.31 |
| Nikon D40 (Adobe Camera Raw 4.1) | 11.9 | 10.9 | 9.89 | 8.30 |
| Nikon D3100 (Adobe Camera Raw 6.3b) | 10.9 | 10.2 | 9.28 | 8.24 |
| Canon EOS-1Ds Mark III (Camera JPEG) | 10.9 | 10.2 | 9.71 | 8.23 |
| Pentax K100D (Adobe Camera Raw 3.6) | 11.3 | 10.3 | 9.51 | 8.23 |
| Pentax K200D (Adobe Camera Raw 4.4.1) | -- | 10.5 | 9.54 | 8.19 |
| Pentax K10D (Adobe Camera Raw 3.7) | 10.6 | 10.0 | 9.29 | 8.19 |
| Canon 7D (Adobe Camera Raw 5.6) | 11.2 | 10.3 | 9.52 | 8.18 |
| Sony A100 (Adobe Camera Raw 3.4) | 11.3 | 10.5 | 9.69 | 8.16 |
| Canon EOS-1Ds Mark II (Adobe Camera Raw 3) | 11.2 | 10.3 | 9.40 | 8.14 |
| Canon 1D Mark IV (Camera JPEG, ISO 50) | -- | -- | 8.45 | 8.10 |
| Canon EOS 50D (Adobe Camera Raw 4.6) | 11.2 | 10.5 | 9.49 | 8.06 |
| Nikon D40x (Camera JPEG) | 10.8 | 10.0 | 9.42 | 8.04 |
| Olympus E-P1 (ISO 200, Adobe Camera Raw 5.5) | 11.5 | 10.4 | 9.26 | 8.04 |
| Canon Rebel XSi (Camera JPEG) (ALO on by default) | 11.3 | 10.1 | 9.34 | 8.01 |
| 8.0 Stops | ||||
| Nikon D7000 (Camera JPEG) | 9.97 | 9.81 | 9.73 | 7.97 |
| Nikon D3S (Camera JPEG) | -- | -- | -- | 7.96 |
| Fujifilm S3 Pro(Camera JPEG) | -- | 9.90 | 9.40 | 7.94 |
| Canon T2i (Adobe Camera Raw 5.7) | -- | 10.0 | 9.21 | 7.94 |
| Samsung NX10 (Adobe Camera Raw 5.7 beta) | -- | -- | 9.18 | 7.91 |
| Sony A350 (Adobe Camera Raw 4.4) | 11.6 | 10.5 | 9.61 | 7.89 |
| Canon EOS-1D Mark III (Camera JPEG) | -- | 10.2 | 9.70 | 7.88 |
| Olympus E-P2 (Adobe Camera Raw 5.6) | -- | 10.2 | 9.44 | 7.88 |
| Canon Rebel XS (Adobe Camera Raw 4.5) | -- | 10.3 | 9.27 | 7.88 |
| Nikon D3 (Camera JPEG) | -- | -- | -- | 7.87 |
| Canon Digital Rebel XTi (Adobe Camera Raw 3.6) | 10.8 | 9.88 | 9.18 | 7.84 |
| Canon EOS 5D (Adobe Camera Raw 3) | 11.0 | 10.4 | 9.21 | 7.83 |
| Nikon D90 (Camera JPEG) | -- | -- | -- | 7.77 |
| Panasonic DMC-GH1 (Adobe Camera Raw 5.4b) | 9.88 | -- | 9.30 | 7.76 |
| Canon 60D (Adobe Camera Raw 6.3) | 10.7 | 9.88 | 9.12 | 7.75 |
| Sony A55 (Camera JPEG) | 9.59 | 9.36 | 8.70 | 7.74 |
| Canon Rebel T1i (Adobe Camera Raw 5.4b) | 11.2 | 10.2 | 9.16 | 7.73 |
| Pentax K-7 (Adobe Camera Raw 5.4) | 10.6 | 9.93 | 9.07 | 7.73 |
| Canon EOS 40D (Adobe Camera Raw 4.2) | 11.2 | 10.1 | 9.26 | 7.72 |
| Panasonic DMC-GH1 (Camera JPEG) | 8.77 | -- | -- | 7.70 |
| Canon Rebel XSi (Adobe Camera Raw 4.4.1) | 10.6 | 9.95 | 9.10 | 7.68 |
| Canon EOS 50D (Camera JPEG) (ALO STD by default) | -- | -- | 8.90 | 7.68 |
| Sony A33 (Camera JPEG) | -- | 9.95 | 9.17 | 7.67 |
| Nikon D700 (Camera JPEG) | -- | -- | 9.05 | 7.67 |
| Canon 5D Mark II (Camera JPEG) (ALO STD by default) | 10.6 | 9.68 | 8.98 | 7.66 |
| Nikon D5000 (Camera JPEG) | -- | -- | 8.96 | 7.65 |
| Sony A560 (Camera JPEG) | 10.5 | 10.2 | 8.86 | 7.65 |
| Canon EOS-5D (Camera JPEG) | 10.2 | 9.68 | 8.82 | 7.65 |
| Olympus E-3 (Adobe Camera Raw 4.3) | 10.3 | 10.1 | 9.29 | 7.64 |
| Nikon D3100 (Camera JPEG) | 10.2 | 9.92 | 9.27 | 7.62 |
| Nikon D60 (Camera JPEG) | 10.5 | 9.62 | 8.89 | 7.62 |
| Nikon D200 (Adobe Camera Raw 3) | 10.6 | 9.65 | 8.96 | 7.61 |
| Sony NEX-5 (Camera JPEG) | 10.4 | 9.64 | 8.82 | 7.57 |
| Canon 7D (Camera JPEG) (ALO STD by default) | -- | 9.70 | 8.54 | 7.54 |
| Canon T2i (Camera JPEG) | -- | 9.44 | 8.45 | 7.53 |
| Nikon D80 (Adobe Camera Raw 3.6) | 11.1 | 10.4 | 9.42 | 7.51 |
| 7.5 Stops | ||||
| Nikon D300S (Camera JPEG) | -- | -- | -- | 7.49 |
| Olympus E-500 (Adobe Camera Raw 3) | 10.7 | 9.97 | 8.90 | 7.46 |
| Canon 60D (Camera JPEG) (ALO=STD by default) | 10.2 | 9.74 | 8.74 | 7.46 |
| Olympus E-510 (Adobe Camera Raw 4.1) | 10.0 | 9.43 | 8.64 | 7.46 |
| Pentax K10D (Camera JPEG) | -- | 9.49 | 8.88 | 7.44 |
| Sony NEX-3 (Camera JPEG) | 10.0 | 9.62 | 8.86 | 7.44 |
| Nikon D300 (Camera JPEG) | -- | -- | 8.70 | 7.44 |
| Olympus E-420(Adobe Camera Raw 4.1.1) | 10.0 | 9.61 | 8.65 | 7.44 |
| Canon Rebel T1i (Camera JPEG) (ALO=STD by default) | 11.3 | 10.1 | 9.34 | 7.43 |
| Nikon D2Xs (Adobe Camera Raw 3.6) | 10.6 | 9.90 | 8.93 | 7.42 |
| Canon EOS 40D (Camera JPEG) | 10.6 | 9.52 | 8.78 | 7.42 |
| Olympus E-PL1 (Adobe Camera Raw 5.7) | 10.4 | 9.89 | 8.76 | 7.39 |
| Nikon D3X (Camera JPEG) | -- | -- | -- | 7.37 |
| Nikon D50 (Camera JPEG) | 10.7 | 9.93 | 8.70 | 7.36 |
| Panasonic DMC-G2 (Adobe Camera Raw 5.7) | 10.3 | 9.87 | 8.77 | 7.35 |
| Sony A380 (Camera JPEG) (DRO Standard by default) | -- | 9.54 | 8.84 | 7.32 |
| Panasonic DMC-G1 (Adobe Camera Raw 5.2) | 10.7 | 9.78 | 8.70 | 7.32 |
| Nikon D3000 (Camera JPEG) | 10.2 | 9.64 | 8.69 | 7.31 |
| Sony A900 (Camera JPEG) (DRO off by default ) | 10.2 | 9.75 | 8.49 | 7.31 |
| Sony A330 (Camera JPEG) (DRO Standard by default) | 10.1 | 9.37 | 8.59 | 7.30 |
| Sony A200 (Camera JPEG) (DRO on by default) | 10.4 | 9.43 | 8.91 | 7.29 |
| Canon EOS 20D (Camera JPEG) | 10.3 | 9.66 | 8.85 | 7.29 |
| Canon EOS 30D (Camera JPEG) | 10.3 | 9.50 | 8.57 | 7.29 |
| Nikon D40 (Camera JPEG) | 10.4 | 9.80 | 8.89 | 7.28 |
| Sony A230 (Camera JPEG) (DRO Standard by default) | 10.1 | 9.51 | 8.51 | 7.26 |
| Sony A900 (Camera JPEG) (DRO on) | 10.1 | 9.76 | 8.47 | 7.26 |
| Pentax K-5 (Camera JPEG) | 10.2 | 9.43 | 8.64 | 7.22 |
| Canon Rebel XS (Camera JPEG) | 10.3 | 9.4 | 8.61 | 7.22 |
| Olympus E-520(Adobe Camera Raw 4.5) | 11.0 | 9.46 | 8.70 | 7.20 |
| Sony A350 (Camera JPEG) (DRO on by default) | 10.3 | 9.55 | 8.85 | 7.19 |
| Pentax K-x Camera JPEG | 9.99 | 8.94 | 8.31 | 7.18 |
| Panasonic DMC-GF1 (Adobe Camera Raw 5.5) | 10.2 | 9.62 | 8.62 | 7.16 |
| Nikon D80 (Camera JPEG) | 10.1 | 9.43 | 8.48 | 7.12 |
| Canon Digital Rebel XT (Camera JPEG) | 10.3 | 9.51 | 8.61 | 7.11 |
| Nikon D200 (Camera JPEG) | -- | 9.07 | 8.36 | 7.11 |
| Olympus E-300 (Camera JPEG) | 10.8 | 9.26 | 8.48 | 7.07 |
| Olympus E-410 (Adobe Camera Raw 4.1) | 10.2 | 9.40 | 8.24 | 7.05 |
| Olympus E-500 (Camera JPEG) | 10.0 | 9.14 | 8.16 | 7.05 |
| Canon Digital Rebel XTi (Camera JPEG) | 9.83 | 9.10 | 8.27 | 7.04 |
| Canon EOS-1Ds Mark II (Camera JPEG) | 10.3 | 9.38 | 8.60 | 7.04 |
| Panasonic DMC-G1 (Camera JPEG) | -- | 9.33 | 8.52 | 7.03 |
| Pentax K200D (Camera JPEG) | -- | 9.50 | 8.30 | 7.01 |
| 7.0 Stops | ||||
| Panasonic DMC-GF1 (Camera JPEG) | -- | 9.33 | 8.44 | 6.99 |
| Canon Digital Rebel (Camera JPEG) | 10.1 | 9.11 | 8.47 | 6.97 |
| Nikon D2Xs (Camera JPEG) | 9.82 | 8.98 | 8.23 | 6.97 |
| Panasonic DMC-L10 (Adobe Camera Raw 4.2) | 10.4 | 9.34 | 8.48 | 6.91 |
| Sigma DP1 (Camera JPEG) | -- | 8.95 | 8.13 | 6.91 |
| Pentax *istDs (Camera JPEG) | 10.2 | 10.0 | 8.87 | 6.90 |
| Sony A100 (Camera JPEG) | 10.2 | 9.24 | 8.39 | 6.89 |
| Samsung NX10 (Camera JPEG, Smart Range, ISO 200) | 10.1 | 8.99 | 8.22 | 6.78 |
| Pentax K100D (Camera JPEG) | 10.3 | 9.30 | 8.39 | 6.73 |
| Panasonic DMC-G2 (Camera JPEG) | 9.72 | 9.18 | 8.15 | 6.68 |
| Pentax K20D (Camera JPEG) | 10.2 | 9.21 | 8.09 | 6.66 |
| Pentax K-7 (Camera JPEG) | 9.59 | 8.87 | 8.03 | 6.54 |
| 6.5 Stops | ||||
| Nikon D2x (Camera JPEG) | -- | 8.93 | 7.75 | 6.43 |
| Olympus E-3 (Camera JPEG) | 9.32 | 9.06 | 8.50 | 6.42 |
| Panasonic DMC-L10 (Camera JPEG) | -- | 8.94 | 8.00 | 6.38 |
| Olympus E-420 (Camera JPEG) | 9.18 | 8.82 | 7.93 | 6.37 |
| 6.0 Stops | ||||
| Olympus E-410 (Camera JPEG) | -- | -- | 7.60 | 5.99 |
| Olympus E-PL1 (Camera JPEG, Gradation = Normal) | -- | 8.63 | 7.45 | 5.89 |
| Samsung NX10 (Camera JPEG) | 9.32 | 8.48 | 7.46 | 5.88 |
| Nikon D70s (Camera JPEG) | 9.84 | 8.69 | 7.46 | 5.85 |
| Nikon D70 (Camera JPEG) | 9.81 | 8.76 | 7.58 | 5.84 |
| Olympus E-520 (Camera JPEG) | 9.32 | 8.68 | 7.74 | 5.74 |
| Olympus E-P2 (Camera JPEG, Gradation = Normal) | 10.1 | 8.83 | 7.78 | 5.58 |
| Olympus E-P1 (Camera JPEG, Gradation = Normal) | -- | 8.85 | 7.74 | 5.47 |
Note that this test is repeatable to within 1/3 EV according to the Imatest website, so differences of less than 0.33 can be ignored.

The chart above shows consolidated results from spatial frequency response measurements in both the horizontal and vertical axes. The "MTF 50" numbers tend to correlate best with visual perceptions of sharpness, so those are what we focus on here. The uncorrected resolution figures are 1,961 line widths per picture height in the horizontal direction (corresponding to the vertically-oriented edge), and 1,995 lines along the vertical axis (corresponding to the horizontally-oriented edge), for a combined average of 1,978 LW/PH. That's somewhat lower than you'd expect from a 16-megapixel camera. Correcting to a "standardized" sharpening with a one-pixel radius improved the numbers significantly, however, resulting in an average of 2,321 LW/PH. The much improved standardized versus uncorrected results indicate the Nikon D7000 is applying a conservative amount of in-camera sharpening to its JPEGs at default settings.
To see what's going on, refer to the plots below, which show the actual edge profiles for both horizontal and vertical edges, in both their original and corrected forms. Here, you can see that a fairly modest level of in-camera sharpening is applied in both the horizontal and vertical directions. Imatest reports 11.2% undersharpening in the horizontal direction, and 10.9 % undersharpening in the vertical direction. This means that the Nikon D7000's JPEG images should respond well to some additional post-exposure sharpening in Adobe Photoshop or other image editing software, without too many visible sharpening artifacts. (Of course for best results, shoot RAW and apply all sharpening while post-processing.)


Note: We don't feature SFR-based LW/PH resolution numbers more prominently in our reviews (eg, outside the Imatest pages) because we've found that they're *very* sensitive to minor differences in in-camera image processing. Relatively small changes in the amount of in-camera sharpening can have a large effect on the resulting resolution numbers. Imatest attempts to compensate for this by adjusting to a "standard" sharpening, but this approach can't completely undo what happens inside the cameras, and so often gives inconsistent results. Sometimes the "standardized" sharpening happens to just match the shape of the edge profile with the in-camera sharpening applied, and you'll get wildly high results. At other times, it will tend to correct in the opposite direction. Unfortunately, ignoring the in-camera sharpening entirely can result in even greater discrepancies, particularly between models from different manufacturers. Turning off sharpening in the camera may or may not fully eliminate the sharpening, so simply turning off sharpening in the camera JPEGs isn't a reliable solution. It also wouldn't be the way most people shoot the cameras. We could process RAW files with no sharpening (as shown below), but then that'd only suit the people working primarily or exclusively from RAW, and would open another can of worms as to what RAW converter was used, etc, etc.
The bottom line is that numbers for resolution only take you so far. Detail handling and edge acuity are very complex issues; ones that don't easily boil down to a single number. The best approach is to simply look look at the broad array of standardized test shots we take with each camera, to the point of downloading and printing them with whatever processing you'd use if you owned the camera and shot with it. See how the differences stack up for you visually, and make your decision on that, rather than on abstract resolution numbers.
Nikon D7000 Performance
Timing and Performance
Generally average to above average speed for a prosumer SLR.
Startup/Shutdown
| ||
Power on
to first shot |
~0.4 second
|
Time it takes for camera to turn on and take a shot.
|
Shutdown
|
~0.3 second
|
How long it takes to turn off.
|
Buffer clearing time
|
7 seconds*
after 19 L/F JPEGs |
Worst case buffer clearing time. -- This is the delay after a set of shots before you can remove the card. Some cameras won't shut down until the buffer is cleared.
See Cycle-Time table below for more buffer clearing times.
|
9 seconds*
after 10 14-bit RAW frames | ||
13 seconds*
after 10 14-bit RAW + L/F JPEGs | ||
* Note: Buffer clearing times measured with a SanDisk Extreme III 30MB/sec 8GB SDHC card. Slower cards will produce correspondingly slower clearing times. Slow cards may also limit length of bursts in continuous mode. ISO sensitivity and noise reduction settings can also affect cycle times and burst mode performance.
| ||
Startup and shutdown times were about average for a prosumer SLR. (Sensor cleaning at startup and shutdown are enabled by default, but cleaning is aborted when the shutter button is pressed.) Buffer clearing times depend on the image size and quality, burst length and how fast the card can be written to, but were generally pretty fast for an SD based camera. Note that the Nikon D7000 supports the new Ultra High Speed (UHS-I) bus standard for SDHC/SDXC cards, so best-case buffer clearing times may be faster than we measured. Unfortunately, we were unable to locate a fast UHS-I compliant card in time for this test. (Fast UHS-I compliant SDHC/SDXC cards from Toshiba and Panasonic are due to start shipping sometime in November, 2010.)
| Mode Switching | ||
|---|---|---|
Play to Record,
first shot |
~0.3 second
|
Time until first shot is captured.
|
Record to Play
|
~0.6 second
|
Time to display a large/fine file immediately after capture.
|
Display
recorded image |
~0.5 second
|
Time to display a large/fine file already on the memory card.
|
Mode switching were very fast, difficult to measure accurately.
| Shutter Response (Lag Time) | ||
|---|---|---|
Full Autofocus
Single Area (center) AF |
0.238 second
|
Time from fully pressing shutter button to image capture. (All AF timing measurements taken with Sigma70mm f/2.8 prime, unless otherwise noted.)
|
Full Autofocus
Auto Area (39-point) AF |
0.436 second
|
Time from fully pressing shutter button to image capture.
|
Full Autofocus
Single Area AF, Flash enabled |
0.306 second
|
Time from fully pressing shutter button to image capture. Auto Flash enabled.
|
Pre-focused
|
0.053 second
|
Time to capture, after half-pressing and holding shutter button.
|
Continuous AF
|
0.054 second
|
This mode is release priority so subject may be out of focus; we have no way to measure performance with moving subjects.
|
Manual focus
|
0.054 second
|
For most cameras, shutter lag is less in manual focus than autofocus, but usually not as fast as when the camera is "pre-focused."
|
Live View
| ||
Full Autofocus
(Contrast-Detect AF) Live View mode |
1.95 seconds
|
Time from fully pressing shutter button to image capture with Sigma70mm f/2.8 prime.
|
1.42 seconds
|
Time from fully pressing shutter button to image capture with Nikon 18-105mm kit lens.
| |
Pre-focused
(Contrast-Detect AF) Live View mode |
0.247 second
|
Time to capture, after half-pressing and holding shutter button.
|
The shutter lag numbers above measure time from shutter button press to image capture, with the lens already set to the correct focal distance. This largely removes the issue of differences in lens focusing speed, and measures how fast the camera can measure and act on focus information. In this metric, the Nikon D7000 was slightly slower than average for a prosumer SLR. The D7000 required 0.238 second for full AF when using Single-point (center) AF mode (our default full AF lag test), a little slower than what we measured for the D90 (0.208s) and D300S (0.225s). The D7000 required 0.436 second when using the 39-point Auto-area AF mode, also slower than the D90 (0.270s) and D300S (0.370s). When prefocused, shutter lag was only 0.053 second which is faster than the D90 (0.067s) and identical to the D300S. Continuous and Manual focus lag times were both 0.054 second, which is very fast; faster than the D90 (0.074s, 0.067s) and D300S (0.155s, 0.150s) respectively.
As expected, the Nikon D7000's Live View mode added considerable delay. Like the D90, the D7000 does not offer the D300S's "Hand-Held" mode which uses the same "mirror-down" phase-difference AF method employed when using the optical viewfinder. The D7000's Live View mode uses contrast detection autofocus, from data streaming off the image sensor. Using the gear-driven Sigma 70mm f/2.8 prime, full autofocus lag was a rather lengthy 1.95 seconds, though that's still faster than the D90 (2.29s) and the D300S's contrast-detect mode (2.5s). We also tested Live View autofocus with the Nikkor AF-S DX 18-105mm f/3.5-5.6G VR kit lens. It has a built-in ultrasonic autofocus motor, so it was quicker at contrast-detect focusing than the Sigma, at 1.42 seconds. Prefocused, the D7000's Live View shutter lag was pretty fast, at 0.247 second. The Nikon D90 was 0.519 second while the D300S required 0.419s.
To minimize the effect of different lens' focusing speed, we test AF-active shutter lag with the lens already set to the correct focal distance. We also use the same Sigma 70mm f/2.8 macro with every camera (on all platforms except Four Thirds/Micro Four Thirds and Nikon consumer models lacking an in-body focus motor), to further reduce variation, and because our tests showed that focus-determination time with this lens was close to the fastest, across multiple camera bodies from different manufacturers. Being an older design with a non-ultrasonic motor, it wouldn't be the fastest at slewing from one focus setting to another, but that's exactly the reason we measure focus determination speed, which is primarily a function of the camera body, vs focus adjustment speed, which is primarily a function of the lens.
| Cycle Time (shot-to-shot) | ||
|---|---|---|
Single Shot mode
Large Fine JPEG |
0.48 second
2 seconds to clear |
Time per shot, averaged over 20 shots, with no signs of slowing down.
|
Single Shot mode
14-bit RAW |
0.48 second
9 seconds to clear |
Time per shot, averaged over 14 shots. (Buffer depth.)
|
Single Shot mode
14-bit RAW + LF JPEG |
0.52 second
13 seconds to clear |
Time per shot, averaged over 12 shots. (Buffer depth.)
|
Early shutter
penalty? |
No
(YES with flash) |
Some cameras refuse to snap another shot if you release and press the shutter too quickly in Single Shot mode, making "No" the preferred answer.
|
Continuous mode
Large Fine JPEG (Size Priority) |
0.169 second
(5.92 fps); 19 frames total; 7 seconds to clear* |
Time per shot, averaged over the buffer length of 19 shots, then slows to an average of 0.48 second (2.07 fps) for subsequent shots, with about 12% variation in cycle times when buffer is full.
|
Continuous mode
14-bit RAW (Lossless Compressed) |
0.170 second
(5.88 fps); 10 frames total; 9 seconds to clear* |
Time per shot, averaged over the buffer length of 10 frames, then slows to an average of 0.93 second (1.07 fps) for subsequent shots, with about 80% variation in cycle times when buffer is full.
|
Continuous mode
14-bit RAW + LF JPEG |
0.168 second
(5.96 fps); 10 frames total; 12 seconds to clear* |
Time per shot, averaged over the buffer length of 10 frames, then slows to an average of 1.30 seconds (0.77 fps) for subsequent shots, with about 10% variation in cycle times when buffer is full.
|
Continuous mode
12-bit RAW + LF JPEG |
0.167 second
(6.00 fps); 10 frames total; 13 seconds to clear* |
Time per shot, averaged over the buffer length of 10 frames, then slows to an average of 1.32 second (0.76 fps) for subsequent shots, with about 64% variation in cycle times when buffer is full.
|
Flash recycling
|
4.0 seconds
|
Flash at maximum output.
|
* Note: Buffer clearing times measured with a SanDisk Extreme III 30MB/sec 8GB SDHC card. Slower cards will produce correspondingly slower clearing times. Slow cards may also limit length of bursts in continuous mode. ISO sensitivity and noise reduction settings can also affect cycle times and burst mode performance.
| ||
Shot-to-shot cycle times were about average for an SLR, at 0.48 second for Large/Fine JPEGs or 14-bit lossless compressed RAWs. Cycle time increased slightly to 0.52 second for lossless compressed 14-bit RAW + Large/Fine JPEGs. These are somewhat slower cycle times than the D90 (which ranged from 0.32s for RAW + L/F JPEGs to 0.36s for L/F JPEGs), though very similar to the D300S. Keep in mind the 16-megapixel D7000 has larger image files than the 12-megapixel D90 and D300S, though.
Continuous mode for Large/Fine JPEGs was quite good for a prosumer SLR, ranging from 5.9 to 6.0 frames per second depending on the file type. That's significantly faster than the D90's 4.5 fps burst mode, but slower than the D300S's 7.1 fps. The big news however is the D7000's 14-bit RAW burst mode does not come with a speed penalty like it does with the D300S. The D7000 managed 5.88 frames per second in 14-bit RAW mode, which is more than twice as fast as the D300S's 2.67 fps 14-bit mode. With 12-bit RAW files, the D300S was however quite a bit faster at 7.1 fps. The D90 only offers 12-bit RAWs, and it managed 4.13 fps in our tests.
The Nikon D7000's buffer depths were quite good for a prosumer SLR, considering the burst rates and file sizes. The D7000 managed 19 L/F JPEGs and 10 RAW or RAW + JPEG frames before slowing down. (You will likely do better, as the target image we use for our tests is designed to be difficult to compress.) Interestingly, the bit-depth didn't seem to matter for RAW buffer depths in our testing. The D90 could shoot over 20 L/F JPEG frames, 10 RAW frames and 7 RAW+L/F frames while the D300S managed 26 L/F JPEGs, 22 14-bit RAW and 17 14-bit RAW + L/F JPEGs.
The D7000's flash took 4.0 seconds to recharge after a full-power shot, which is a bit slower than average for an SLR. The D90 required 2.2 seconds while the D300S took only 1.7 seconds.
As mentioned previously, the Nikon D7000 supports the new Ultra High Speed (UHS-I) bus standard for SDHC/SDXC cards, so best-case buffer clearing times may be faster than we measured. Unfortunately, we were unable to locate a fast UHS-I compliant card in time for this test. (Fast UHS-I compliant SDHC/SDXC cards from Toshiba and Panasonic are due to start shipping sometime in November, 2010.)
| Download speed | ||
|---|---|---|
Windows Computer, USB 2.0
|
10,648 KBytes/sec
|
Typical Values:Less than 600=USB 1.1;
600-769=USB 2.0 Low; Above 770=USB 2.0 High |
Connected to a computer or printer with USB 2.0, downloads are very fast.
Bottom line, the Nikon D7000 is a very responsive camera overall. Autofocus speeds were slightly slower than average for a prosumer SLR, but still quite good. Continuous mode speeds were faster than average making the D7000 good for sports and action shots, and it was nice that the D7000 didn't slow down when shooting 14-bit RAW bursts like the D300S does.
Battery and Storage Capacity
Battery
Excellent battery life for a lithium-ion design.
Excellent battery life for a lithium-ion design.
| Operating Mode | Number of Shots |
|---|---|
Optical Viewfinder,
(CIPA standard) |
1,050
|
Live View LCD,
(CIPA standard) |
Unknown
|
The Nikon D7000 uses a custom rechargeable lithium-ion battery for power, and ships with a charger. Battery life is excellent with the optical viewfinder, but if you plan to use Live View or shoot movies much, you'll definitely want to have a spare battery to bring along.
The table above shows the number of shots the camera is capable of (on either a fresh set of disposable batteries or a fully-charged rechargeable battery as appropriate), based on CIPA battery-life and/or manufacturer standard test conditions.
(Interested readers can find an English translation of the CIPA DC-002 standards document here. (180K PDF document))
Storage
The Nikon D7000 accepts SD/SDHC/SDXC memory cards. No card is included with the camera. Nikon recommends cards with at least SD Class 6 speed rating if you want to shoot HD movies.
The Nikon D7000 accepts SD/SDHC/SDXC memory cards. No card is included with the camera. Nikon recommends cards with at least SD Class 6 speed rating if you want to shoot HD movies.
Resolution/Quality 2GB Memory Card | Fine | Normal | Basic |
14-bit
RAW |
12-bit
RAW | |
| 4,928 x 3,264 |
Images
(Avg size) | 136 15.1 MB | 270 7.6 MB | 530 3.9 MB | 54 37.9 MB | 72 28.4 MB |
Approx.
Comp. | 3:1 | 6:1 | 13:1 | 0.8:1 | 0.7:1 | |
| 3,696 x 2,448 |
Images
(Avg size) | 240 8.5 MB | 472 4.3 MB | 916 2.2 MB | - | - |
Approx.
Comp. | 3:1 | 6:1 | 12:1 | - | - | |
| 2,464 x 1,632 |
Images
(Avg size) | 530 3.9 MB | 1,044 2.0 MB | 2,032 1.0 MB | - | - |
Approx.
Comp. | 3:1 | 6:1 | 12:1 | - | - | |
The numbers in the table above reflect using the Size Priority setting for JPEG compression, and Lossless Compressed for RAWs (the Nikon D7000's defaults). Capacity numbers above are reported by the camera, and are often very conservative. Actual capacity is likely to be better for typical subjects, as file size varies with scene. We strongly recommend buying a fast SDHC/SDXC card. You should probably consider at least an 8GB card if not a 16GB one, to give yourself extra space for extended outings, especially if you plan on doing a lot of RAW or HD movie shooting. (Check the shopping link above, cards are cheap these days, so there's no reason to skimp -- But do consider faster cards for this camera, to reduce buffer clearing times.)
Nikon D7000 Video Recording
In 2008, Nikon kicked off a new era for SLR cameras with the introduction of the D90, the world's first DSLR with video recording capability. A little over two years later, high definition video recording has become a de rigueur feature available on a wide selection of SLRs at every price point, right the way down to the entry level. Although there are some important differences, the D7000's video mode retains much of the DNA from Nikon's prosumer D300S model, including some features that are rare even among more expensive cameras, let alone at this price point. Key among the changes is the availability of Full HD (1,080p) video capture, recorded using H.264/MPEG-4 AVC compression. Also key for many consumers will be the availability of contrast detection autofocusing with tracking capability during video recording, albeit with some adverse effects on video and audio quality. More experienced videographers will find intriguing possibilities in the D7000's ability to control movie exposure manually, to accept an external microphone, and to adjust audio gain.
Nikon D7000 Video: Image Size, Frame Rate, and Encoding

Movie settings. Options include resolution, quality, frame rate (720p movies only), microphone sensitivity / muting, recording destination, and whether the D7000 should allow manual exposure control.
The Nikon D7000 records movies at three progressive scan resolutions: either 1,920 x 1,080, 1,280 x 720, or 640 x 424 pixels. The highest resolution 1,920 x 1,080 pixel mode is commonly known as Full HD or 1,080p, and has a 16:9 aspect ratio. Movies at this resolution are nominally recorded at a rate of 24 frames per second, although the precise capture rate is actually 23.976 fps. The intermediate 1,280 x 720 pixel resolution also has a 16:9 aspect ratio, and is better known as 720p. This offers a choice of two frame rates -- either the same nominal 24 frames per second as in Full HD mode, or a secondary rate that varies depending upon the Video mode setting in the Setup menu. When the D7000's video output is set to the North American NTSC format, the secondary movie recording rate is nominally 30 fps, and actually 29.97 fps. If switched to PAL format, the D7000 alternatively offers a 25 fps rate. Finally, the non-standard 640 x 424 pixel mode has an approximate 3:2 aspect ratio. With this standard definition mode, recording frame rates are fixed at either the nominal 30 fps for NTSC, or 25fps for PAL.
Regardless of resolution and frame rate, recording times are limited to 20 minutes or four gigabytes per clip, whichever limit is reached first. Nikon hasn't explained the reason for the time limit as of this writing, but it's likely due to sensor heating issues that might start to degrade image quality. The Nikon D7000 records movies using H.264/MPEG-4 AVC compression with Linear PCM audio, and stores them in .MOV files. Compared to the Motion JPEG format used by some cameras, H.264 is much more conservative of memory card space. It also avoids some of the severe image quality loss suffered by AVCHD cameras, when faced with significant amounts of change in image content between frames. (AVCHD uses a subset of the H.264 standard, which among other things mandates a limit in recording bandwidth, translating into a lesser ability to convey rapidly-changing detail.) The choice of H.264 comes with the requirement of greater processing power, though -- not only from the camera when recording, but also when playing back or editing videos. The more sophisticated encoding used in the H.264 standard requires quite a bit of processor power to pull it apart and put it back together again, so frame-accurate editing of H.264 requires a fast processor and capable editing program.
Here's a list showing what to expect for file sizes with the Nikon D7000's video recording:
Nikon D7000 Video Options
| ||||||
|---|---|---|---|---|---|---|
H.264/MPEG-4 AVC Format (.MOV file container)
| ||||||
Resolution
|
Aspect Ratio
|
Quality
|
Encoding
|
Frame Rate
|
Max. Clip Length
|
File Size
|
1,920 x 1,080
(1,080p Full HD) |
16:9
|
High
|
NTSC
or PAL |
24p
(23.976 fps) |
20 minutes
or 4GB |
~170
MB/min |
Normal
|
~100
MB/min | |||||
1,280 x 720
(720p HD) |
16:9
|
High
|
NTSC
|
30p
(29.97 fps) |
20 minutes
or 4GB |
~100
MB/min |
Normal
|
~85
MB/min | |||||
High
|
PAL
|
25p
(25 fps) |
~100
MB/min | |||
Normal
|
~70
MB/min | |||||
High
|
NTSC
or PAL |
24p
(23.976 fps) |
~70
MB/min | |||
Normal
|
~55
MB/min | |||||
640 x 424
(non-standard SD) |
~3:2
|
High
|
NTSC
|
30p
(29.97 fps) |
20 minutes
or 4GB |
~50
MB/min |
Normal
|
~35
MB/min | |||||
High
|
PAL
|
25p
(25 fps) |
~50
MB/min | |||
Normal
| ||||||
~35
MB/min | ||||||
Nikon recommends using an SD card with at least a Class 6 rating to capture and playback movies.
Nikon D7000 Video-Mode Focusing
Unlike some of Nikon's digital SLRs, the D7000's Live View mode -- from which Movie recording is initiated -- lacks the company's separate Handheld and Tripod modes. Instead, autofocus during live view and movie capture is always performed using contrast detection autofocus, which operates based on data streaming from the image sensor -- the same technique referred to as Tripod mode on some models. (On cameras that offer a choice, you can switch to Handheld mode to use the camera's phase detection autofocus system before movie starts, so long you don't mind a brief interruption of the live-view feed so that the reflex mirror can be lowered to let light reach the dedicated AF sensor. All of Nikon's DSLRs, like the vast majority of interchangeable-lens cameras, must rely on contrast detection AF during video capture.) The good news is that, while not quite in single-lens direct view or compact camera territory, the D7000's contrast detection autofocus is quicker than the average, among those offered by its peers. A measure of Nikon's confidence in the D7000's contrast detection performance can, perhaps, be read from the fact that it not only offers full-time AF during movie capture, but also provides an AF tracking function.
As in the earlier consumer-oriented D3100 model, the Nikon D7000's contrast detection-based continuous autofocus mode carries a different name from its phase-detection equivalent. Dubbed Full-time Servo AF (AF-F for short, as opposed to AF-C / Continuous-Servo AF for phase detect), this function does involve some hunting around the point of focus, and can lag behind changes in your subject's focus distance somewhat. If your subject is relatively static, you can instead opt for the Single-servo AF mode, which will still allow you to perform single autofocus operations during video capture by half-pressing the shutter button. You can, of course, also focus manually by appropriately setting the Focus-mode selector on the camera's front panel (as well as that on the lens, if applicable).
The D7000 offers four AF-area modes for use during movie capture: Face-priority AF, Wide-area AF, Normal-area AF, and the aforementioned Subject-Tracking AF. The Wide and Normal-area modes are self-explanatory, providing two different focus area sizes, which can be manually positioned anywhere within the frame (and even moved during video capture.) Face-priority AF can identify up to 35 individual faces within the frame, and will select the closest subject among the group when adjusting focus. This individual will be indicated by a double-yellow frame on the D7000's LCD panel. Finally, the Subject-tracking AF function allows you to manually position the point from which autofocus tracking should commence, and to start or stop the function by pressing the OK button when your subject falls under the AF point. The D7000 will then indicate the point at which it is currently tracking the subject with a focus frame that changes between either green to indicate a focus lock, or red to indicate that a focus lock hasn't currently been attained.
Like most interchangeable lens cameras capable of AF during video, it should the D7000 has a tendency to pick up autofocus drive noise quite clearly in the audio track of its movie clips. This can at least be mitigated somewhat by use of an external microphone, and by adjusting the D7000's three-step manual gain control, however. If AF noise is too much of an issue, you can of course switch to focusing manually, during a recording, and the true manual operation of AF on Nikon's lenses means you can do this more or less silently, simply by being careful about turning the focus ring. (Some interchangeable lens cameras we've tested use "fly-by-wire" focusing, whereby the focus ring only instructs the camera to move the lens elements rather than moving them directly via a mechanical coupling. This can mean that focus operation is still audible, regardless of how slowly you turn the focus ring. With true manual operation of its lenses, the Nikon D7000 doesn't have this problem, although it's possible that third-party or older Nikon lenses might produce audible noise while their focus was adjusted.)
As we've noted in other SLR reviews, the good news with focusing for video is that you can get surprisingly good depth of field in video mode by stopping the lens down, thanks to the relatively low resolution of the video image. With a pixel resolution of only 2.1 megapixels in the Nikon D7000's highest-resolution 1,080p "Full HD" mode, 0.9 megapixels in 720p HD mode, and just 0.3 megapixels in the standard-definition mode, images that would be unacceptably blurred as 16 megapixel still shots look perfectly fine as video frames. This not only provides greater depth of field at any given aperture, but is also more forgiving of diffraction limiting at very small lens apertures. Diffraction at small apertures means you'd usually want to avoid f/16 or f/22 for still images, but again, the results generally look perfectly fine at video resolutions. Bottom line, with the Nikon D7000's lens set to f/16 or f/22 (assuming you're shooting under fairly bright conditions), you'll be surprised by how little focus adjustment is needed during a typical video recording.
Nikon D7000 Video: Audio recording

Connectivity. The top jack is for composite video / mono audio output. Beneath is a Type-C Mini HDMI connector, which supports 1080i, 720p, 576p or 480p digital video with stereo digital audio, and offers both automatic resolution sensing, and Consumer Electronics Control support. At bottom left is a 3.5mm stereo microphone jack. The adjacent GPS port allows geotagging of still images, and isn't applicable to video capture.
The Nikon D7000 has an internal microphone comprising three holes located directly beneath the D7000 badge on the camera's front panel, a location which is a bit of a mixed blessing. Some competing cameras place the microphone on the top deck, where it has a greater tendency to pick up noise from the camera operator, and doesn't directly face the intended subject. Unfortunately, it's quite easy to accidentally cover the microphone with the index finger of your left hand, if you don't use it to support the weight of the lens -- something that's more likely to happen when shooting with a light prime or kit zoom, than with larger, heavier lenses. As noted previously, the internal mic also has a tendency to pick up camera handling and autofocus drive noise on the audio track of captured movie clips, with the severity of this likely varying significantly depending on the videographer, and the lens model in use.
Thankfully, the D7000 also provides for an external mic, courtesy of a 3.5mm stereo input jack under a flap on the left side of the camera's body. Simply switching moving to a shoe-mount mic with some form of shock mount can do wonders for your DSLR audio, while moving the mic off camera at a distance can completely resolve the issue. Another feature that can help resolve audio problems -- and one that's extremely unusual at this price point -- is the adjustable sensitivity for the microphone. There are three sensitivity levels to choose from (Low, Medium and High), along with Auto gain, and Off settings. The settings apply to the built-in microphone as well as to an external mic. We found the D7000's internal microphone to be quite sensitive when using Auto gain. It has no problem picking up even quiet conversation from across a room, as long as there are no background noises. Ah, but there's the rub: The mic will pick up all sorts of background noise if you're not careful. Given that most users will likely be using the D7000's video recording for short clips of memorable moments, its tendency to pick up every sound is probably a positive feature. For those wanting the best audio quality, an external microphone will almost certainly prove a better choice, however, allowing selection of a microphone with the desired characteristics, as well as reducing the effects of noise from handling the camera body or using the focus and zoom mechanisms.
The D7000's Linear PCM audio is recorded with a bit depth of 16-bits, and a sampling rate of 48 kHz, plenty enough for good quality audio.
Nikon D7000 Movie Recording User Interface

Movie editing. The D7000 allows you to trim the start and end of movie clips in-camera, as well as to extract a single movie frame as a still image.
The Nikon D7000's movie recording functionality is accessed from Live view mode. To start and stop capture, you simply press the red center button in the multi-selector while live view is active. If set to control exposure manually, you can do so with the Mode dial in the M position for full manual control, or the A position for Aperture-priority control. With the Mode dial in any other position, or if Manual Movie Settings are disabled, movies will be recorded as if the Mode dial were in the Program position. As previously noted, if you want to control the aperture manually, you do have to set the desired value before capture starts. Autofocus can be set automatically or manually both before and during movie recording, and if available on the mounted lens, zoom can also be set manually at any time. Focus and zoom operation is likely to result in motor / handling noise being recorded on the audio track, although use of an external microphone that is distanced from the camera body should help minimize these issues.
The D7000 groups several settings related to video capture in a dedicated Movie Settings menu, accessed from the last page of the Shooting menu. One curious exception is the autofocus settings, which can instead be found from option a8 of the Custom Setting menu. Of course, the same AF settings can be accessed without needing to enter the menu system at all, using the AF-mode button and command dials in concert. Finally, the D7000 does offer limited in-camera movie editing functionality. You can select either a start or end point for a video clip, and save the resulting trimmed video as a new file, and it's also possible to extract single frames from a video. These functions are accessed from the Playback mode's Retouch menu
Essentially every video capable digital SLR currently on the market exhibits motion-related distortions called rolling shutter artifacts. These are caused because the image data is captured and then read off the chip sequentially by rows, rather being captured all at once. In the case of the Nikon D7000, with its variable frame rate, this means that image data for the last row of a given frame is captured and read out anywhere from 1/24th to 1/30th second after the data for the top row was captured. The effect on moving objects is similar to that of a focal plane shutter in an SLR, but more pronounced, because the video frame is read out much more slowly than the slit of a focal plane shutter moves across the sensor.
For a camera that scans video frames vertically (as all do that we're aware of), rolling shutter artifacts will be most noticeable for subjects that are moving rapidly side to side, or when the camera itself is being panned horizontally. Verticals in the scene will appear tilted to the right or left, depending on the direction of camera motion. As an example, consider the case of a camera being panned from left to right, with a flagpole or other vertical object in the middle of the scene when recording for a particular frame begins: If the top of the object was centered horizontally when the first line of the video frame is acquired, by the time the last line of the frame has been captured, the bottom of the object will have shifted to somewhere left of center: As a result, the vertical object would appear to be leaning to the right.
While our tests in this area aren't quantitative, it seems clear to us that the D7000 shows *much* less rolling shutter than most of the competition, at least in bright light. We've yet to try it in lower light, but in reasonable ambient lighting we were actually pretty amazed at how well the picture held together even in the face of fairly rapid panning back and forth. Very nice!
Computer Requirements for Viewing HD Video
A typical computer these days has little trouble dealing with still images, but high-definition video can be another matter. Depending on the file format involved, it can take a pretty beefy computer to handle HD-resolution video playback without stuttering or dropping frames. The H.264/MPEG-4 AVC image compression used by the Nikon D7000 is one of the more compute-intensive formats, and its 1,920 x 1,080 (1080p) resolution means there's a lot of data in each frame to deal with at full resolution. The net result is that you'll want a relatively recent and powerful computer to play full-res high-def video files from the D7000 on your computer. At lower resolutions, the requirements will be more modest. You can, of course, view your movies on a TV -- either via the composite A/V Output, or on an HDTV via the Type-C Mini HDMI output.


No comments:
Post a Comment