Monday, May 28, 2018

Tips for Doing Natural Light Headshots and Portraits

A Post By: jackie Lamas
You may think that headshots are just like portraits or perhaps think that they are only best photographed in a studio space. Thankfully, natural light headshots can help you to achieve the perfect look and portraits for your clients.
Both indoors and outdoors, natural light will give you a more organic and authentic feel to your client’s headshots. Making the photos more personable and versatile when it comes to using them on social media, resumes, or the like.
Natural light headshots - portrait of a man in cactus setting
Using natural light allows you to create headshots with a more authentic feel.

Advantages of Natural Light Headshots

While studio headshots are the more traditional route for this style of photography, natural light will offer more options as far as backgrounds and lighting than you could ever imagine.
Photographing in natural light gives you more mobility to go from indoor to outdoor without fussing with setting up or tearing down a whole set.
Natural light headshots - two photos of a lady indoors and outdoors
Natural light gives you the opportunity to photograph your client both indoors and at outdoor locations.
You also have the opportunity to photograph your client more organically and more authentically than a traditional headshot in a studio light setup. These types of headshots are growing in popularity since they can be versatile for social media and online profiles.
For example, a wedding decorator actually decorating an event can be a great optional headshot since this way her clients can see her working the event, in addition to the waist cropped headshot.
Natural light headhshots
Photographing your client in natural light helps to create more authentic and real shots that can be used for different purposes.
Natural light also helps you choose backgrounds that perhaps you don’t have available or can’t afford in a studio setup. Brick, repetitive lines like stairs, textured concrete, etc., will give your client more options when choosing her headshots.

Photographing Indoor Natural Light Headshots

Your client may ask you to photograph them in the very place where they work, which will most likely be inside. If this is the case, ask them if you can photograph during midday. This ensures that you will get the best possible light entering their office or building.
Natural light headshots - two portraits of ladies
Using elements already found inside near large windows can offer subtle backgrounds without distracting from your client.
When you are photographing headshots it’s very important to keep your background in mind. Look for evenly dispersed, soft light and a neutral background. Headshots are meant to put the focal point of the photo on the person’s face. Neutral backgrounds help to isolate your client and keep the focus on them. This is one advantage of photographing inside.
Ideal backgrounds where natural light is abundant can include office building lobbies, large windowed offices with lounge seating, plain neutral colored walls, rooms with an interesting pendant or incandescent lighting.
Natural light headshots
Using natural light and combining it with the ambient light in the building can give the portrait a more interesting look.

Photographing Outdoor Headshots

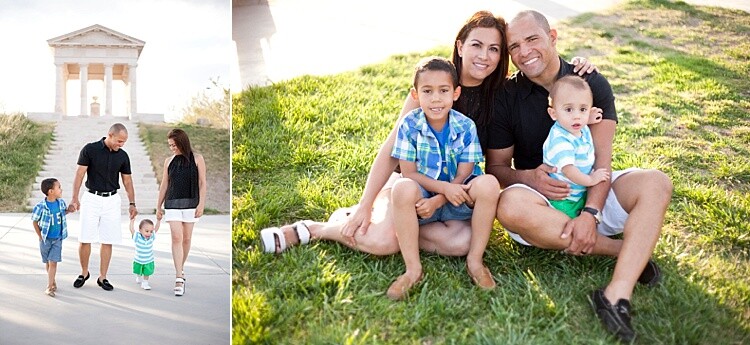
If your client has asked you to photograph them at their workplace, don’t feel pressured to only photograph them indoors. Most often office buildings will have beautifully manicured gardens, atriums, or lawns where you can photograph your client’s headshots.

Choose the background wisely

Try to steer away from too busy a background, though, as this can cause the background to compete with your client. Photographing your client in the shade is most likely to give you the best results as you don’t want to have blotchy lighting on your client’s face or body.
Natural light headshots
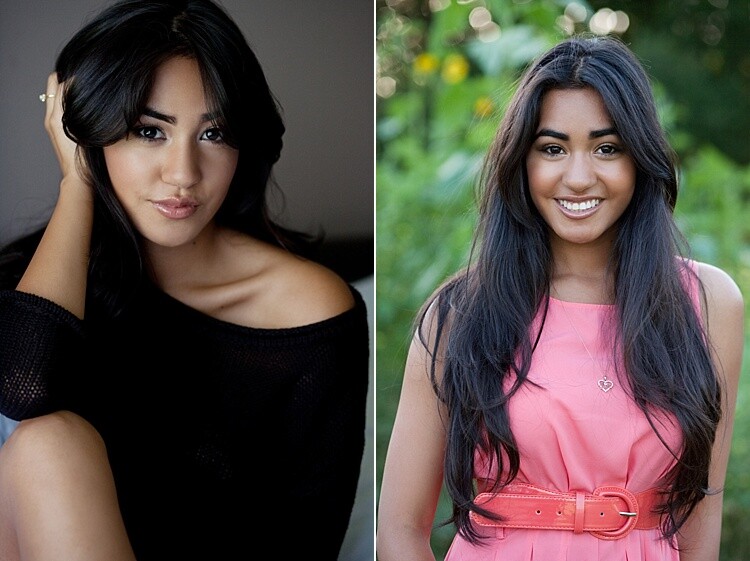
Use neutral backgrounds for your client’s headshots in natural light.
Shooting on location can also offer you other options such as textured walls, patterned walls like a brick wall, solid concrete walls, and staircases. All of which creates a neutral background where you will have an overflow of natural light.   
Natural light headshots
Using different types of backgrounds can give your client options.
One of the best backgrounds that you can use is the pavement. Placing your client on a ladder, crate, or having them crouch down will help you get the right angle so that the pavement becomes an even colored background.
If you do use the pavement, place your client close to the edge where the sunlight and shade meet, this will create a natural reflector and bounce light back onto your subject.
Natural light headshots
Using both solid pavement and a manicured garden can offer your client variety.

Add variety

Another advantage to photographing on location is that you can add variety to the session without being limited. Photograph your client with a textured background and then try a solid background.
Even though placing your client in the shade is ideal, you can also use the sunlight as a hair light or to light parts of the background to create more depth in the image.
Natural light headshots
Depending on where you place your client, you can choose how you want to light the headshot. More light or with more drama.
Depending on what your client intends to use the headshots for, you may even try facing your client towards the setting sun.
Natural light headshots
Facing this model towards the sun gives his headshot a different look.
One more advantage of on-location headshots is the option of bringing props for your client’s headshot. For example, if they are a photographer, they can bring cameras. Or if they are a travel writer, they can bring suitcases. Or a fashion blogger with accessories.
All of these, with the various backgrounds work well to create the perfect headshot for your client.
Natural light headshots
Natural light headshots can give you the option of using props to create a more stylized portrait.

In Conclusion

Natural light headshots
Using props can also enhance the effect of your client’s headshots and portraits.
Given that you are using natural light as your main source for your client’s headshots and portraits means that you will be able to offer more variety to your client. This is a great advantage because it can give your client the chance to use the photographs for different purposes.
Furthermore, your client will have more natural and authentic headshots versus more traditional studio headshot, which is becoming more and more popular as well

Friday, May 18, 2018

How to Find and Use Natural Reflectors for Portraits

A Post By: jackie Lamas
Natural light is one of the simplest ways to create beautifully lit portraits, without having too much equipment or worrying about setting up extra gear. However, it limits beautiful light to certain hours of the day and for you to work in the shade. This is where finding and using natural reflectors comes into play.
With natural light reflectors, you can photograph at any time of the day without having to carry any extra gear. It’s really easy to find and use to help give your portraits that extra boost of light.
Natural light reflector for portraits
Here we can see that the natural reflector is the path at the park.

What is a natural reflector?

A natural reflector is using already built-in or found materials to bounce light back onto your subject. This rids you of having to carry more equipment on location. 
It also helps immensely when you are photographing your subject during not so great hours of the day, like say, noon. When the light is harsh, it makes for great big natural reflectors to bounce that light back onto your subject.
Natural reflector for portraits
In this portrait, the subject is in direct sunlight at midday and the pavement helped to bounce light back onto her face.
Natural reflectors can come in many different forms, the most useful are big light-colored walls, the pavement, buildings with silver or light colored walls, white/silver cars in parking lots, mirrors, windows, even your white t-shirt. 
They are all found naturally occurring on location and all of them bounce light back onto your subject.
Natural light reflectors for portraits
This family is being lit by the sidewalk as a natural reflector, bouncing light back onto their faces.
The bigger your reflector, the more dispersed and diffused (soft) the light will be. Keep this in mind when photographing big groups or families, as you want the light to be evenly spread over all of your subjects’ faces.

How to use a natural light reflector

Natural reflectors are used a lot like real man-made or handheld reflectors. Position your subject in front of the natural reflector, for example, a large white wall. 
How to Find and Use Natural Light Reflectors for Portraits
The sidewalk directly in front of this couple is naturally reflecting light back onto their faces. The natural light reflector is large and therefore disperses light evenly on both of them.
Parking garages make for great portrait locations, especially for headshots. Make sure to position your subject behind the edge of where the sun is hitting the pavement and the shadowed area. This will keep the lighting on your subject even while maintaining an even background as well.
Using buildings is also a great way to reflect light on to your subject and compete with the sun, offering a different style of portraits. As light is reflected off a big silver wall, the light reflected creates more drama. Adding to the overall effect of your photographs!
How to Find and Use Natural Light Reflectors for Portraits
The silver paneling on the building serves as a natural reflector competing with the sun in the background.
If you are out in a field or more of an open space, you can still find natural reflectors. Fields reflect a beautiful golden hue as does the sand on the beach when the sun is brightest.
Natural reflectors can also add a little more drama to your photos if you use them strategically. Placing your subject away from the light can create interesting shadows. Same with reflectors below your subject. Experiment to see which types of natural reflectors work best for you.
How to Find and Use Natural Light Reflectors for Portraits
Here the light reflected creates a little bit of drama in the portraits of this young man.

Best time for natural light reflectors

The best time to use natural reflectors is anytime the sun is shining bright! 
On cloudy days you may get some bright light, but when the sun is out, that is the best time for maximum reflection. It’s a good rule of thumb to go to the portrait location before your session and observe when is the best time and which natural reflectors will be useful.
How to Find and Use Natural Light Reflectors for Portraits - maternity portraits in natural light
Use natural light reflectors in both brightly lit backgrounds or in shaded areas.
To get the most out of a natural reflector, it’s best to photograph your subject between 11 am and 2 pm so that the sun hits these natural reflectors evenly and you can move your subject around to get the best background, angle, and of course, lighting.
How to Find and Use Natural Light Reflectors for Portraits
Fields are great for naturally reflecting onto your subject’s face during a session.
If you are photographing in a cityscape or urban area with a lot of buildings, the best time is a couple of hours before sunset. The sun will reflect against the windows of buildings and offer the best strength. 
Don’t stop photographing though. You’ll want to catch the sunset reflecting in the windows as well after the sun goes down a little.
beach family portrait - How to Find and Use Natural Light Reflectors for Portraits
Using the sand as a natural light reflector is a perfect way to evenly light your subjects at the beach.
Another example of beach photos and using the sand as a natural reflector.

You can also become a natural reflector

Wearing white can bounce some much-needed light off you and back to your subject if you need a bit more light. A simple white t-shirt can do the trick and give you a little boost of light. It especially makes for great catchlights in your subject’s eyes.
How to Find and Use Natural Light Reflectors for Portraits
Using white can help reflect light. Take precaution when photographing in really bright sunlight as it can sometimes wash out details in the shirts. However, if you use a white shirt, it has the same effect of bouncing light.
White shirts can give your subject a soft dewy look. Just be mindful that you will have to be relatively close to your subject so that enough light can bounce back onto the subject’s face.

In conclusion

portrait of a girl - How to Find and Use Natural Light Reflectors for Portraits
When you’re photographing in natural light, these natural reflectors can help make for interesting, beautifully lit portraits of your subjects. The boost of light can get you out of shaded areas and allow you to shoot at all hours of the day without having to carry additional gear other than your camera. 
Have fun and experiment with different types of natural reflectors to add drama to your portraits.

Wednesday, May 16, 2018

The Highs and Lows of ISO and How to Use it to Your Best Advantage

A Post By: Kevin Landwer-Johan

Treating ISO as the foundation of the exposure triangle and only adjusting it when you really need to will help you produce more consistently creative photographs.
Asian woman taking a photo - all about ISO
ISO 100 (allowing a wide aperture setting).
ISO stands for International Standards Organization, which does not really help you understand what it is. But it does indicate the standard is international and it is constant across all brands and types of cameras.
The ISO is the measurement of how responsive your camera’s sensor is to light. The lower the numeric value, the less responsive, the higher the value, the more responsive.
Editor’s note: ISO is actually much more complicated than that but for purposes of this article, this is generally considered the easiest explanation of ISO to understand, especially for beginners. 
Close up of twp people holding DSLR cameras - ISO settings
ISO 400

Low ISO

Choosing a low ISO setting, say less than 400, is best when there’s a lot of light or when you have a tripod and the style of photograph you want to make allows you to use a long exposure. When the ISO setting is low, the sensor is less responsive to light, so, therefore, it requires more light to create a well-exposed photograph.
Using a low ISO setting will result in better technical quality photos generally. There will be little or no digital noise, the colors and contrast in your images will be better.
Woman standing in a fresh market holding vegetables - ISO 100
ISO 100 allowing for a slow shutter speed in bright light. My friend was standing very still and my camera was on a tripod.

High ISO

Choosing a higher ISO setting is best when the light is low or you are not able to make a long exposure. Higher ISO setting means your camera’s sensor is more responsive to light, so it needs less light to reach the sensor to create a well-exposed photograph.
It also means the technical quality of your images may be affected by digital noise, colors may be less vibrant and overall image contrast is flatter. How much, depends on how high you have your ISO setting and your camera model.
Sensor technology is rapidly changing and, if you have a newer, higher-end model of camera you can more confidently choose to make photos at higher ISO settings than with older, lower-quality cameras.
Sky lanterns being released in Chiang Mai during Yee Ping festival - high ISO
ISO 6400. Allowing a fast enough shutter speed to avoid motion blur in the lantern in low lighting conditions.

When and Why to Adjust the ISO

Unlike shutter speed and aperture settings, the ISO setting has no direct creative impact on your photographs. If you think the inclusion of obvious digital noise in an image mimics a creative value similar to film grain I suggest you do some more serious study on the matter.
Adjusting the ISO can assist you to achieve the shutter speed and/or aperture settings you desire to create the style of photograph you have in mind.
Street scene at night in Thailand - ISO
ISO 100 allowing a very slow shutter speed (long exposure).

ISO and Aperture Creativity

If you are wanting to blur a background using a wide aperture setting when the light is bright, you will need to adjust your ISO to one of the lowest settings to accomplish this. If you were to use a high ISO setting you may not be able to obtain a good exposure with a wide enough aperture setting, so your background will not be as soft looking as you want it to be.
Asian woman portrait - ISO
ISO 160 allowing a wide aperture setting to achieve a blurred background.
Alternatively, if you want to create an image where everything in your composition is in sharp focus, it is best to choose a higher ISO, especially when the light is not so bright. By choosing a higher ISO you will be able to set your aperture to a higher f-stop number and achieve a greater depth of field than if your camera were set to a lower ISO value.

ISO and Shutter Speed Creativity

Choosing a low ISO can assist you in achieving a slow shutter speed when you want to create a photograph incorporating some motion blur. If you are photographing a moving subject, like a waterfall, and wish capture a lovely silky effect in the water, you will need to use a slow shutter speed.
This is easier to do when your ISO setting is low.
Mae Ya Waterfall - low ISO
ISO 50 on a bright day to set the shutter speed slow enough to capture motion blur in the water.
Freezing action by using a fast shutter speed will often require you to choose a higher ISO setting, especially if the light is not so bright. Being able to adjust your shutter speed so that is will render a fast moving subject as though it’s frozen in time will often mean balancing your exposure with a higher ISO.

Auto ISO

If you are comfortable with having your camera in control of your exposure, then Auto ISO is a good option to consider. If you set your ISO to Auto as you adjust your aperture and/or shutter speed settings, the ISO will modify itself to make an exposure the camera finds appropriate.
Night time photo of Chedi Luang Thailand - ISO 800
ISO 800
If you do choose to work with Auto ISO, I recommend you do some testing first to discover what maximum ISO setting you are comfortable with for your camera.
To do this, take a series of photos of the same subject in the same lighting conditions and double your ISO setting each time. Then compare all the photos (look at them close-up and full image) and find the ISO setting for the image you are comfortable with, the one just before you see too much digital noise.
Editor’s note: Try not to overly pixel-peep. By looking at your images at 100% on your computer screen you will not get a true feeling for the amount of noise which will be visible at a normal viewing distance. 
Many cameras have a means to set a maximum when using Auto ISO. So you can now set this to the number you determined with the test above.

Practical Conclusions

Three Asian woman review an image on a DSLR monitor - ISO
ISO 320
Adjusting your ISO setting is generally only necessary when you want to achieve a specific effect or when the light conditions change.
When we do our photography workshops we always make sure to choose some locations which are outdoors and some which are indoors. This gives us the opportunity to demonstrate when it’s good to make an adjustment to the ISO setting.
Thai Wood Carver - ISO
ISO 2000 allows for a shutter speed fast enough to freeze the action in this low light setting.
If you are photographing outdoors on a bright day, your ISO setting will most likely be between ISO 100 and ISO 400. If you go inside, especially to a dimly lit building with few windows, you may find yourself struggling to obtain a good exposure with a fast enough shutter speed if you are only adjusting your aperture and shutter speed settings.
By adjusting your ISO so your camera’s sensor becomes more responsive in the low light you will be more flexible and capable of being more creative with your camera

Tuesday, May 8, 2018

Five Budget Portrait Photography Hacks to Save You Money

A Post By: Jackie Lamas
We all love some good photography hacks, and what better than some for portraits. Photography is such a great and fun artistic journey and there is always something new to try, or rather, buy. However, taking great portraits can be done with these five hacks that won’t break the bank. Most of these hacks can be made using household items or you can find them at your local craft stores for a quarter of the price.
Background Portrait Photography Hack - Five Budget Portrait Photography Hacks to Save You Money
Use a plain, solid painted wall on location as a background for your portraits to add a different look.

#1 – Reflectors

Reflectors are a great tool, especially for both studio and on-location setups. They help fill in the shadows with light, bounce light back onto your subject, and can create cool effects. They can even help block out the sun or light falling on either on you or your subject. A reflector is great all around tool.
There are many great reflectors available, like the very popular 5-in-1. But you can definitely make one yourself that will give you the same results and enhance your portrait photography. The great thing here is that your handmade reflectors can be large or small depending on your portrait needs. Small, perhaps for the studio, and large for outdoors or on location portraits. Or make one of each, as it really is so simple to do!
Reflector portrait photography hack - Five Budget Portrait Photography Hacks to Save You Money
Use your handmade reflector to bounce light back onto your subject’s face.

Making your reflector

Grab a piece of cardboard and some aluminum foil (crinkle it up a bit first). Next, glue down the aluminum foil with the shiny side up with spray glue or double-sided tape. Make sure to smooth it out as best you can and cover one side of your board. Finally, paint the other side white. If you choose to go with white foam board, then you can skip the last step.
What you will have is a very durable and effective two-in-one reflector! Use the silver side for maximum fill and use the white side for a softer look. This reflector can be used for both indoor and outdoor portraits. Make a few in different sizes to fit your needs.
Aluminum foil glued to recycled box cut to lay flat.
DIY reflector in use.
Reflector bounce portrait photography hack - Five Budget Portrait Photography Hacks to Save You Money
Use the white side of your DIY reflector to softly fill in light while photographing portraits on location.
Don’t want to DIY it? You can head over to your nearest store and pick up a reflective car shield, the ones that help block the sun from heating up the inside of your car. Those also work great as reflectors and the best part is that you can simply fold it up when you’re finished using it.

#2 – Diffusers

Diffusers, like reflectors, are incredible tools especially for outdoor portraits and for newborn photography. They are simply a translucent material that you can use to soften hard lighting or to create soft light on your subject.
I say newborn portraits because even window light can be hard for these little ones and a diffuser helps to soften it. You can also place the diffuser in front of off-camera speedlights to disperse the light over a larger area, effectively softening it.
Newborn portrait photography hack - Five Budget Portrait Photography Hacks to Save You Money
Use a diffuser to create soft light for your subject, especially great for newborns.
You have the ability to create a diffuser just the right size for your portraits. Grab an embroidery ring and some translucent fabric at your local fabric or craft store. Place the fabric inside the embroidery ring, cut the remaining fabric so that you don’t have too much hanging out. You could hem the edges but the embroidery ring really does hold it pretty tightly.
Once you cut the edges, you have a portable and easy to hold/mount diffuser. It’s lightweight and easy to carry. Use this indoors to soften window light or even a speedlight. Or use it on location to soften harsh sunlight and simply to shade your subject during the session.
This scrim was made with a thiPVCvc pipe about 6 feet long to create a diameter of about 3 feet. I duct taped the ends together and hot glued the translucent fabric to the ring. A hula hoop would be perfect to use for this as well. I couldn’t find one big enough to use for this so I used PVC, both are inexpensive and quick to make.
DIY lighting diffuser in action.
You can also make a DIY large lighting panel – get instructions here.
Editor’s Note: Make note that a ring, 12″ or so is still a relatively small light source and as such will produce fairly hard light. You need a large diffuser (larger than the subject’s face) to really soften the light.

#3  Portrait stools

There are many tools that are made specifically for portrait photography like the portrait stool. It’s basically a fancy hydraulic stool to sit your subject on while you make their portrait. There are also some made especially for children. You don’t have to invest in one of those, however, you simply have to go to your local hardware store and pick up a small two-step ladder, or if you photograph children, a two-step stool. Both of these options offer you the same functionality as a portrait stool.
Use them during your session to pose your subject indoors or on location. Another advantage to using a ladder as a posing stool is that it gives you the option to use it yourself to get a higher camera angle. There are really no limits to the usefulness of the ladder, or small step stool, and it is easy to transport. If you are a beach photographer, use it as a tabletop to hold your gear and keep it from touching the sand.
Portrait Photography Hack - Five Budget Portrait Photography Hacks to Save You Money
Use a portrait stool to seat your subject.

#4 – Phone Flashlight

Sometimes the best tools are right in your pocket. Your phone is used for so much of your daily life and it can also be a great tool for photography. The flashlight on your phone can serve as a steady fill light in case you don’t have an off-camera flash or need a little boost of light.
Turn your camera’s flashlight on and point it directly toward your subjects. You may need the help of a selfie-stick or a friend because although it’s powerful, you’ll still need to have the light pretty close to your subject. The mighty flash is perfect for portraits where you want to capture the light behind, but need a little fill on your subject. This is perfect for on-location photography, especially when the sun is setting behind your subject.
A phone flashlight was used to create interesting lighting in a dark area.
Use your handy smartphone’s flashlight to add drama to your portraits.
Create a little drama using your phone’s flashlight and use it to manipulate the available light around you. This is also very easily done for indoor portraits and it works great to fill your subjects when there is beautiful warm light behind, like in the photo above. Get creative with this portable light that you always have with you. It’s quick and there’s no fussing with adjustments.

#5 – Backgrounds

One of the best photography hacks that you’ll learn is how to turn plain walls into beautiful portrait backgrounds. When you’re looking to do some headshots or just photograph so that it looks as though you were in a studio, this is the hack you can use every time.
Choose a concrete wall that is plain. Pose your subject a good distance from the wall so that you can let the background blur a bit (use a wide aperture as well). Then, with your handmade reflector or phone flashlight, photograph your subject. What you will get is a beautiful seamless background just a tad out of focus to give it that studio look.
Portrait photography hacks - Five Budget Portrait Photography Hacks to Save You Money
Use your ladder and a plain wall to create studio-style portraits on location.
You can also choose a more patterned wall to give your background added texture. Look for walls that are painted in a solid color or have a repeating texture like the brick wall below. Another great photography hack is to shoot from above and let the concrete stairs or asphalt blur out so that it creates a nice background.
Portrait Photography background hack - Five Budget Portrait Photography Hacks to Save You Money
Choose plain or patterned walls to give your on-location portraits more of a studio look.

Conclusion

These five portrait photography hacks will save you both time and money all while enhancing the portrait experience for both you and your subject while photographing on-location. Use them for your next portrait session to get new and different results!

10 Tips for Breathtaking Cityscape Photography (+ Examples)

  10 Tips for Breathtaking Cityscape Photography (+ Examples) A Post By:  Richard Schne Capturing stunning cityscape photos might seem hard,...